Archive for the ‘Miniatures’ Category

h1

More Predastore Predators

January 18, 2015

My ever-expanding Predator review keeps on going. Three more Predastore miniatures have now been added: Stalking-Hunter, Executioner-Hunter and Mermaid-Predette. Go check out the full review here.

Click for a larger version

Click for a larger version

Executioner-Hunter. Click for a larger version

Executioner-Hunter. Click for a larger version

Mermaid-Predette. Click for a larger version

Mermaid-Predette. Click for a larger version

h1

From the painting desk #28 – The Witcher

January 9, 2015

In my previous post I showed off my Witcher conversion, and a mere four days later he is fully painted! Much like the conversion, this was a fairly quick and rough job, mainly to ease me back into painting and to produce a painted miniature in a decent amount of time.

Click for a larger version

Click for a larger version

I kept the palette quite muted, as Geralt (as the witcher character is called) is depicted as a sombre, battle-worn character. For the same reason I drybrushed the clothing fairly roughly to make them appear a bit more worn and dusty.

The eyes were a special case. The fiction reports that witchers – the mutants that they are – have reptilian eyes. Surprisingly I got the eyes painted on the first try, so better knock on wood! Naturally I don’t have the camera to show it off, so you’ll just have to trust me. I added some stubble and scars as per most descriptions of the character.

All in all, it’s not the prettiest of paintjobs, but still very serviceable. Seeing as he’s the first mini I’ve painted in some eight months, I’m happy enough with the plastic White Wolf of Rivia.

h1

Off the back burner

January 4, 2015

New year, newfound enthusiasm! I can already feel myself getting interested in miniatures again – spending several hours today working on them is a sure enough sign. I figured I’d write a few words on the subject of getting back in the saddle after a half year long break, based on what I’ve been doing today.

For me the important thing is to get going, to actually do something. I need to put water in that dried-out pot and give my paints a good shake if I ever actually want to paint something after a break. It doesn’t matter what I paint or whether I have a huge project planned, the crucial bit is getting things done.

I noticed today that budding inspiration needs to be carefully nurtured. I started thinking about my projects: which one should I work on? It started to feel overwhelming, so I changed my approach. Instead of focusing on results and progress, I decided to do something fun and inspiring and to not be too self-critical. I actually ended up with two things:

The first one is a piece from Leading Edge’s old Colonists’ Last Stand set. It’s a great mini, showing the fateful moment a facehugger latches on to an unsuspecting victim. As you can see from the photo, this one was in a half finished state. To make it fit in with the rest of my minis, I had glued it onto a circular base and added some xenomorph-y tendrils with greenstuff. I’d even undercoated it and given the victim’s coveralls their first layer of paint. The mini had then sat on my desk collecting dust before getting returned to the cupboard housing my un- and semi-painted miniatures.

Why did I pick this one to finish? I’m on a bit of an Alien franchise kick again, after watching blu-ray versions of the first three films and reading two books: Alien – the Archive and The Art of Alien: Isolation. On top of this, the miniature was well on its way to being finished and I’ve always loved it. Not to mention that it doesn’t have a lot of fiddly detail, making it a pleasure to paint. It doesn’t have any real use as a gaming piece other than as an objective marker or something, but that’s okay. Actually, it just might be what makes it appealing right now.

hugtime

Click for a larger version

I took some ProCreate putty and added some more tendrils to cover the base up a bit more. I wasn’t too careful, as the base will get a hefty dose of glue and gloss varnish to make it look nasty and wet. I’m pretty happy with it at the moment!

Another thing that I’ve recently been interested in is the Witcher franchise. If you’re not familiar with it, it’s a grim and gritty fantasy world created by Polish writer Andrzej Sapkowski, focusing on a witcher – a monster hunter – named Geralt of Rivia. There are books, games, comics and even a cheapish tv series (which has also been cut into a poor movie) available. I bought the PC games years ago in a Steam sale, and they’ve been sitting unplayed ever since. I finally decided to tackle them, and it was a great call. Altogether I spent some 60+ hours on The Witcher and The Witcher 2 and read three of the four published books.

Click for a larger version

Click for a larger version

While the idea of a small project based on the franchise isn’t a far-fetched idea, I decided to start small – with a single miniature. Naturally it was Geralt himself, the White Wolf of Rivia. I went for a quick plastic and putty type of thing, and knocked him together from a bunch of old WHFB Empire plastic pieces. I roughly shaved a bearded plastic head, resculpted the mouth area and turned his fancy leggings into boots. All in all, it’s rough with mould lines, uneven putty and the like, but hey, it should look decent once painted. Again I went in more with inspiration than self-criticism, which seems to be a good choice! I haven’t done fantasy miniatures in ages, so this was a fun diversion. Who knows!

I’ll leave you with the intro cinematic to Witcher 2. If this doesn’t get you excited, I don’t know what does…

h1

It’s ruined!

July 21, 2014

I’m getting back to painting after one of my hobby-uninspired periods (see this blog post from four years ago). Sort of like exercise, you have to ease yourself into it after a break, so I figured I’d start easy and built a few ruins for my Pacific Rim project. After all, those cities are going to be hit and wrecked, so I’ll need plenty of replacement pieces for destroyed buildings.

After buying a bunch of Monsterpocalypse buildings and popping them off their bases, I was left with plenty of empty plastic bases which I didn’t feel like throwing away. These provided a great base for ruins. I then simply slapped on rubbish – mainly plasticard cut-offs, sprue pieces, sand and small rocks, undercoated with black and gave the whole thing a quick drybrush treatment. They turned out quite nice, and I wasn’t going for beautiful diorama pieces anyway as they’re rather just glorified tokens.

Click for a larger version

Click for a larger version

The pieces work nicely on the battlefield. Here’s a shot of the kaiju Knifehead with one of the ruins. I like the way the base fits in!

Click for a larger version

Click for a larger version

As and added bonus you can combine them and they work well with 28mm too, which is always a good thing:

Click for a larger version

Click for a larger version

Setting up the mini diorama above prompted me to throw together some ruins, Knifehead and some of my city terrain and smoke pieces to show you what it’s meant to look like eventually:

Click for a larger version

Click for a larger version

As always, all comments welcome!

h1

Morning glory

May 22, 2014

I happened to get up earlier than normal today (6:15 am in fact), and there was such a lovely light in my game room that I snapped a photo of the current state of my Pacific Rim setup. It’s actually an Instagram photo, so I slapped a retro filter on it, and I think it turned out nice. So, here’s a mood piece for you to hopefully enjoy!

“We’ll never forget May 22, when Knifehead hit us around sunrise.”

h1

From the painting desk #27 – Knifehead

May 3, 2014

After painting two jaegers, it was time to tackle a kaiju – they obviously need someone to fight. The first mini in my monster queue was Knifehead, a kaiju from the Pacific Rim movie.

Click for a larger version

Click for a larger version

The miniature for it is a Pacific Rim Heroclix one. I forgot to photograph it before painting, but here’s a catalog image:

knifehead

Painting Knifehead was very different from painting the jaegers. The machines are all straight lines, flat surfaces and clean, bright colours, whereas the kaiju has plenty of texture and organic shapes. This was sort of reflected in my painting of him, as I went for a more irregular layering (read: not as neat), did some drybrushing and used several washes. The end result is very different from the jaegers both stylistically and in feel, and I think it was a good call as it accentuates the whole organic vs. mechanical setup. It also had the benefit of being super fast – the whole mini probably took me a few hours from start to finish.

While I liked the colour scheme of Knifehead and the rest of the kaiju in Pacific Rim, I wasn’t too fond of all the bioluminescent markings, so I did away with them. Instead I went for a blue-green scheme, almost looking like verdigris. In fact, in it’s early stages the model looked a lot like a statue. Again, the tones are very different from the jaegers’. While obviously straying far and white from the canon (schmanon), the end result was worth in my opinion.

As you may know, I like my bases very simple. This time, however, I added a little extra touch in the form of a tiny tank. Instead of completely flipping it over, I just positioned it at an angle that suggests its toylike insignificance compared to the kaiju.

You might have noticed that I seem pretty happy with Knifehead. I am! I was very sceptical of it at first, it being a clix repaint, but I was happily surprised with the end result. There are some awful, awful mould lines there, which I didn’t clean (“Come on, it’s a vinyl clix mini, not worth the hassle, let’s just get it on the table”) but even those don’t show up too badly.


h1

From the painting desk #26 – Seeing red

April 30, 2014

Another miniature done! Not completely happy with my previous jaeger, I decided to pick a colour I was much more comfortable with – red. I went to work on another Reaper CAV miniature, Hawk. I wasn’t originally too impressed with the mini. I thought it was boring and looked like a generic Transformer. Nevertheless, I started painting it and slowly it grew on me. Now that it’s finished, I’m really happy with it. I spent more time than usual on layering and washes, and I hope it shows!

Click for a larger version

Click for a larger version

Inspiration for the colour scheme was another jaeger from Pacific Rim, Crimson Typhoon:

crimsontyphoon

While I would’ve loved to add some fancy freehand detailing, I’m simply rubbish at it. I settled for a few yellow transfers that I painted over a little and added a few dots to make it more interesting, and I think it doesn’t look bad at all. This also stylistically ties it together with the first jaeger I painted. I would’ve loved to paint on some weathering, but in my game setting the kaiju action is only just beginning, and the jaegers have yet to face any – hence no battle damage.

With the first two jaegers painted, it’s time to tackle the first kaiju. Comments and constructive criticism always welcome!

h1

From the painting desk #25 – Kaiju hunting

April 24, 2014

The first mini I’ve finished in a long, long time is a CAV mech, Spitfire, from Reaper Miniatures. My painting skills and patience had rusted a bit, but the end result is still reasonable. White is a pain to paint, and I could have done a better job here, but eventually I decided to just be (somewhat) happy with it and move on to another miniature. And hey, I now have the first painted mini for my Pacific Rim project.

Click for a larger version

Click for a larger version

I drew inspiration for the colour scheme from Tacit Ronin, a Mk. I jaeger in Pacific Rim, which can be glimpsed in the film’s introduction sequence:

tacitronin2

with the colour scheme nicely shown in this piece of concept art:

tacitronin

While painting the model wasn’t as fun as it could’ve been, finishing it sure was! The next one is already on my table and well on its way. This time I’m painting my favourite colour, red. I guess painting with your favourite colour is the miniature painter’s comforting chicken soup.

h1

Seaside fun

April 20, 2014

Every single miniatures project I’ve ever worked on has suffered its share of setbacks. Often these are a result of rash actions instead of careful planning. With my Pacific Rim game board, it just so happened that I decided that the table would look nicer drybrushed. The smart guy that I am, I tried a sample piece first, then a small corner of the table – both yielded nice results. I then meticulously started drybrushing a large board with a small drybrush, got bored, took a bigger brush to it, didn’t bother to wipe the paint off well enough and ended up with one end of the game board looking like someone did some very poor drybrushing on it.

Next came the question of what to do. As the table wasn’t painted to begin with, I figured that to try and paint the area wouldn’t work – I would have to paint the rest of the table to match. For a brief moment I thought that I might simply cut of the messy end, after all foam cuts easily. This however felt a bit too much. Suddenly, a wild idea appeared!

I’d been thinking hard about how to build a seaside on the table. After all, Pacific Rim was all about giant monsters wading out of the sea and into harbours to cause havoc. I had in fact already built a a mock-up of a corner harbour piece out of plasticard and a 1/700 harbour set by Tamiya:

Click for a larger version

Click for a larger version

I wasn’t completely happy with it though. A lot of plasticard was wasted in the design, and the corner design was quite limiting. This got me thinking…

Why not just paint the whole end of the table as seaside? The sea would probably be present in all games anyway, and if I didn’t want it for some reason, I could always cover it up. After a quick round of “is this another stupid, rash idea?”-thinking, I went to work, and in a short time I’d painted the end of the table a lovely sea blue, completely covering up my amateurish drybrushing mess.

coastline

Click for a larger version

What about the harbour then? With the sea fixed on the table, I figured the harbour just needed to be something to show where the sea ended and to make the razor sharp coastline a bit more interesting. I kept the main idea of my original harbour design, and simply cut out the strips I needed to make the pier. Wanting something more interesting, I went crazy and cut half of the pier in an angle. I was soooo pleased with myself, until I placed it on the waterline and had a wonderful facepalm moment.

Click for a larger version

Click for a larger version

As you may have figured out, I’m not really an engineer. I am however a teacher, and fairly used to improvising fixes for my mistakes. I’ve lately been working with thin mousepads as scenery building material (might do a blog on it), so I just cut out a suitable shape, sprayed it black and voila!

Click for a larger version

Click for a larger version

After I paint it to match the pier, it won’t look out of place at all.

Finally, here’s a shot of the harbour with accessories. I think once it’s painted, it will look mighty lovely. The waterline design also means, that if I want to make a sandy beach for example, I can simply cut up mousepads, paint/flock them and lay them over the waterline. Great success!

Click for a larger version

Click for a larger version

h1

Genbu by Zenit Miniatures – a review

April 18, 2014

I usually spend money on miniatures somewhat sparingly. Or rather, I do consider price quite a lot when making my purchases, although I end up spending lots of money nevertheless. Usually this means I steer away from keywords such as “limited edition” or “boutique” or “for collectors” when it comes to miniatures. Despite this, every now and then I run into something exceptionally interesting that makes me break this rule, and I end up doing a review like the one that follows after this unnecessarily long intro.

As regular readers know, I’m working on a project inspired by the movie Pacific Rim, and thus I’m on the lookout for interesting monsters and giant robots. I visited Salute 2014 a week ago, and I ran into a miniature I’d seen on a news site before and noticed, but which had slipped my mind – Genbu by Zenit Miniatures.

Click for a larger version

Click for a larger version

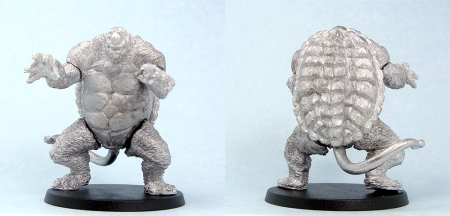
Genbu is a giant, bipedal turtle monster with a snake for a tail, and a part of Zenit Miniatures’ Kensei line. If the concept sounds strange, it has its roots in Chinese (and later Japanese) mythology, and you can read more about it here. Genbu also links directly into the kaiju genre, as it’s undoubtedly the inspiration behind Gamera.

The model comes in seven parts: main torso, shell, tail and four limbs. Normally I would classify this as a nightmare, as I loathe putting metal miniatures together after too many cases of ill-fitting and poorly cast parts requiring literally hours of filing, sanding, cutting, pinning and filling to fit. Zenit Miniatures’ offering was a positive surprise in this respect: the parts fit together well right out of the box. There are joins that need filling, but the model doesn’t appear to require pinning – although you may want to do that with the tail due to the small surface for attaching it. The shell especially snaps into place in a very, very satisfying manner. The one glaring exception to this is the left leg, which I simply couldn’t get to fit well, and will require filling of the joint.

Both the torso and the inside of the shell are hollow, in a smart move to reduce the amount of metal needed. Genbu stands at 45-46mm from soles to top of head, so the model is impressively sized and will work as a giant monster in smaller scales or an ogre sized one in 28mm. There’s a separate square plastic base included, but I mounted mine on a standard 40mm round base.

Sculpting on Genbu is excellent. The sculptor has managed to make a wonderfully characterful giant turtle monster with a gnarled, well textured skin. My only complaint is that the model was originally supposed to be a giant Kappa (see here for original concept art, notice the distinct lack of tail) and as such the Genbu model still has a patch of hair-like texture on top of its head, which doesn’t quite fit in. Even though it can be painted to match the skin, the texture is obviously different. Casting quality is very good, with crisp detail and very little flash. There are some noticeable mould lines but they were quick and easy to clean.

Praise upon praise then, any downsides? Yes. There’s one obvious one that I mentioned right at the start. I bought Genbu at £18.60, and on the Zenit Miniatures site it retails at €19.95. Nice as the model is, that is a hefty price compared to many competitors on the market and will sadly put potential customers off buying it. The model comes with nice packaging – a padded cardboard box with a full colour sleeve around it. I can’t help seeing this as somewhat too much. I don’t know the actual packaging costs, but this grates on me a from an ecological viewpoint as well. I’ve added a photo below showing the actual space the model takes up vs. the size of the box. Then again, the lovely packaging did catch my eye, but it’s a very rare case that I actually by something from a brick and mortar store. If I was mail ordering Genbu, the shipping would add an extra €5 to the price, bringing it to €24.99 and probably keeping me from buying it. Then again, I know a lot of people are used to spending lots more on a single mini than I am, so your mileage may vary!

Click for a larger version

A smaller box maybe?

As usual, I added a size comparison picture. I also added a 28mm miniature, as Genbu is intended to be a large creature in that scale.

L to R: Pacific Rim Heroclix Knifehead, em4, Genbu, Reaper CAV Weasel

L to R: Pacific Rim Heroclix Knifehead, em4, Genbu, Reaper CAV Weasel

Overall verdict: Genbu is pricey, but you do get a very nice model for your money. Good, clean sculpting and very nice casting with (mostly) well fitting parts mean that you won’t pull your hair out putting the model together. If you’re on the lookout for a great giant turtle monster to spice up your games, whether they’re giant monster ones or something else, you could do far worse. Also, if you leave out the tail, this is the nicest Gamera in miniature form you’ll probably find.

You can get Genbu direct from Zenit Miniatures.