Posts Tagged ‘Pirate ship’

h1

Painting the ship

September 30, 2015

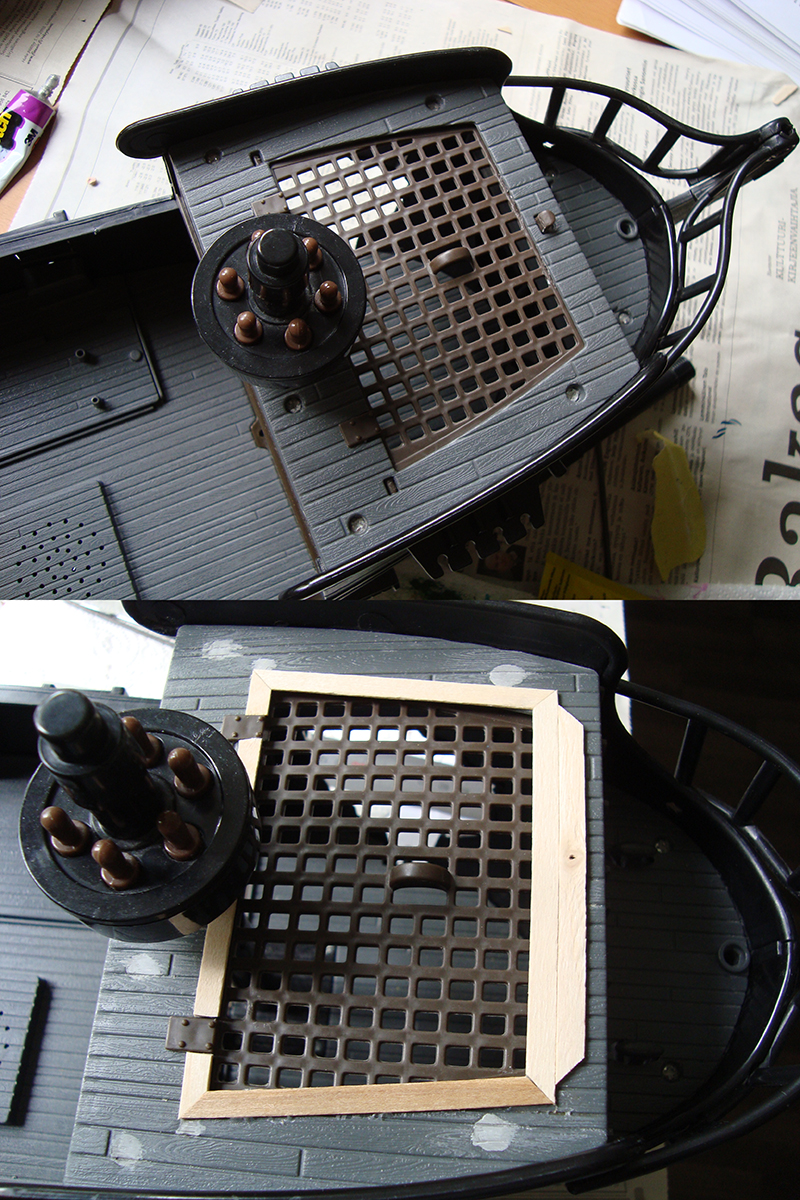
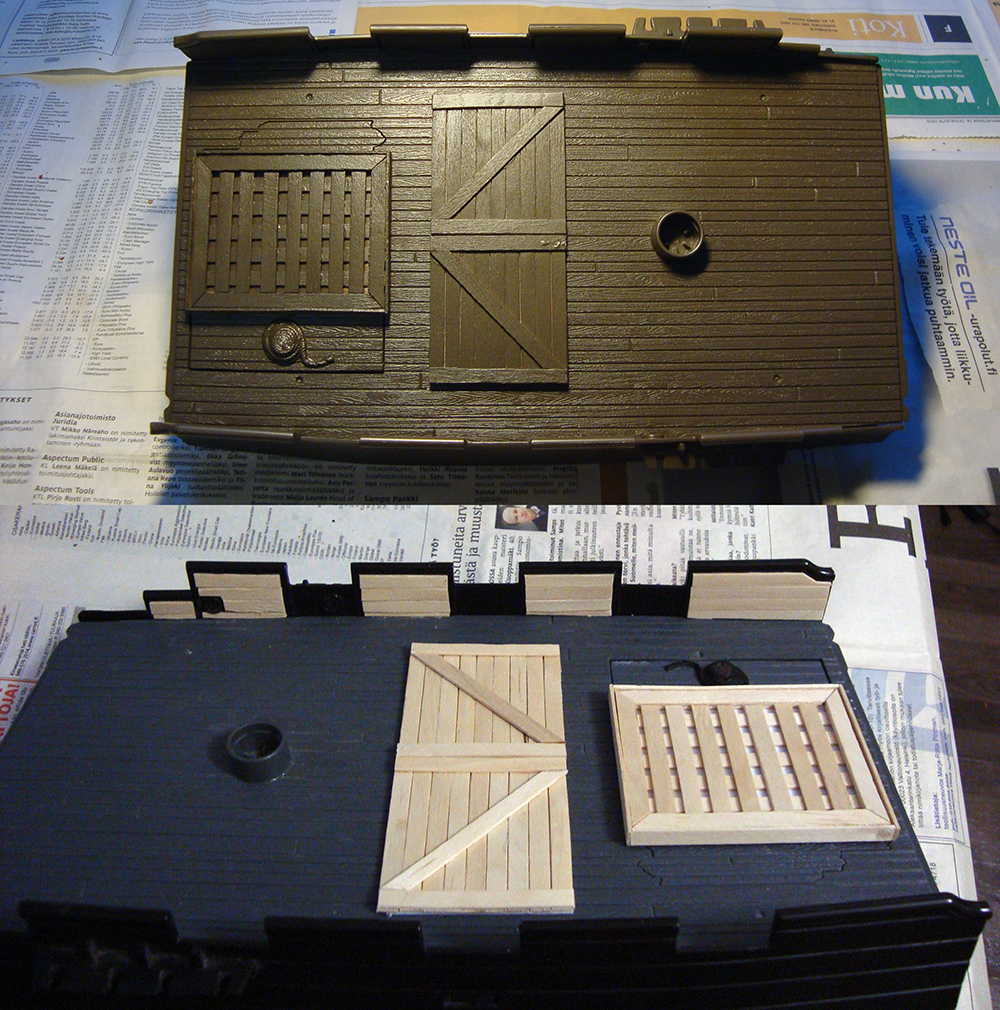
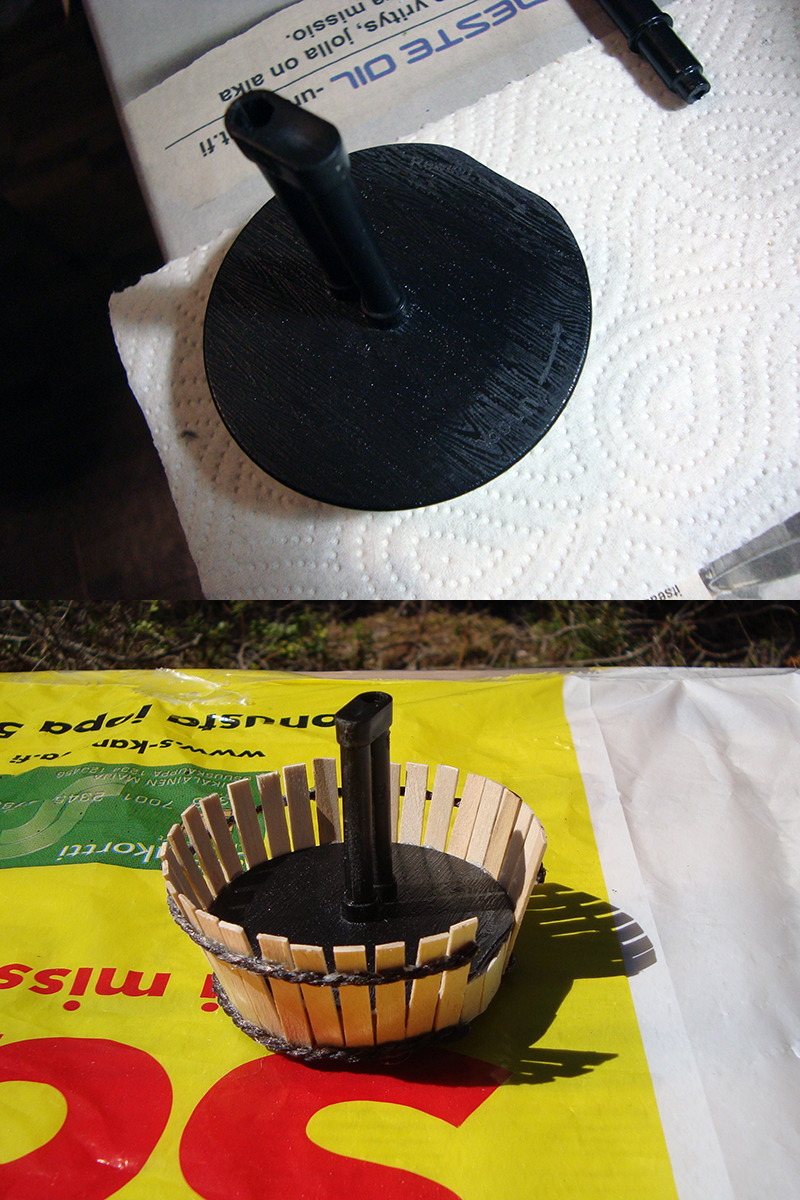
The ship is finally being painted! Or rather, I’ve been painting it on and off for months, but to be honest it’s boring as anything – much more dull than putting it together. Nevertheless, I’m grinding my way through it and figured you’d like to see some WIP shots as some of you have been following through the whole progress. Plenty of work is still needed, but I’ve noticed that making these posts tend to remind me that the thing is progressing and boost my motivation! I’m at the crucial stage where projects are either finished or left to gather dust momentum, and I’m definitely going with the former.

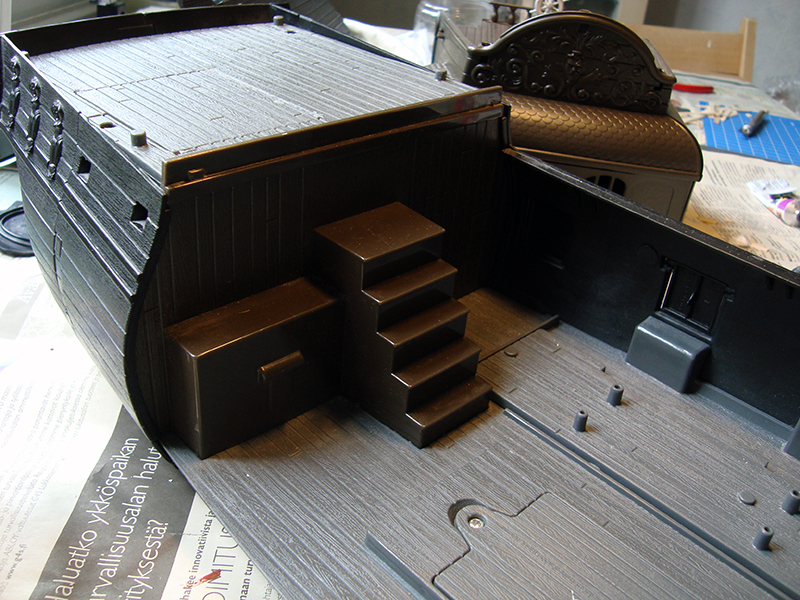
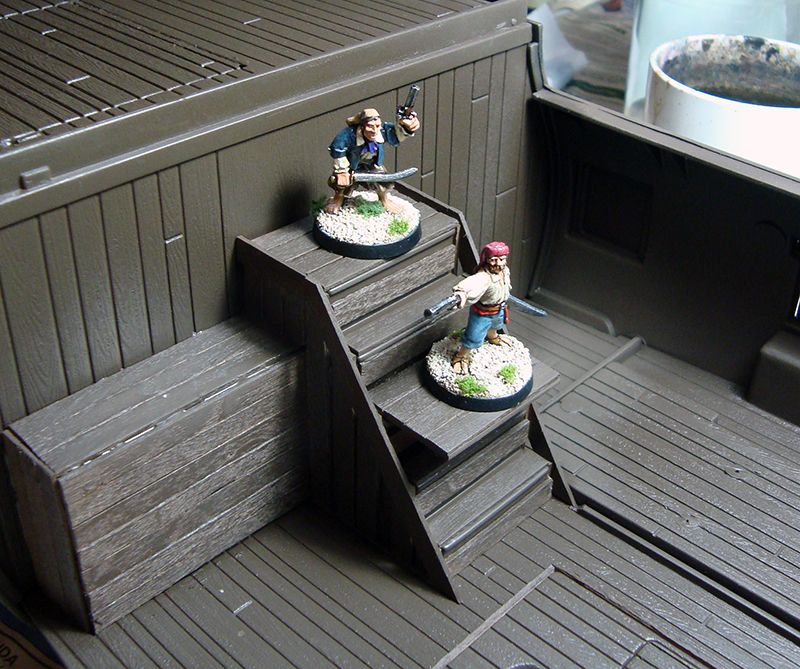
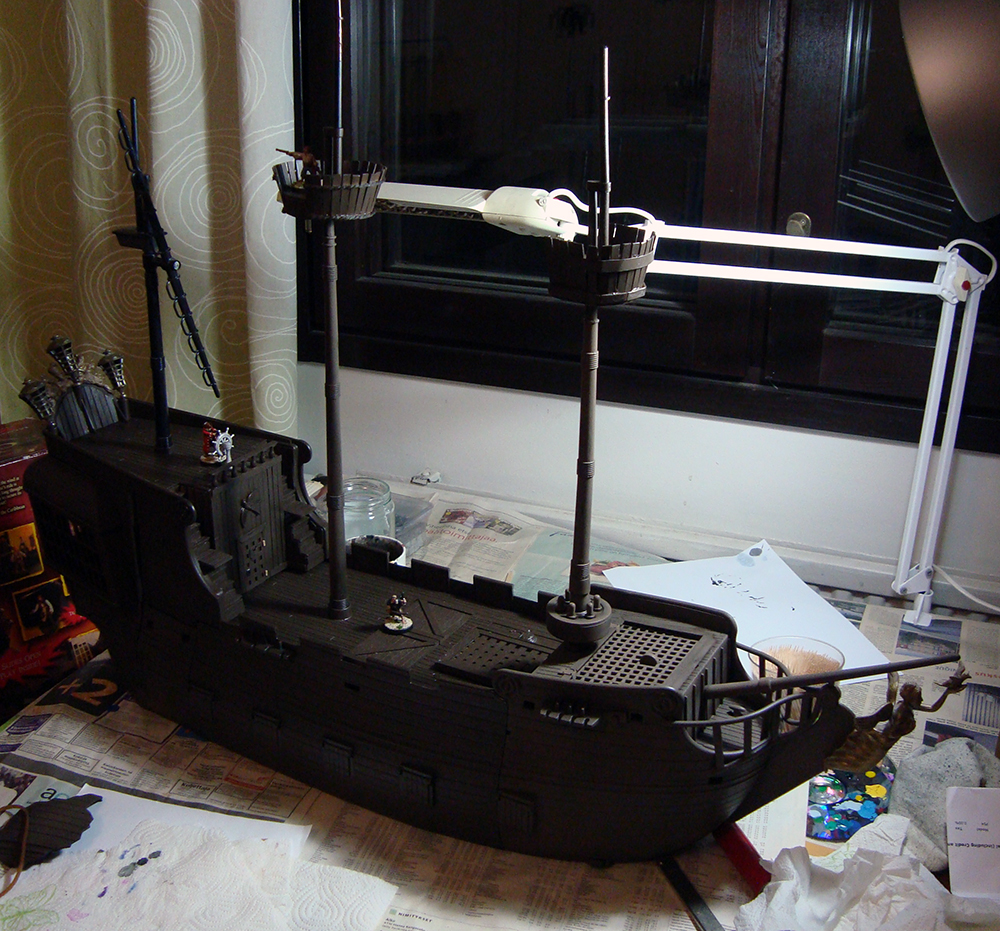
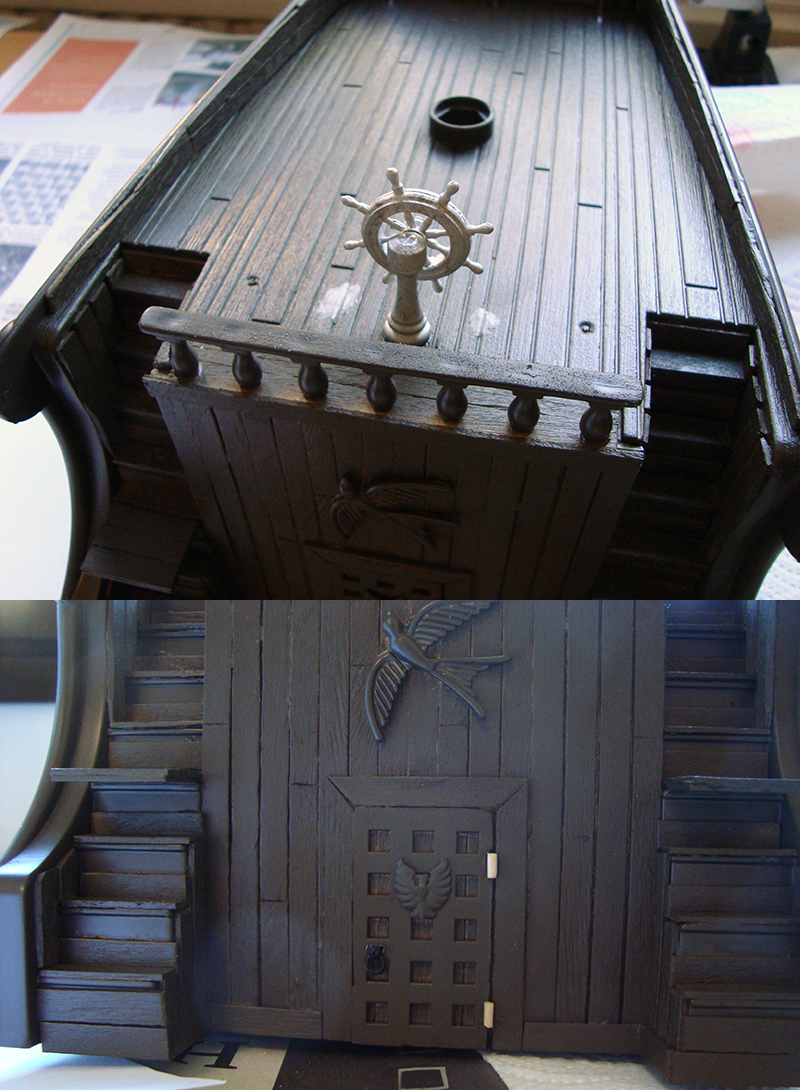
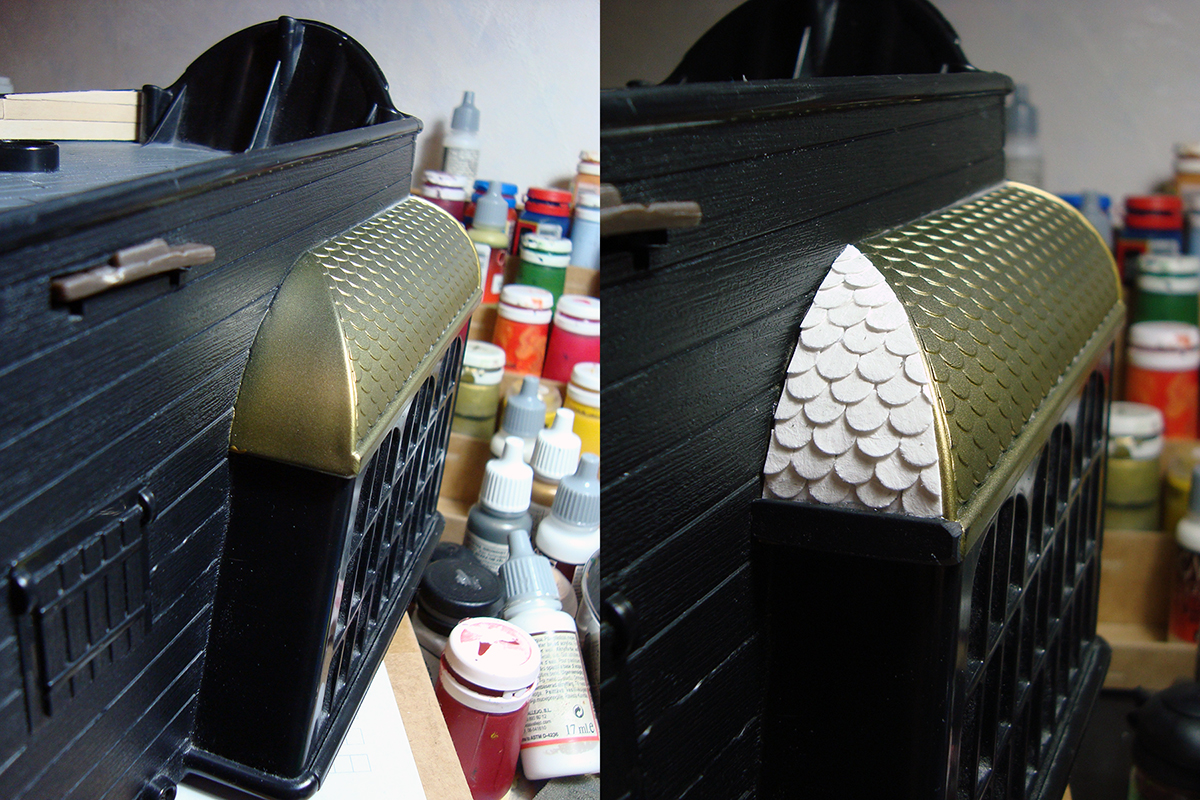
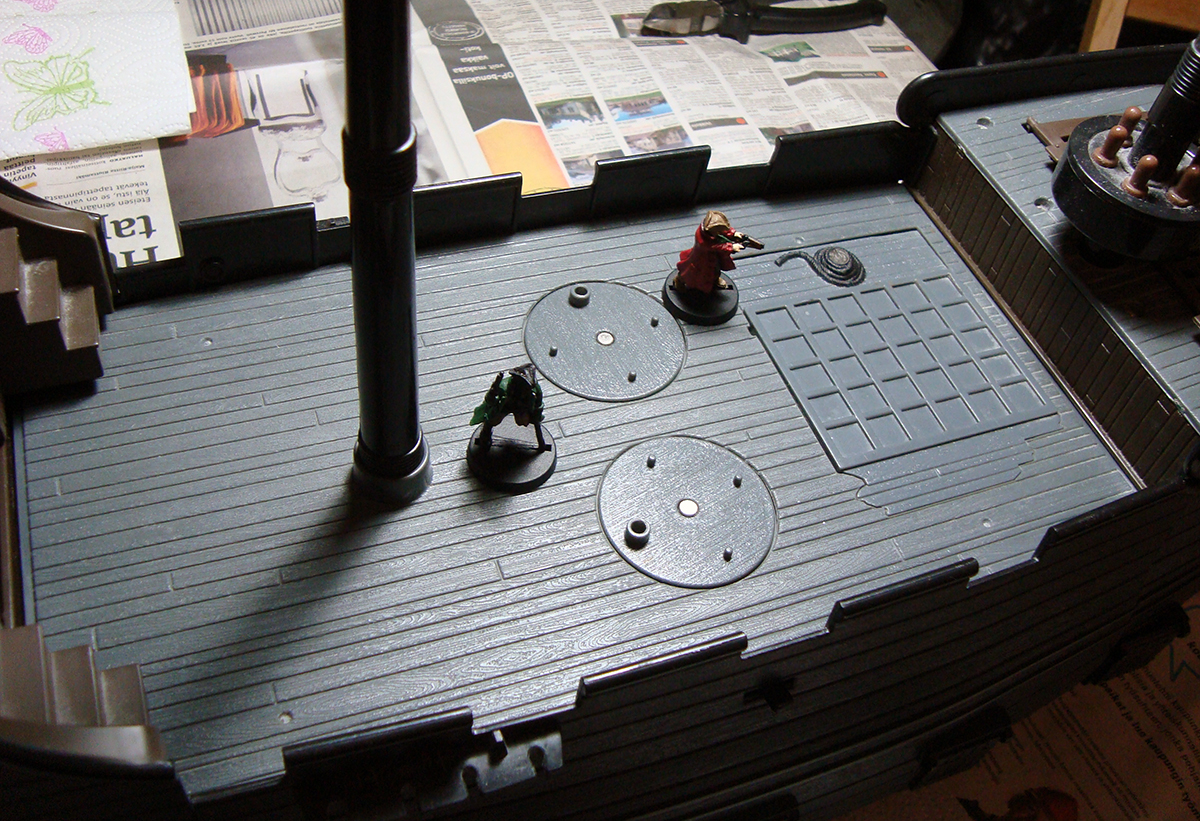
So, here’s the ship. As you can see, I went for a wood/black/red colour theme with some gold and brass detailing. Note that only the outside of the ship has been washed and drybrushed, the decking is still heavily WIP, missing all detail work, so it will look a whole lot better eventually. The ship is also still missing its figurehead as well as the stern lanterns, which I haven’t painted yet. There’s still loads to do, but it’s progressing.

Click for a larger version

Click for a larger version

Click for a larger version

Click for a larger version

Click for a larger version

Click for a larger version

Click for a larger version

Click for a larger version

I wanted a colour scheme that was menacing enough to be used as a pirate ship but also neat and clean enough for the ship to be used as a more reputable vessel if needed. The ship has a fair amount of decoration and detailing. I went with gold for these, as I love how they give the ship a bit of extra flamboyance. Most credit goes to my lovely girlfriend who painted the extra fiddly stuff by the aft windows.

I’m somewhat sorry for the poor quality photos, but hey, that’s WIP for you! C&C welcome as always.


h1

Holding it up

July 10, 2015

I’ve been working hard on the ship in the past few weeks, and it’s almost ready to paint. Here are the latest updates. I sadly forgot to take a lot of photos, but this should give you a fair idea.

I got to work on the ship’s hold. The key elements were stairs and something that I think was meant to represent a chest.

Click for a larger version

Click for a larger version

There was also a large, barred gate leading to another part of the hold. I decided to remove the door, leaving a very large doorway. The hole in the background is one of the ship’s toy functionalities, as there’s a matching piece that blows out when a button is pressed – a mechanism I left intact.

Click for a larger version

Click for a larger version

I went to work on the stairs and what I’ll now call the chest. I wanted the stairs to be usable in games, so I used plasticard and build a platform halfway down the stairs to allow me to place minis. The chest was given a very rough treatment, as my plans only involved covering it with planks.

Click for a larger version

Click for a larger version

Sadly, there are WIP pictures missing here, and I’ll just skip ahead to where the stairs and the chest are finished. You can see I also chopped down the pegs that were originally holding the ship’s toy cannon. As you can see I added some details to the stairs to make them look a bit nicer. I also added planking around the battery case for the same reason. As you can see, the whole thing has already been sprayed a glorious brown.

Click for a larger version

Click for a larger version

I gave the doorway a frame, but left it otherwise untouched. I figured the size makes it look like the ship is capable of taking in loads of cargo.

Click for a larger version

Click for a larger version

As you can see, the stairs can nicely accommodate a few pirates.

Click for a larger version

Click for a larger version

Apologies for the unusually poor quality of the photos, they’ve been hit with a fair amount of blur and excess lighting. The uneven, bleached look in some of the brown areas isn’t only due to lighting, however. I spray painted part of the ship during really humid weather, i.e. Finnish summer, so I got some of the lovely frosting that tends to happen. Luckily the brown paint it there primarily to serve as a basecoat, so no real harm done.

Here’s a final photo of the ship in its present state.

Click for a larger version

Click for a larger version

As crazy as it sounds, all I need to do is rough up the mizzenmast, add some planking to the forecastle and basecoat both, and I’m actually ready to start painting this thing. For the paint job I’m thinking of something similar to the one on this model of Bartholomew Roberts’ Royal Fortune, so burnt umber with a dash of red. Of course I want to throw in something a bit more extravagant, so you can be sure you’ll be seeing a lot of gilding as well. Getting there!

h1

Unleash the Cagafuego!

July 4, 2015

In my previous post I lamented too small cannon, so I wanted something bigger. Remembering I had just the thing in my bits box, I got to work. Said “thing” is a WHFB cannon from the 6th edition boxed set, now 15 years old. It’s not in the best shape, having had bits glued, removed, re-glued and so on, as well as fairly haphazard filing and smoothing of mould lines and such.

Courtesy of me 15 years ago

Courtesy of me 15 years ago

The cannon itself is a big, ornamental beast as fits the gothic fantasy look of WHFB. This led me to thinking that obviously such an ornamental piece on a pirate ship must be looted from the Spanish. Seriously, is there another explanation? I think not. This also gave me the chance of using one of my favourite words ever, as I named it…

Cagafuego!

Impressive name, isn’t it? Of course, it has a historical background, as it was the nickname of a Spanish ship captured by Sir Francis Drake. As Wikipedia will tell you:

Nuestra Señora de la Concepción (Spanish: “Our Lady of the (Immaculate) Conception”) was a 120-ton Spanish galleon that sailed the Peru – Panama trading route during the 16th century. This ship has earned a place in maritime history not only by virtue of being Sir Francis Drake’s most famous prize, but also because of her colourful nickname, Cagafuego (“fireshitter”).

Seriously, is there a better name for a massive Spanish cannon than “Fireshitter”? I think not. It appeals both to my love of history and 10 year old’s sense of humour.

Cagafuego is a huge piece, and I’m thinking that its role on the ship is that it’s a piece mainly for intimidation. Due to the build of the ship and for practical reasons, it’s only going to carry some seven cannon altogether – much fewer than a ship of this size historically would have. Of these seven, six will be normal sized and Cagafuego much larger, so I’m thinking that it’s always a bit of a spectacle when it’s utilised. You know:

– Captain, they’re not striking their colours.

– Very well then. ROLL OUT CAGAFUEGO!

The only problem was that I didn’t have a carriage for the gun as the original mount was a field one, not suitable for ships. Having grown more accustomed to working with plasticard and coffee stirrers, I figured I’d try my hand at building the carriage from scratch, resulting in this:

Click for a larger version

Click for a larger version

Click for a larger version

Click for a larger version

It turned out alright, I think! Sure, anyone into things like history and realism will probably find plenty of things wrong with it, and there are some irregularities here and there, but to my fantasy pirate eye it looks as it should. The core structure is plasticard with an old Warmaster base underneath. The wooden bits are coffee stirrers, the wheels are cut from 10mm diameter dowel rod and the axles are decorative studs meant for clothing.  The smaller iron rings are plastic pieces from the original cannon set and the bigger ones are from WHFB orc weapons. As with a lot of my woodwork, this one also relies a lot on the “it’ll look nicer once painted” factor, but I have high hopes!

To cap off the post, here’s a comparison shot of Cagafuego and my existing Ainsty cannon as well as a Foundry pirate. Neat, right?

Click for a larger version

Click for a larger version

h1

Run out the baby guns!

June 30, 2015

Eventually, any project will suffer minor setbacks. I received my order of 6 cannon from Ainsty. Lovely, crisp castings, great detail…and far too small for my heroic-scaled ship. See here:

Click for a larger version

Click for a larger version

While it’s quite realistic in size, that’s very much the problem. I’m not at all faulting Ainsty, as the problem stems more from my massive ship – even with the base the cannon barely reaches over the side at the gunport. I’m going to need bigger guns, so I put in an order with Thomarillion for some more beefier guns:

Photo ©Thomarillion

Photo ©Thomarillion

Now, what to do with the six guns I already own? They will probably find employment in small coastal settlements, guard towers and such. I’m also thinking I might use some of them as very large swivel guns like shown below, what do you think? I feel it might work with a bit of converting.

Click for a larger version

Click for a larger version

That’s all for now! I’ll put up a post once the Thomarillion cannon arrive. Should someone arrive here looking for measurements for the Ainsty cannon, they’re

Length of cannon 30mm
Length of cannon + carriage 34-35mm
Height 15mm (highest point with level barrel)
Width of carriage + wheels 21mm


h1

Foredeck work

June 15, 2015

The ship project is my first time working with coffee stirrers. It’s immensely fun and satisfying work, as the perfectionist in my rejoices every time I manage to make a nice, fitting angle. On that note I present to you my latest work on my ship’s foredeck.

Click for a larger version

Click for a larger version

The foredeck isn’t a very large part. The deck planking had plenty of holes for screws in it, so I filled those with ProCreate putty. While they don’t look very nice, once painted they blend in quite well. The lattice hatch was designed to open and drop action figures down into the hold. As obviously I didn’t want that to happen to my miniatures, I glued it shut. While the hatch itself looked fairly nice, it looked weird situated sort of under the deck planking. I added a rim around it, and I think this improved its look a lot. It was the most difficult cutting work so far, so you can imagine how happy I was when everything finally fit into place. I added a decorative piece (the foremost plank) to cover up the cut off peg that originally locked the hatch in place. I liked the look of the hatch hinges, so I left them in place. The belaying pins at the base of the mast can be pressed for awesome sound effects, so they’ll definitely be left in place. With this part done, the foredeck only needs a little more planking work and two more screw holes filled (oh my, that sounded somewhat inappropriate). After that it’s a bit more work on the hold and that’s it. I’m actually finishing this thing!

h1

Paint it brown!

June 9, 2015

In what has to be one of the most boring updates ever on this blog, I report that the main deck of my pirate ship has now been painted a flat brown. That’s it.

Click for a larger version

Click for a larger version

…ok, as an afterthought I added a before shot, showing the paneling I added to the rail. It still doesn’t make this post super interesting, but it’s something! The main thing I want to report is that the project is still going strong. I’m starting to surprise myself.

h1

Batten down the hatches!

May 31, 2015

Work on the pirate ship continues after a short lull spent painting the crew and watching Black Sails (watch it if you haven’t!). Rough work in progress photos as usual.

The poop deck is pretty much finished, apart from the possible addition of a small lantern next to the door. I decided not to work on the interior, as it would be extra work for little added value. I added a ship’s wheel from Eureka Miniatures that I ordered from Fighting 15s. The door got hinges cut from a cocktail stick to cover some rough cuts in the plastic. I also added a door handle of sorts, cut off the end of a WHFB orc weapon. Two holes left from removing the ship’s original wheel were filled with ProCreate and sculpted to match the decking.

Click for a larger version

Click for a larger version

With the poop deck more or less done, I went to work on the main deck. While there already was a hatch with grating, it was far too big in terms of scale. Also, the removal of a fighting functionality (pull a lever, and two disks in the deck rotate, making two action figures fence if they’re stuck to the disks) left me with two large holes in the middle of my deck. After spending a lot of time thinking and trying out various materials, I whipped out the good old combination of plasticard and coffee stirrers and got to work. Here’s a before and after shot:

Click for a larger version

Click for a larger version

This is some of my favourite work on the ship so far. I’m slowly getting to be a little more proficient with all the cutting and gluing, and I think it shows! I have no idea on whether you’d find a setup like that on an actual ship, but hey, this is my pirate fantasy.

The lines you can see in the deck are from another toy functionality that I removed – you could press on one end of the grating piece to make the other end launch up. That wasn’t something I wanted happening with miniatures, so I just glued it shut. I’m not sure if I’m going to fix the gaps it left, probably not.

Somewhat surprisingly there’s not much work on the main deck. I still need to add planking detail to the insides of the railings, but that’s it!

Praise, constructive criticism and general rambling in the comments welcome as always!


h1

More ship building

May 18, 2015

I spent the best part of last week at our summer house. While I was mainly there working on my dissertation, I couldn’t help but bring my ship with me for some extra work. The project is progressing nicely, and here are the latest updates:

I added planking to the second, larger crow’s nest and added a rope band made out of coarse string around it. While the rope looks nice, it mainly came about simply because making a band around an inverted cone shaped object out of anything else was far too tricky.

Click for a larger version

Click for a larger version

The poop deck is almost finished. I added planking to the blank inside of the aft railing (or whatever it’s called). It took some extra work cutting it into shape, but I think it paid off. I added a swallow decoration above the door from my girlfriend’s broken earring, and decorated the door itself with a plastic shield boss from an old WHFB Empire set. I think it will get a small knocker to finish it off. I messed up a little bit while cutting up the door, so I’ll probably add hinges to the right edge to cover those ragged parts. The wall will also get a lantern from another WHFB set. In the picture you can also see the lovely plank you can extend from the side of the ship. I’ll definitely leave that in place for those Hollywood swashbuckling moments.

Click for a larger version

Click for a larger version

I’ve been putting a fair bit of thought into the painting of the ship, as messing everything up with a failed paintjob after all the work done so far would be heartbreaking. After a lot of consideration I settled on dark brown spray paint, intended for use on metal roofing. It sticks well, covers something wonderful, takes paint and is suitably matte. The decking will probably get a hand-painted lighter, warmer shade and everything will of course be drybrushed later on. Something I was a little concerned about was how well the painting would tie the different elements together. After spraying it all, I could breathe a sigh of relief as it came out as intended, really making the different parts into a whole. At a glance you can’t easily tell the difference between the original plastic ship elements and the coffee stirrer bits.

Click for a larger version

Click for a larger version

Click for a larger version

Click for a larger version

I’m still happy with the project and its progress – and more than a little surprised that it hasn’t come grinding to a halt yet. Watching Black Sails and painting pirates helps, too!

h1

Ship building

May 10, 2015

Work on the ship (see previous post) is progressing at a steady rate, or actually much quicker than I’d anticipated. I’m really starting to get the hang of cutting up coffee stirrers (which I picked up a box of 1000 for 4 EUR) and gluing them in place. I rather feel like a teeny tiny carpenter.

Anyway, here are some pictures of my progress at the moment, with explanations. The picture quality is somewhat poorer than usual, as these are mostly quick progress shots. There is still a lot of work to be done, dremeling, detailing and such.

First up is one of the two crow’s nests. While the original was nice and big, it posed a serious risk of miniatures taking a major fall down to the deck. I remedied this with some stick planking and card. It still needs smoothing over as it was my first attempt, but I think it’s still nice enough and I believe painting will hide the more obvious rough spots. It can easily accommodate a few minis and they’re quite safe from falling.

Click for a larger version

Click for a larger version

Next up is the poop deck (which always makes me snigger, I’m twelve after all). It was originally nice enough, but there was a lot of blank, untextured plastic that I wanted to hide, and the doorway was scaled for larger action figures.

Click for a larger version

Click for a larger version

I covered the doorway area with plasticard and built a new wall out of coffee stirrers. I then chopped up a Playmobil basket for a door and built a doorframe around it. I liked the steps, but added more detail in the form of planking. As this will be a gaming piece, I added little stands made from plasticard and stirrers halfway between each staircase so that models can be placed there to indicate they’re on the stairs.

Click for a larger version

Click for a larger version

I added planking to the insides of the ship’s railing as well. It was somewhat awful work but looks decent.

Click for a larger version

Click for a larger version

For some reason, one side of the cabin’s outside wall – or rather its roof – was left untextured. Of course, I could’ve left it as it was, but there was a nice fish scale pattern to the roof and all…so of course I had to fix it using a lot of small paper discs from a hole puncher. Silly work, but I think the end result was well worth it. This was the sort of crazy stuff that’s always had me going “who does that?” before.

Click for a larger version

Click for a larger version

There was also an oversized balustrade on the edge of the poop deck. I cut this down to a more suitable size.

Click for a larger version

Click for a larger version

So there’s my progress at the moment. A lot of the hardest and most intricate work is actually already done. There’s still plenty to do, but I’m really motivated at the moment. I love working on this, and the visible progress really helps. I’m also genuinely surprised about how good it actually looks, as my hopes really weren’t that high. It will receive a dark brown paint job, that will hopefully work wonders in hiding some of the gaps between wood and plastic and so on.

Comments are welcome! Next up is the inside of the poop deck as well as cabin wall and door detailing. Actually looking forward to it!

h1

Pirate madness

May 7, 2015

Salute 2015 sparked a huge interest in pirates in me. I was thinking of keeping it very low key – you know, a few packs of miniatures from Black Scorpion and Foundry, some pieces of special terrain, nothing major.

As these things tend to develop, yesterday evening I found myself in possession of a huge, 80 cm long pirate ship. It’s the Black Pearl from the Pirates of the Caribbean movies, it comes from this playset and I got it for 30 EUR off a Finnish auction site. As I said and the pictures show, it’s a massive model, and I’ve no idea how I’m going to store it, but for now I won’t worry about it. Instead I’ll focus on the positive!

There’s so much to love about the ship from a miniature gaming point of view. It’s magnificently scaled for 28mm, it’s nicely textured and has easy access to the ship’s interior. On top of that there are great toy functions such as a small soundboard and even flashing red led lights for the cannon. A piece of the ship’s prow also comes off, which will be a good way to show damage or to depict a beached ship.

The ship will give me plenty of work. While the scale is good for the most part, it’s still intended for large action figures, so I’ll need to make doorways smaller, give the ship a smaller rudder, replace the cannon and so on. Some of the less detailed pieces will need a going over with coffee stirrers and some toy mechanisms will need to be removed. I don’t doubt that it will be a major task, but I’m still looking forward to it! To make my task easier, I’m going for a functional gaming piece and as said, I’m trying to keep many of the toy functions intact. This means I won’t go over the model, puttying over and sculpting every join and gap, nor will I add authentic rigging or anything like that. I know myself, and I want to actually finish this one!

I’ll post updates on the blog as the thing progresses. While I don’t usually show a lot of work in progress stuff, I think that sharing in this case will be good for keeping up the morale (and the stamina). Hopefully this will also provide you with inspiration and entertainment! It goes without saying that feedback, ideas and experiences are warmly welcomed.

I added some quick pics below just to give you an idea of the whole, sorry for the rubbish lighting and setup! All the minis are 28mm.

The ship in all its glory

The ship in all its glory

The rudder has been removed and the railing will be cut down

The rudder has been removed and the railing will be cut down

The crow's nest is large enough for several minis

The crow’s nest is large enough for several minis

Plenty of deck space, the discs will be removed

Plenty of deck space, the discs will be removed


%d bloggers like this: