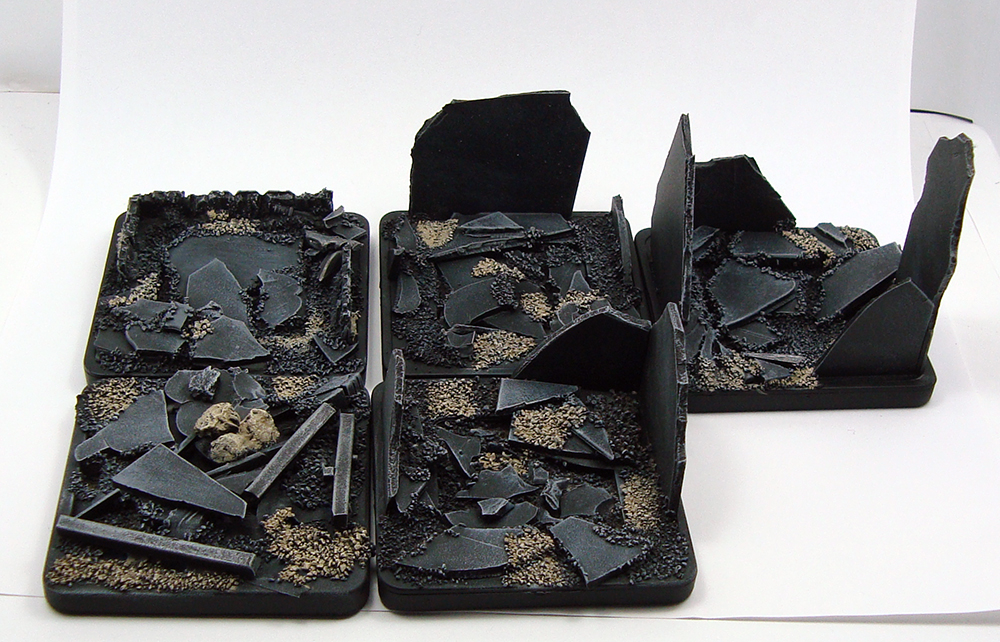
I’m getting back to painting after one of my hobby-uninspired periods (see this blog post from four years ago). Sort of like exercise, you have to ease yourself into it after a break, so I figured I’d start easy and built a few ruins for my Pacific Rim project. After all, those cities are going to be hit and wrecked, so I’ll need plenty of replacement pieces for destroyed buildings.
After buying a bunch of Monsterpocalypse buildings and popping them off their bases, I was left with plenty of empty plastic bases which I didn’t feel like throwing away. These provided a great base for ruins. I then simply slapped on rubbish – mainly plasticard cut-offs, sprue pieces, sand and small rocks, undercoated with black and gave the whole thing a quick drybrush treatment. They turned out quite nice, and I wasn’t going for beautiful diorama pieces anyway as they’re rather just glorified tokens.
Click for a larger version
The pieces work nicely on the battlefield. Here’s a shot of the kaiju Knifehead with one of the ruins. I like the way the base fits in!
Click for a larger version
As and added bonus you can combine them and they work well with 28mm too, which is always a good thing:
Click for a larger version
Setting up the mini diorama above prompted me to throw together some ruins, Knifehead and some of my city terrain and smoke pieces to show you what it’s meant to look like eventually:
I happened to get up earlier than normal today (6:15 am in fact), and there was such a lovely light in my game room that I snapped a photo of the current state of my Pacific Rim setup. It’s actually an Instagram photo, so I slapped a retro filter on it, and I think it turned out nice. So, here’s a mood piece for you to hopefully enjoy!
“We’ll never forget May 22, when Knifehead hit us around sunrise.”
After painting two jaegers, it was time to tackle a kaiju – they obviously need someone to fight. The first mini in my monster queue was Knifehead, a kaiju from the Pacific Rim movie.
Click for a larger version
The miniature for it is a Pacific Rim Heroclix one. I forgot to photograph it before painting, but here’s a catalog image:
Painting Knifehead was very different from painting the jaegers. The machines are all straight lines, flat surfaces and clean, bright colours, whereas the kaiju has plenty of texture and organic shapes. This was sort of reflected in my painting of him, as I went for a more irregular layering (read: not as neat), did some drybrushing and used several washes. The end result is very different from the jaegers both stylistically and in feel, and I think it was a good call as it accentuates the whole organic vs. mechanical setup. It also had the benefit of being super fast – the whole mini probably took me a few hours from start to finish.
While I liked the colour scheme of Knifehead and the rest of the kaiju in Pacific Rim, I wasn’t too fond of all the bioluminescent markings, so I did away with them. Instead I went for a blue-green scheme, almost looking like verdigris. In fact, in it’s early stages the model looked a lot like a statue. Again, the tones are very different from the jaegers’. While obviously straying far and white from the canon (schmanon), the end result was worth in my opinion.
As you may know, I like my bases very simple. This time, however, I added a little extra touch in the form of a tiny tank. Instead of completely flipping it over, I just positioned it at an angle that suggests its toylike insignificance compared to the kaiju.
You might have noticed that I seem pretty happy with Knifehead. I am! I was very sceptical of it at first, it being a clix repaint, but I was happily surprised with the end result. There are some awful, awful mould lines there, which I didn’t clean (“Come on, it’s a vinyl clix mini, not worth the hassle, let’s just get it on the table”) but even those don’t show up too badly.
Every single miniatures project I’ve ever worked on has suffered its share of setbacks. Often these are a result of rash actions instead of careful planning. With my Pacific Rim game board, it just so happened that I decided that the table would look nicer drybrushed. The smart guy that I am, I tried a sample piece first, then a small corner of the table – both yielded nice results. I then meticulously started drybrushing a large board with a small drybrush, got bored, took a bigger brush to it, didn’t bother to wipe the paint off well enough and ended up with one end of the game board looking like someone did some very poor drybrushing on it.
Next came the question of what to do. As the table wasn’t painted to begin with, I figured that to try and paint the area wouldn’t work – I would have to paint the rest of the table to match. For a brief moment I thought that I might simply cut of the messy end, after all foam cuts easily. This however felt a bit too much. Suddenly, a wild idea appeared!
I’d been thinking hard about how to build a seaside on the table. After all, Pacific Rim was all about giant monsters wading out of the sea and into harbours to cause havoc. I had in fact already built a a mock-up of a corner harbour piece out of plasticard and a 1/700 harbour set by Tamiya:
Click for a larger version
I wasn’t completely happy with it though. A lot of plasticard was wasted in the design, and the corner design was quite limiting. This got me thinking…
Why not just paint the whole end of the table as seaside? The sea would probably be present in all games anyway, and if I didn’t want it for some reason, I could always cover it up. After a quick round of “is this another stupid, rash idea?”-thinking, I went to work, and in a short time I’d painted the end of the table a lovely sea blue, completely covering up my amateurish drybrushing mess.
Click for a larger version
What about the harbour then? With the sea fixed on the table, I figured the harbour just needed to be something to show where the sea ended and to make the razor sharp coastline a bit more interesting. I kept the main idea of my original harbour design, and simply cut out the strips I needed to make the pier. Wanting something more interesting, I went crazy and cut half of the pier in an angle. I was soooo pleased with myself, until I placed it on the waterline and had a wonderful facepalm moment.
Click for a larger version
As you may have figured out, I’m not really an engineer. I am however a teacher, and fairly used to improvising fixes for my mistakes. I’ve lately been working with thin mousepads as scenery building material (might do a blog on it), so I just cut out a suitable shape, sprayed it black and voila!
Click for a larger version
After I paint it to match the pier, it won’t look out of place at all.
Finally, here’s a shot of the harbour with accessories. I think once it’s painted, it will look mighty lovely. The waterline design also means, that if I want to make a sandy beach for example, I can simply cut up mousepads, paint/flock them and lay them over the waterline. Great success!
I usually spend money on miniatures somewhat sparingly. Or rather, I do consider price quite a lot when making my purchases, although I end up spending lots of money nevertheless. Usually this means I steer away from keywords such as “limited edition” or “boutique” or “for collectors” when it comes to miniatures. Despite this, every now and then I run into something exceptionally interesting that makes me break this rule, and I end up doing a review like the one that follows after this unnecessarily long intro.
As regular readers know, I’m working on a project inspired by the movie Pacific Rim, and thus I’m on the lookout for interesting monsters and giant robots. I visited Salute 2014 a week ago, and I ran into a miniature I’d seen on a news site before and noticed, but which had slipped my mind – Genbu by Zenit Miniatures.
Click for a larger version
Genbu is a giant, bipedal turtle monster with a snake for a tail, and a part of Zenit Miniatures’ Kensei line. If the concept sounds strange, it has its roots in Chinese (and later Japanese) mythology, and you can read more about it here. Genbu also links directly into the kaiju genre, as it’s undoubtedly the inspiration behind Gamera.
The model comes in seven parts: main torso, shell, tail and four limbs. Normally I would classify this as a nightmare, as I loathe putting metal miniatures together after too many cases of ill-fitting and poorly cast parts requiring literally hours of filing, sanding, cutting, pinning and filling to fit. Zenit Miniatures’ offering was a positive surprise in this respect: the parts fit together well right out of the box. There are joins that need filling, but the model doesn’t appear to require pinning – although you may want to do that with the tail due to the small surface for attaching it. The shell especially snaps into place in a very, very satisfying manner. The one glaring exception to this is the left leg, which I simply couldn’t get to fit well, and will require filling of the joint.
Both the torso and the inside of the shell are hollow, in a smart move to reduce the amount of metal needed. Genbu stands at 45-46mm from soles to top of head, so the model is impressively sized and will work as a giant monster in smaller scales or an ogre sized one in 28mm. There’s a separate square plastic base included, but I mounted mine on a standard 40mm round base.
Sculpting on Genbu is excellent. The sculptor has managed to make a wonderfully characterful giant turtle monster with a gnarled, well textured skin. My only complaint is that the model was originally supposed to be a giant Kappa (see here for original concept art, notice the distinct lack of tail) and as such the Genbu model still has a patch of hair-like texture on top of its head, which doesn’t quite fit in. Even though it can be painted to match the skin, the texture is obviously different. Casting quality is very good, with crisp detail and very little flash. There are some noticeable mould lines but they were quick and easy to clean.
Praise upon praise then, any downsides? Yes. There’s one obvious one that I mentioned right at the start. I bought Genbu at £18.60, and on the Zenit Miniatures site it retails at €19.95. Nice as the model is, that is a hefty price compared to many competitors on the market and will sadly put potential customers off buying it. The model comes with nice packaging – a padded cardboard box with a full colour sleeve around it. I can’t help seeing this as somewhat too much. I don’t know the actual packaging costs, but this grates on me a from an ecological viewpoint as well. I’ve added a photo below showing the actual space the model takes up vs. the size of the box. Then again, the lovely packaging did catch my eye, but it’s a very rare case that I actually by something from a brick and mortar store. If I was mail ordering Genbu, the shipping would add an extra €5 to the price, bringing it to €24.99 and probably keeping me from buying it. Then again, I know a lot of people are used to spending lots more on a single mini than I am, so your mileage may vary!
A smaller box maybe?
As usual, I added a size comparison picture. I also added a 28mm miniature, as Genbu is intended to be a large creature in that scale.
L to R: Pacific Rim Heroclix Knifehead, em4, Genbu, Reaper CAV Weasel
Overall verdict: Genbu is pricey, but you do get a very nice model for your money. Good, clean sculpting and very nice casting with (mostly) well fitting parts mean that you won’t pull your hair out putting the model together. If you’re on the lookout for a great giant turtle monster to spice up your games, whether they’re giant monster ones or something else, you could do far worse. Also, if you leave out the tail, this is the nicest Gamera in miniature form you’ll probably find.
Work continues on my Pacific Rim board. I recently made the base for the game board by first taping the edges of a 60 x 120 cm Finnfoam sheet with blue masking tape, and then gluing wallpaper (see this post) to it. The operation went fairly smoothly – literally – as there were only a few small bubbles left in one part of the sheet. I actually used a rolling pin to smooth it! The key was in the mixture of PVA glue and water, as it needed to be runny enough to make sure no place was left unglued. There are two seams, and they turned out very neat and tidy as well.
Here’s a look at the board itself:
Click for a larger version
And with added buildings:
Click for a larger version
At this point it looks nice, but still a bit too sterile and clean, so I figured I’d throw in a bit of (WIP) scenics, a few creatures, a tiny tank and some fire and smoke:
Click for a larger version
Click for a larger version
The buildings are a mix of paper ones from Sarna that I’ve customized, and Monsterpocalypse buildings. They fit together quite nicely, but I still need loads more. I thought of making separate streets, but figured it might be too much of a hassle and create a potentially unnecessary slew of more loose elements. Then again, streets would probably make it look more like a cityscape and less like a grey field. Of course, this is still very much a work in progress thing, but the question of streets keeps bugging me. Do I need them, or will simply adding more variety to the cityscape work? What do you think?
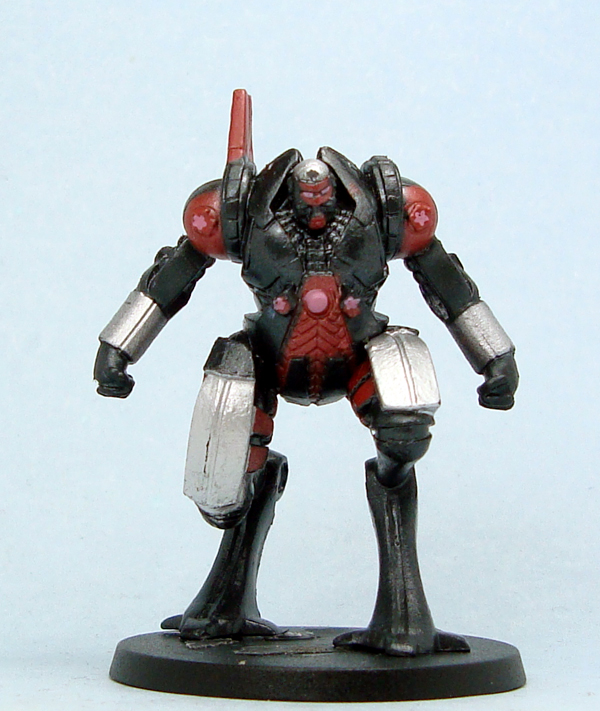
Two more additions to my Pacific Rim project, which is pretty much complete when it comes to miniature acquisitions. Now all I need to do is start actual work on the project instead of just buying things. That’s not entirely true, actually, as I’ve got a fair few buildings put together already! More about those in a later post.
Click for a larger version
First up is Sasha Hammer. It’s a Heroclix mini, and the character portrayed is apparently an enemy of Iron Man’s. Just so you know. The mini itself is actually very nice, and fits the Pacific Rim aesthetic. With a slightly forward leaning pose, bulky upper body and reverse-jointed legs, the model gives off an air of menace. Sizewise it’s comparable to the other mechs I have, see end of post.
Click for a larger version
Joining the kaiju side is Zorog. Part of the Monsterpocalypse line, Zorog is an impressively large model. Most of the Monsterpocalypse (or “Monpoc” as it’s often called) minis are too cartoony to use in serious giant monster gaming, but Zorog fits in nicely – even with his massive pincers. Tall and bulky, Zorog received a larger 50mm base as opposed to the 40mm ones on (under?) the rest of the cast.
Both of these miniatures are actually quite nice as far as pre-paints go, and the vinyl is quite rigid. Of course they will be repainted, but if you were feeling lazy, they could be used as is. Both were fairly easy to pop off their bases.
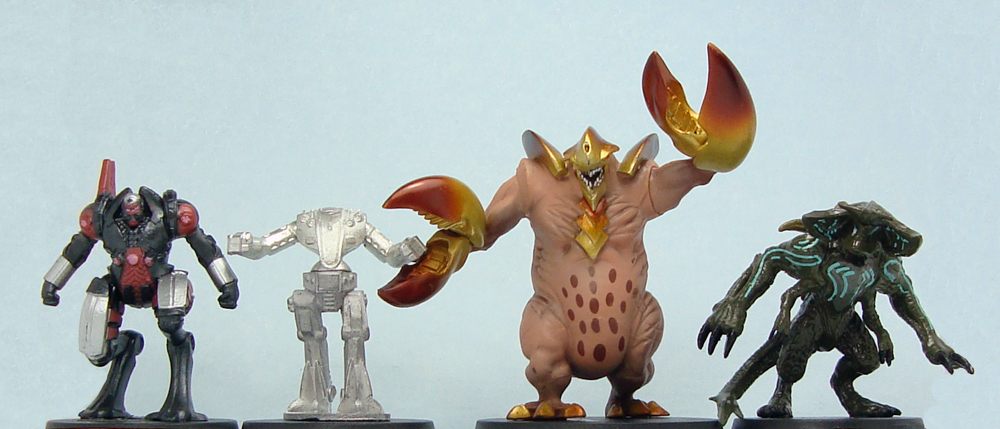
Here’s a comparison pics to illustrate their size compared to my earlier purchases:
L to R: Sasha Hammer, Reaper CAV Weasel, Zorog, Pacific Rim Heroclix Scunner
As part of my Pacific Rim project (see previous posts) I ordered some mechs from Reaper Miniatures‘ CAV line. They were such nice models that I figured I’d review them for the benefit of other hobbyists as well.
By way of disclaimer I have to say that I know nothing about the CAV: Strike Operations game, so I’ll be reviewing these purely from a “giant robots to be used in Pacific Rim style gaming” point of view. I’ll happily take the liberty of interpreting the designs as I view them, so vents might become guns and so on!
All the miniatures are sculpted by Chris Lewis, and have integral metal bases. I’ve glued them to 40mm plastic bases. There were no major casting issues, only minor mould lines and very little flash on some models. All except one of the models are four part castings consisting of torso, legs and two arms. The parts fit together nicely on all the models.
You can find all the miniatures in Reaper’s online store. Prices are from approximately 7.50 EUR to 8.30 EUR.
Click for a larger version
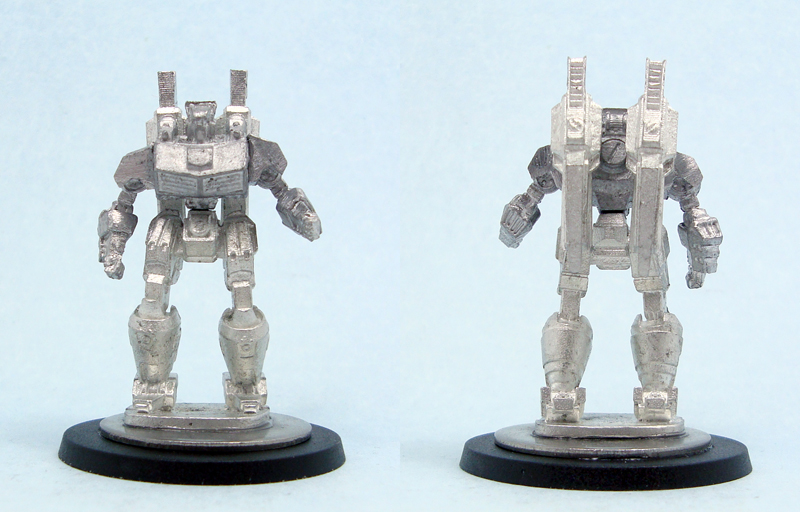
Hawk has a strong Transformers vibe, mostly due to the chest reminiscent of Optimus Prime. Hawk stands at around 49mm from the bottom of his soles to the tips of the things on his back. I’m not entirely sure what they are, although their design and the mech’s name suggest some sort of jet engines. They might be weapons, too. Anyone more familiar with the game, feel free to comment! Hawk’s smallis stature made me put it on a washer to give him a slight height boost. Of all the models in this review, Hawk might be my least favourite one – it’s just a bit boring. Hawk is the exception to the “models come in four parts” rule, as his back..things add an extra two parts.
Click for a larger version
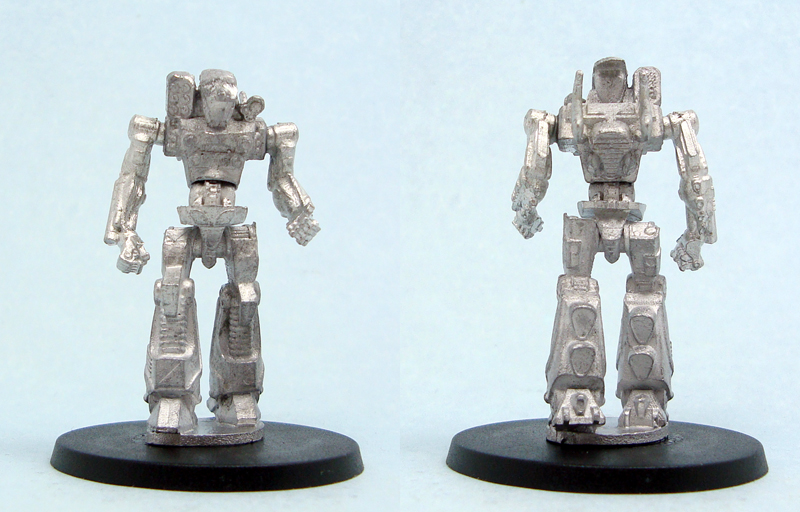
If Hawk was Transformers, Spitfire is Gundam. With sharp edges, reverse jointed legs and sloping armour, this one is the most high tech looking of the selection, and the first word that springs to mind is “sleek”. Spitfire isn’t too tall, standing at approximately 47mm from the bottom of his soles to the top of its head. This is a lovely, lovely design, and one of my favourites. Spitfire’s bracers have hollows that I envision as weapon barrels or housings for retractable weapons.
Click for a larger version
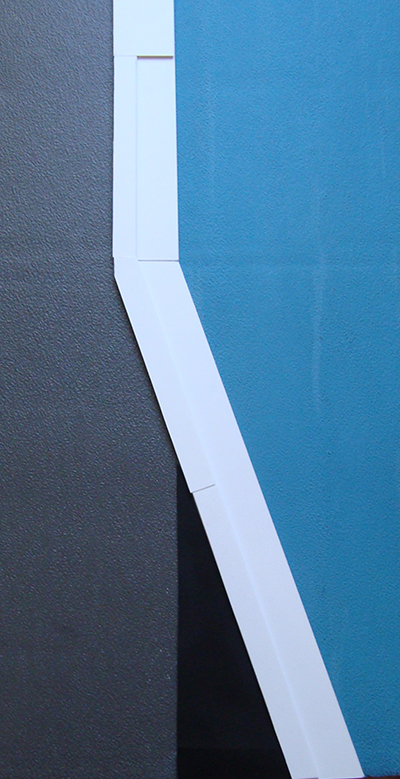
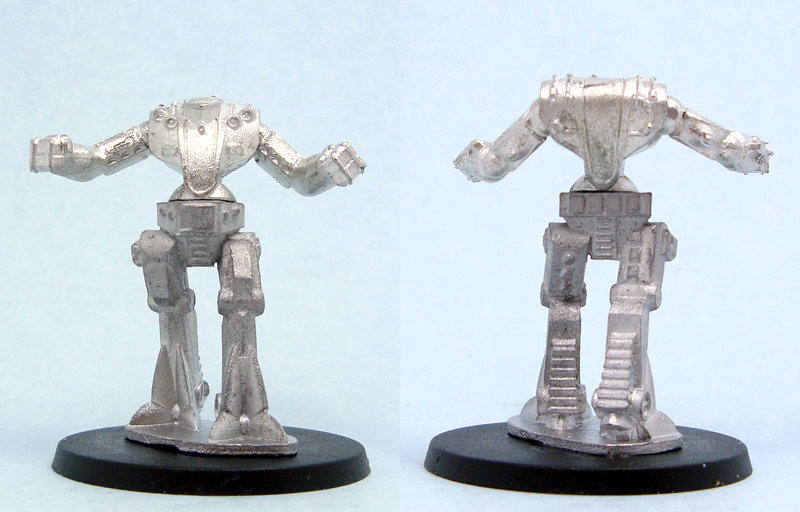
Weasel reminds me of an old boxer with its arched back, long arms and broad shoulders. The somewhat retro pose and design further reinforce this thought. Weasel is surprisingly characterful for a giant robot! While Weasel only stands at around 43mm or so. However, the squat design with the head a part of the torso makes the model look bigger than it is. There are four barrels on Weasel’s chest, and the pose suggests that they’re about to fire something. A bit like this piece from Pacific Rim:
Click for a larger version
The first impression I got from Hemi was “lanky”. With a fairly short torso and long legs, it reminds me of an ent from the LotR movies. Of course this ent is metal and has a pod of six rockets on the right shoulder, which makes a slight difference. There are also four barrels/vents on its chest, a searchlight on the left shoulder and two fins on its back. There’s something very menacing and purposeful in the design. Hemi is roughly 46mm tall.
Click for a larger version
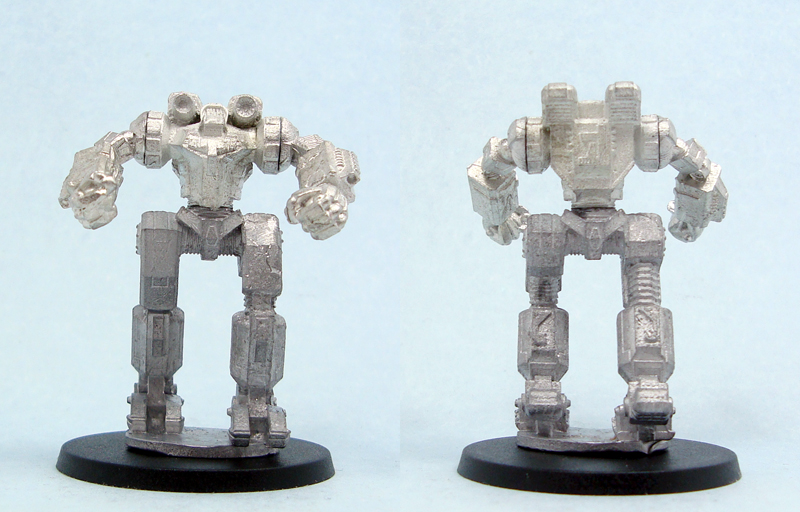
Dauntless might be my favourite of the lot. 50mm tall, clunky, bulky and swinging two massive fists, Dauntless is definitely the Cherno Alpha of this group. In addition to the very heavily built legs, Dauntless has two cannons on its shoulders. While the mech is only a few millimetres taller than the rest, it’s roughly 15mm wider than Hemi for example. You can really see the difference in the comparison pictures below. The size combined with the gorilla-like stance makes Dauntless look believably brutal.
Click for a larger version
Waraxe is the tallest of the models reviewed, at a whopping 56mm. As the name suggests, the mech carries a large axe. No, seriously. It’s a giant robot wielding a giant axe. How’s that for awesome! In addition to its namesake axe, the robot has a shoulder cannon as well as another gun in its left hand, reminiscent of a tonfa (aka nightstick). It has a slimmer build than Dauntless, and to my eye it looks a lot like a cylon from the new edition of Battlestar Galactica. The shoulder guards on Waraxe bug me a little bit, as they’re completely flat on the inside lending them an unfinished look.
Overall verdict: Well, these are some fine models. While writing the review I found it surprisingly difficult. Having never been into giant robots as a genre, I didn’t have many things to compare these to. I bought them for use in my Pacific Rim project, and for that they will be lovely as they’re a very characterful bunch. With good casting quality and nice sculpting, the main risk here would be boring designs for the robots, but that has been avoided here. Well ok, Hawk is a little boring, but he can be the exception to the rule. While I have a very specific use for the models, I can see them getting use in plenty of contexts and scales, so if you’re looking for some nice giant robots, you could do far worse than these.
The comparison pictures show the size of the mechs compared to each other. I also threw in some Pacific Rim Heroclix kaiju, as I figured there might be interest.
L to R: Weasel, Dauntless, Hawk
L to R: Waraxe, Dauntless, Hemi
L to R: Waraxe, Spitfire, Hemi
L to R: Heroclix Knifehead, Spitfire, Heroclix Scunner
After a moment of despair and bafflement I’m back on the painting track. I’ve decided to keep adding to my Colonial Marine force, slowly expanding it outside the Alien canon and building it more into a generic human scifi army. This means I finally get to paint all sorts of wonderful stuff I’ve collected over the years. Maybe I’ll even find a new use for some old models.
I’m currently working on a group of four minis, who will all join the ranks of my CM force as various specialists. First up is a medic. Unarmed and -armoured, she doesn’t really seem to be geared for combat. The model’s posing still suggests that she’s out in the field, so maybe she’s been called up in an emergency situation or perhaps she’s aiding some civilians.
The miniature itself…well, what can I say. It’s a repaint of a Heroclix Paramedic. This was pretty much what I was working with (pic lifted from eBay):
Click for a larger version
While I did strip the model of paint with acetone, I was still left with some gritty, uneven surfaces, flecks of paint etc. Also, I didn’t notice some glaring mould lines until I was far into painting, so I had to go back and scrape them off. To be honest, this was a miniature I just wanted to paint quickly as it had been sitting (with a twin sister) in my miniatures cupboard for ages, so I didn’t do a very thorough job . Some will certainly be bugged by this, for me it was much more important to just finish the mini before I got frustrated by the soft detailing.
I think the model turned out ok. There are problems with it, especially a lack of detail on some parts. For example, a large part of the hair strands have been painted on. The paint coat is very uneven and frankly ugly in some parts, but the varnishing will help a little with this. Below is the medic on her own, as well as with a selection of other Marines. I think she fits in nicely.
For a zombie blogger and miniatures collector, I have surprisingly few painted zombies, only around 50 or so. Since I was asked to show more of my painted stuff, I figured I’d put up my horde along with some closeups of my favourites.
Here’s my “horde” in full. 50+ models don’t look like much, do they? At the moment they’re a mix of GW plastic zombies, GW plastic Catachans, Mega Miniatures, Recreational Conflict, Ral Partha and Copplestone Castings. Additionally there’s one model each from Heroquest, GW Imperial Guard, Warzone, HorrorClix, and HeroClix.
Click for a very large version
I already showed some of my favourites in the post on GW plastic conversions, but there are others as well. Here’s a selection:
The Zombie Patient is a repaint of a HorrorClix model. It’s quite an improvement, don’t you think? Sorry for the horrible quality on the comparison original, I had to snatch it from an older pic and resize it. The promotion picture for the model was far better looking than what I received. Also note the change in lighting. White daylight bulb on the left.
Click for a larger version
Zombie Kids are always fun and creepy. The following three are all from Mega Miniatures. The freehand on all models rather shows that I’m not really that focused on neat painting on zombies, they’re very much test pieces to try stuff on. These ended up looking nice enough for the tabletop, though.
Click for a larger version
The Chewed Up Shambler from Recreational Conflict is a nice model. I usually give my zombies fast, rough paintjobs and it shows. Here, however, I wanted to try and paint a zombie to the standard that I use on other models, and I’m very happy with the result. If I only had the time and patience to do this on all zombies!
Click for a larger version
The Classic is an old Grenadier mini – still available through Mirliton – from the 80s, making it probably as old young as I am. I started my gaming with Dungeons & Dragons (or actually Miekka ja Magia, the first Finnish RPG, which was basically a simplified D&D) with my big brothers, and this also introduced me to miniatures. This Frankensteiny zombie dates back to those days, and it was a moment of great nostalgy for me to paint him. The model show its age, but is still one of my favourites.
Click for a larger version
The Neo-Nazi is a conversion based on a HeroClix thug, with a GW zombie hand and head, and the other arm cut off. Simple, characterful and effective in my opinion.
Click for a larger version
The Rambo is a GW Catachan jungle fighter. The left leg has been cut up and repositioned and the head glued on in a zombie-ish angle. The hanging left arm adds to the effect. The right wrist that he’s missing was used in the soldier zombie conversion shown in the previous post. This model is a nice example of how simple it’s to make zombies out of other models, especially if they’re plastic. With very little work you could transform a full box of plastic troopers into zombies with limb repositioning.
Click for a larger version
The Officer is a metal GW Imperial Guard model from the Last Chancers box set. The left hand was holding a massive weapon, so I cut the wrist off and replaced it with a plastic one from the Catachan set. The model ended up looking like it’s reaching for someone, and the bandages and torn clothing only enhance the zombie appearance. The Officer is another example of a zombie that I spent a bit more time painting as I liked the model too much to just give him a basic zombie slap-on.
Click for a larger version
The Jogger and The Beach Bum are my own sculpts, so I naturally gave them more attention than my usual zombie fare. While the sculpts aren’t that great, I think they look very nice painted and certainly don’t look out of place in my horde. The feeling of painting metal that you’ve sculpted yourself, man that was cool.
Click for a larger version
Click for a larger version
I’ve got plenty more to paint, and I’m slowly starting to attack my backlog. Anyway, here’s what I have managed to do so far. I’d be happy to hear your comments, as usual.