Archive for the ‘Scenics’ Category

h1

The sweetest imperfection

May 15, 2022

Wow, really hasn’t been an active year for blogging, has it? While DotL has been very quiet, I’ve been busy with hobby stuff – and I’ll hopefully eventually post about it.

Much of this year’s gaming has been Five Parsecs from Home, a solo game that I’m happy to recommend, which I have been printing and painting models and scenery for. However, this is more of an editorial style post than a regular From the painting desk one. Why is this? Because I’m doing something profoundly different!

By “profoundly different” I don’t mean a new technique or a fancy new tool, but a fundamentally different approach to what I usually do. I’m a bit of a perfectionist when it comes to miniatures stuff (and various other minor things in life). Very small things can bug me far too much. An irritating mote of dust stuck to a miniature’s varnish. A slightly off painted eye. A mould line that I didn’t clean up neatly enough. Support marks on prints. A slightly different colour tone on two miniatures’ bases when they should be the same…you get the idea.

In general I don’t mind this, it’s just who I am after all, but it can cause some practical issues now and then, such as when you’re in need of a table full of new terrain. Sticking to my usual working habits, a table full of scifi terrain would probably take me months, and even that would involve compromises. That’s really not good for actually getting a game in – a couple of months is plenty of time for a budding project to run out of steam and result in half-finished reminders of that one cool idea you had.

Solution? Live with these minor imperfections. This is obviously nothing groundbreaking, and I’m sure it’s something every miniaturist thinks about at some stage. Sometimes you’ve done something as well as you can no matter if you’re happy with it or not, sometimes you just want to finish something so you can do something else that’s more inspiring or interesting. I’ve done this in the past too, and obviously I don’t put 110% into everything I do, sometimes I just want stuff that’s finished. This time, however, I’ve been doing it to a different extent than usual.

With this scifi scenery, I went for terrain that looks good on the table. I wanted it to look nice for gaming, but it does not have to stand up to close scrutiny or close-up photos – which this post will feature to illustrate a point. What this means in practice is that I printed at a much higher layer height than usual (0.2mm compared to my usual 0.12mm), only bothered to do minimal clean-up, and no imperfections such as failed or rough bits have been fixed. As I don’t want to bin things that can be used, these are basically stuff that I’d normally label “test prints” and give away for someone who can stand them being a bit crappy, or spend a lot of time fixing them with putties, sanding, and things like that.

The same goes for painting. These models have been hit with spray primers (one of which completely malfunctioned, covering the model and my spray booth in dry paint powder – no matter, still used the model), lathered in quickly made washes, and given a couple of coats of drybrushing using large brushes and craft store paints. Some very basic detailing and weathering, and that’s it, done!

You can click on the photos below to enlarge them.

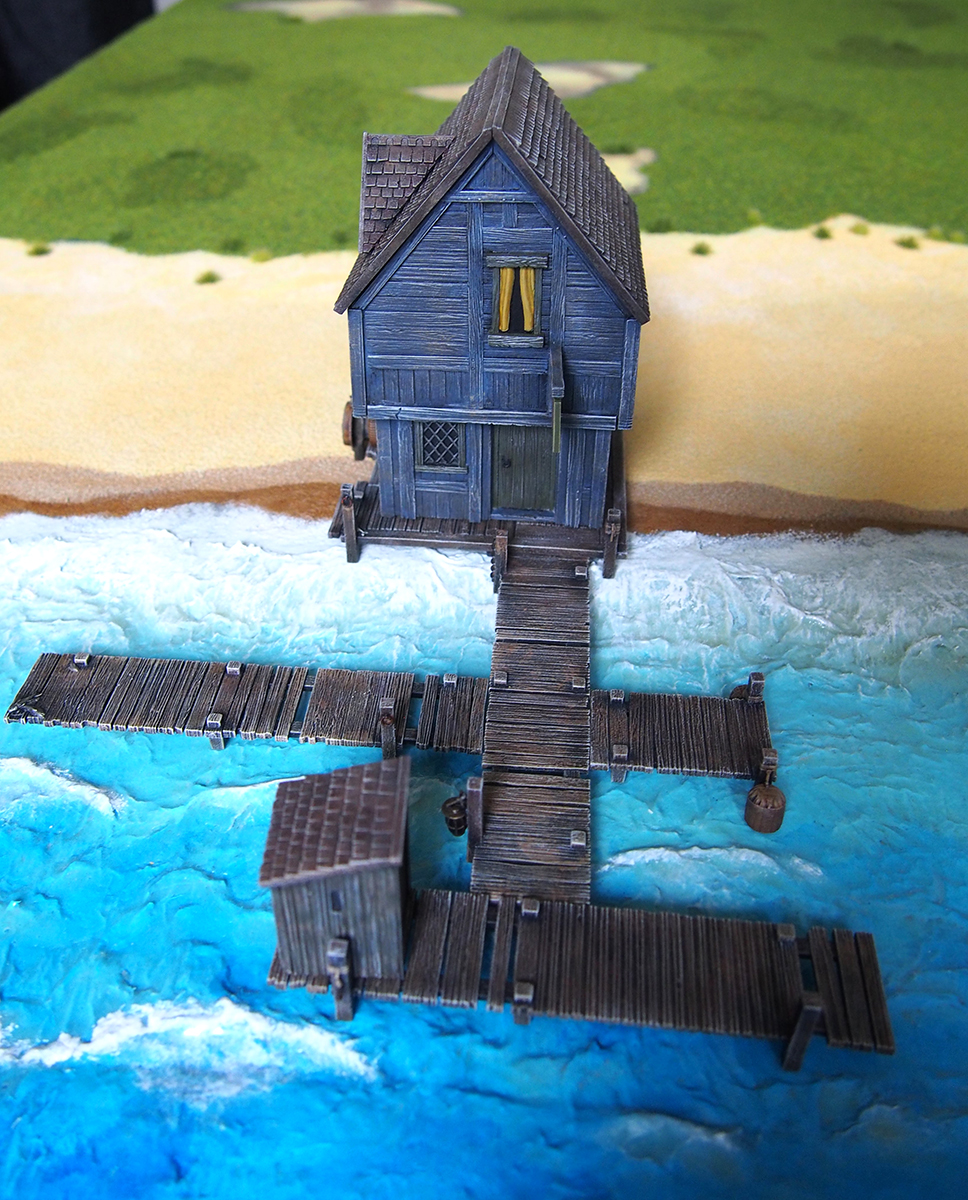
Wrong printer settings resulted in funky random lines on the surface. Also, the windows are just blotches of paint.

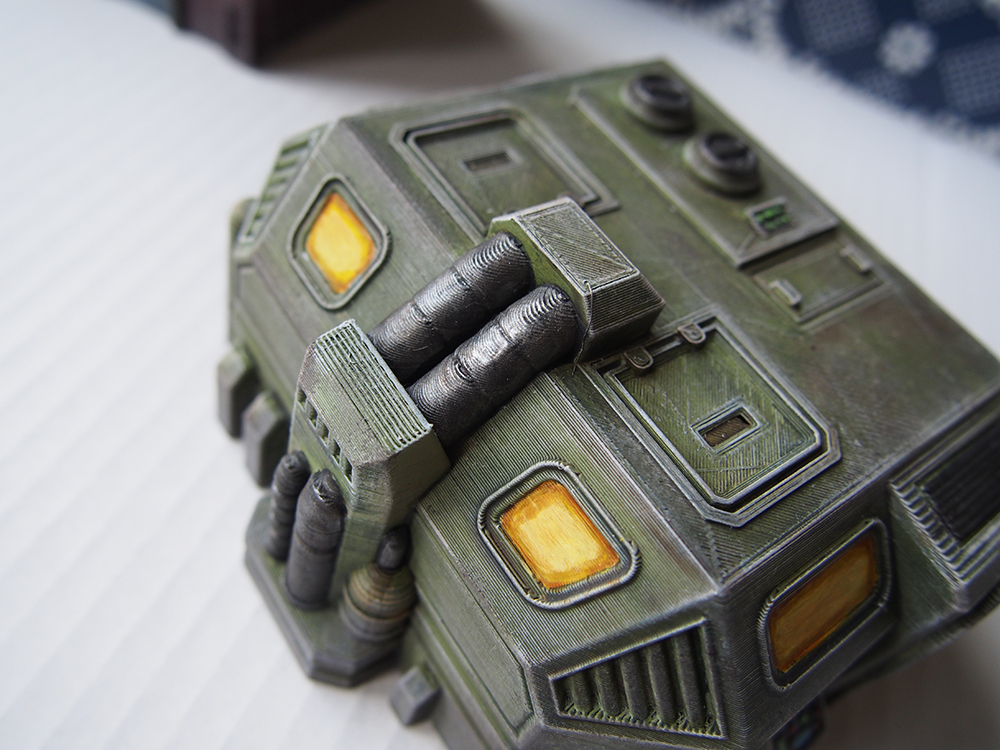
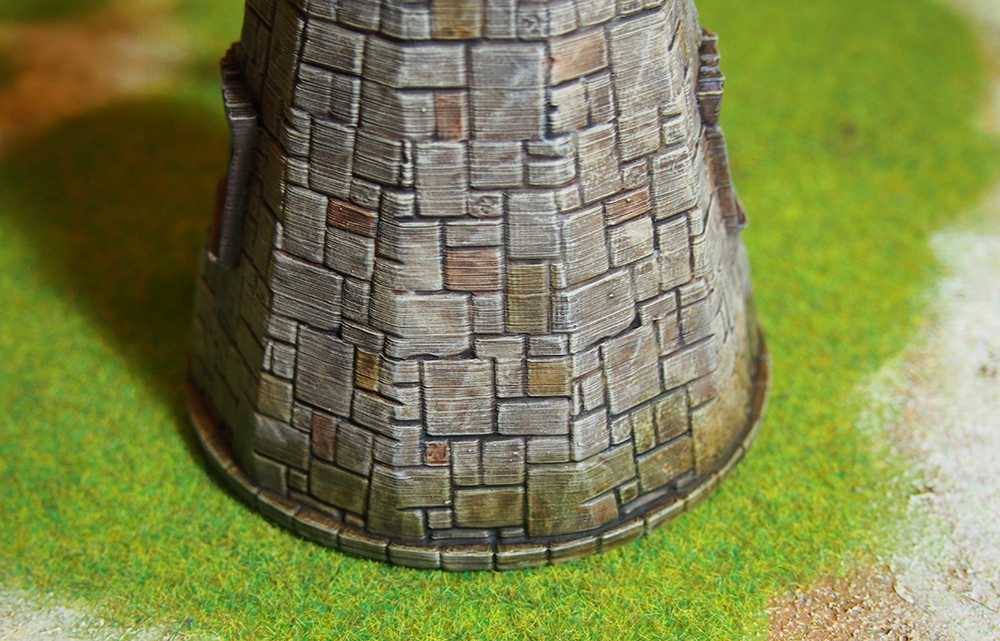
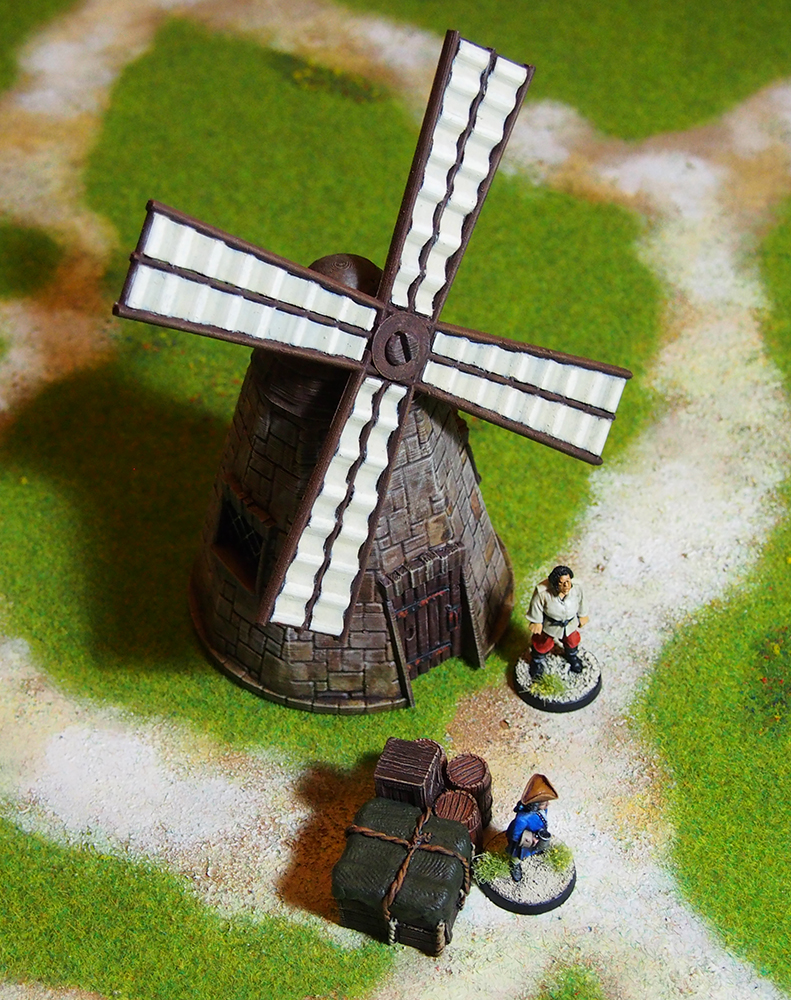
Layer line central! Printers aren’t good at shapes like the pipes here.

These buildings have detachable roofs…

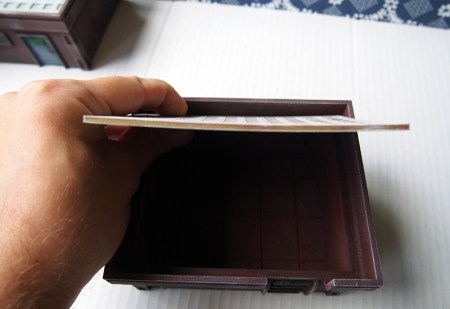
…that warped horribly after painting.

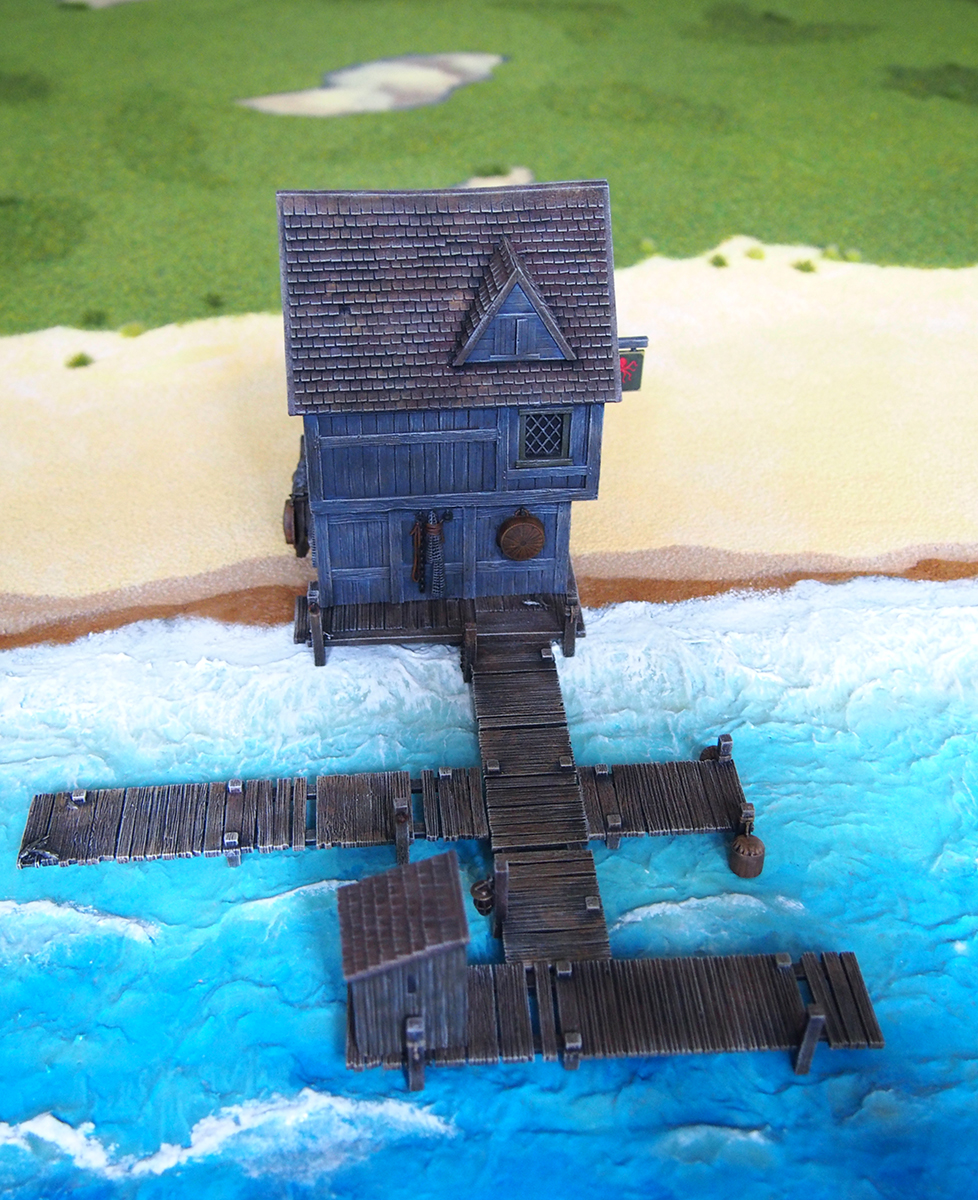
My printer had a rough day with this file, resulting in some gnarly texture and print artifacts.

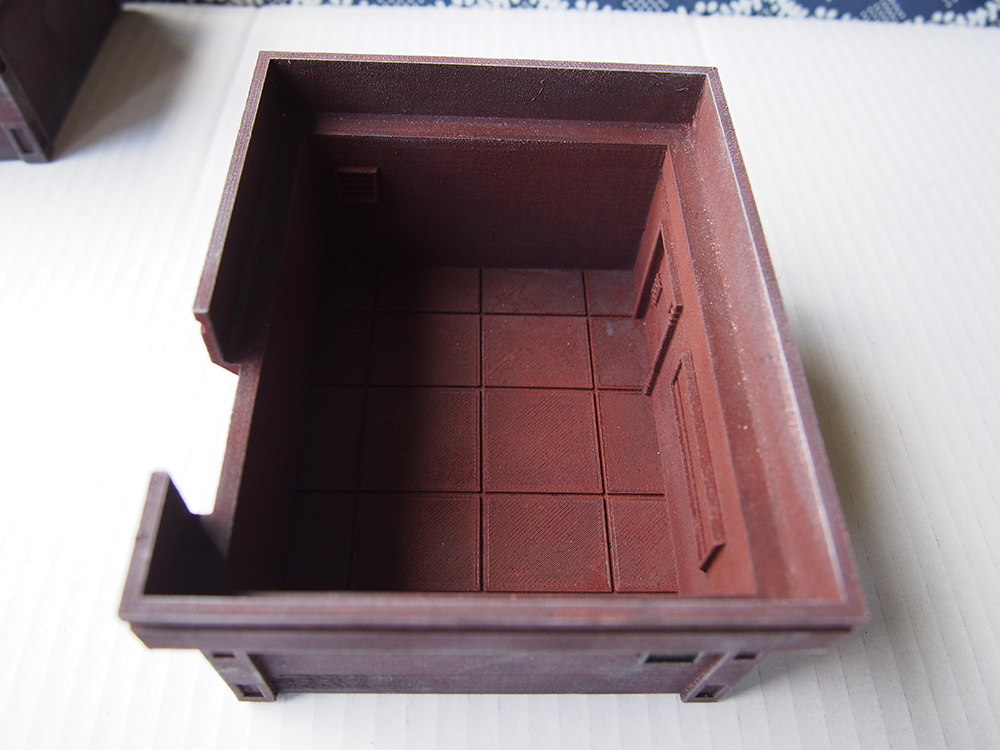
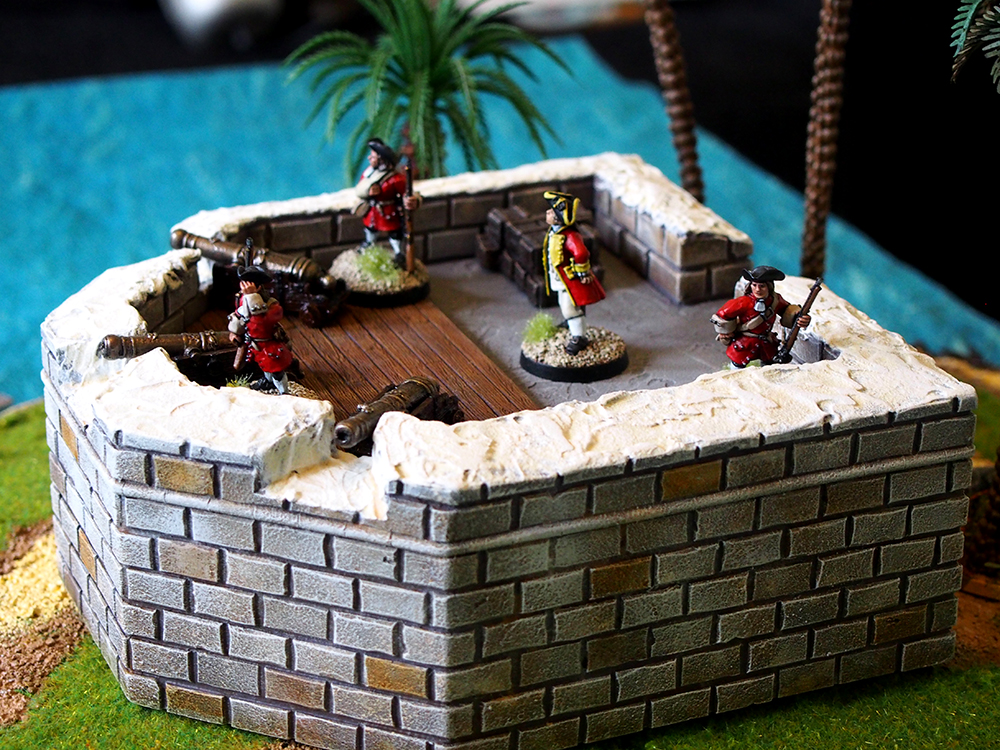
Spray can malfunction left the inside gritty and chalky. I decided not to do anything to it, as I don’t usually play inside buildings anyway.

At first this felt horrible, but as it was a very conscious experiment, I decided to plough through and just live with it. What do you know, at some point I started to be more and more happy about them! Are they perfect? No! Do they need to be? Also no! Placed on they table they look really nice actually, and of course everything is subjective – I would’ve died for terrain this cool as a kid! This isn’t an “oh, woe is me, my super high standards are simply unbearable” kind of thing, but more an issue of my own personal flaws features and idiosyncracies and dealing with them in a healthy and beneficial way. I know this may not seem like a big thing, but believe me, it is!

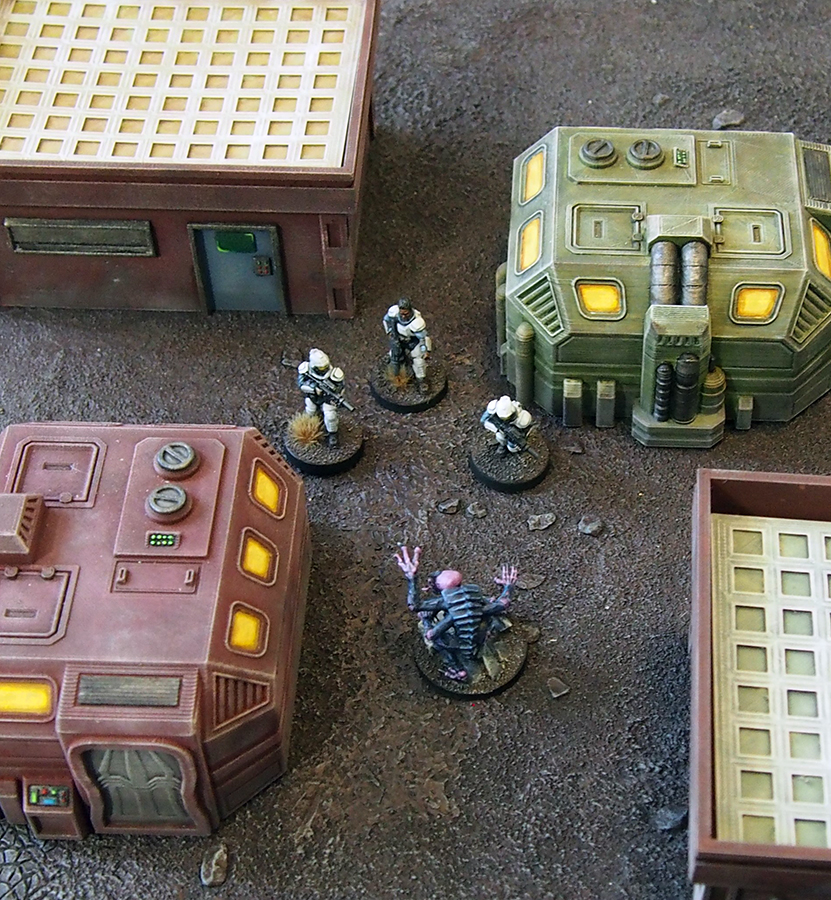
Local planetery enforcers about to get destroyed by a genestealer. Doesn’t look at all bad to me.

I’m sure most of us have feelings of inadequacy at one point or another in this hobby: with the internet full of amazingly skilled people, while inspiring, it can also be disheartening at times. Learning to let go of excessive perfectionism or self-criticism that needlessly holds back hobby enjoyment is, I think, a great way of getting more out of our toys. For me, it meant putting together a bunch of very adequate terrain in a fraction of the time it usually would’ve taken, which means more time left for other things, more terrain to actually use in games, and more joy from completing things. Most of all, it allowed me to enjoy this awesome hobby even more than before. Importantly, this isn’t a “you should do this as well” post. Lavish attention on your models to your heart’s content if that is what makes you happy!

As an interesting final note, I started this post months ago but haven’t gotten around to finishing it. After digging the models out of storage, I found myself thinking that they actually look pretty nice and much better than I remembered. This made me happy – it seems there’s been an actual shift in how I view these things now, so…go me, I guess?

The hut in the first few pictures is a micro hab unit by Saucermen Studios, available for free on Thingiverse.

The buildings with the detachable roofs are stackable buildings by Rocketship Games, also available for free on Thingiverse

h1

From the painting desk #73 – Odds and sods

September 19, 2020


I’ve been painting a fair bit of smallish stuff in the past months, scatter scenics mostly. Barrels, crates and the like are something that I can paint without devoting too much attention to them, they’re good for getting the “models painted” counter up and allow me to retain some painting mojo even on those days when it’s just not quite there. As my blogging has stalled a bit, I figured it would be fun to show of some of this stuff.

These small pieces have been a great way to test out Citadel Contrast paints too, which I’m liking more and more. With a barrel or crate, who cares if it gets a bit messy – speed is key here.

These trade goods were both designed and printed by yours truly. I’m pretty proud that I can actually create something that in my not so humble opinion looks very professional.

Click for a larger version

This is a gibbet (labeled a “hanging cage”) from WizKids, a part of their Deep Cuts range. Although you can’t really see it in the photo, there’s a little guy in there. I originally added a raven sitting on top of the gibbet, but managed to snap its tiny resin legs, so no luck there.

Click for a larger version

This rowboat is from the Depths of Savage Atoll Kickstarter, and printed on my FDM machine. It’s simple and easy to use in multiple settings, and the photo angle conveniently hides minor printing issues.

Click for a larger version

I can’t recall where I bought these resin pieces. They’re nice enough designs, but casting quality was awful – I had to spend quite a bit of time greenstuffing things up, and I pretty much painted these to be rid of them.

Click for a larger version

Here are two tree stumps that I got off Thingiverse. In the middle is a giant snake wrapped around another tree stump. The snake is another Depths of Savage Atoll piece, and printed by me in resin.

Click for a larger version

As these sort of photos can get a little boring, and I wanted a bit of photo play, I decided to stage some photos of them “in action”. This also gave me a chance to test my new photo backdrop, that I created from a cheap home decoration sticker – I think it works pretty well!

“Well gentlemen, these will fetch a tidy sum back in England.”

“You ever think about going pirate, George?”
“Nah, just look at this wretch here.”

“They say she can talk to snakes. Then again, they say a lot of things.”

Here’s hoping my next post is a bit sooner than a month from now. It’s been grant application writing season here, so not much time for anything fun. It’s letting up now, though, so time to get those brushes moving!

h1

From the painting desk #71 – A whale of a time

April 8, 2020

Ok, this is in fact more a case of a whale out of time. I finally finished painting up a wonderfully disgusting whale carcass from the Depths of Savage Atoll Kickstarter. Regular readers might remember that I showed this three-part print back in September. It sat for a long time undercoated on my desk, and as often happens in these cases, once I actually got to painting it, it was a decently quick affair. I tried to play it a bit loose and not get too fiddly – basically just washes, drybrushes and some very rough layering. The carcass looks horrible, but in a good way, I think.

Click for a larger version

Click for a larger version

Click for a larger version

It’s really relaxing to paint large, chunky pieces like this from time to time, it’s so different from the more intricate work required by 28mm or smaller minis. What’s more, painting something that’s supposed to look tatty, dirty and rotten, makes it even easier. It’s a rotting whale carcass, how neat does it need to be?

This will sit on a beach somewhere on Tyburn island, lending the place a quaint, nautical atmosphere. An old whale beached and eaten by scavengers, or a mighty ocean predator crushed by the Kraken? You never know…

I’ve been slowly building up (if not painting) a whole bunch of stuff to wash up on a shore – shipwrecks, half buried and broken barrels, driftwood, that sort of thing. I hope to make a kind of a ship graveyard at some point. This poor whale will fit right in.

In other news, there are no other news. Nothing is happening, I’m spending a lot of time working from home and quite enjoying it to be honest. Wrestlemania 36 was fun, the second season of Kingdom was really fun, season three of Castlevania was fun, the fifth season of Outlander is fun and a rewatch of Godzilla: King of Monsters reminded me that it was still fun, too. Life is not bad, all things considered. Hope you are keeping safe!

h1

From the painting desk #70 – Fountain

March 28, 2020

A quick piece I finished during an evening of lazy painting. This is a wonderful fountain from the Wightwood Abbey set (available as a freebie on Thingiverse) by Infinite Dimensions Games that I printed on my Lotmaxx SC-10. A simply paintjob of a grey primer followed by a liberal application of washes (Agrax Earthshade, Seraphim Sepia, Athonian Camoshade for the inside walls) and then drybrushed layers of sandy colours up to off-white, then some more mucking about with washes. In pieces like this it’s not usually a very systematic process for me, which I think helps me keep it looking more natural.

Photo of painted miniature fountain

Click for a larger version

I wanted the water look brackish and not too fresh, so went with a VGC Cayman green base and slopped on some lighter tones with plenty of Lahmian medium to help with blending. Once happy with it, I added three thick layers of gloss varnish. It’s not a super fancy water effect, but I like how it turned out!

The fountain was printed at a time when I was still experimenting with FDM printing (to be honest, I still am). While the layer lines aren’t nearly as pronounced as in the windmill I showed earlier, they’re still more visible than in my latest prints. However, I think the piece is perfectly adequate for gaming – especially considering it was free! As you can see from the Black Scorpion mini beside it, it’s a sizable piece.

In other news, I’m looking at getting some gaming mats just for setting up my minis and townscapes. If there’s something good to be said about this whole pandemic thing, it’s that more time at home means more energy for projects and more space for the imagination.

h1

A windmill

February 1, 2020

As the very, very imaginative post title suggests, this post is about a windmill. Said windmill is one of the early prints on my Lotmaxx SC-10, and is a free model from Thingiverse. As basically a test print using pretty poor quality filament, it has quite harsh layer lines and I couldn’t really be bothered to clean it up. I was already thinking of simply giving it away (as I’ve done with some other test prints), but figured I’d paint it up for fun. While it wasn’t all that fun – the windmill blades especially were a pain – I have to say I’m quite pleased with the end result, especially when viewed from a tabletop distance. The natural stone look turned out pretty nice! I threw in a couple of minis to act as a size reference. I think the Fezzik/André the Giant mini makes for a great miller, or at least a mill worker. The windmill blades actually spin, that obviously warrants a mention.

Click for a larger version

Click for a larger version

Click for a larger version

Luckily my newer prints are much smoother. The striated look on the close-up photo is exactly what I want to avoid, but then again: waste not, want not.

In non-miniature news (and pretty much explaining my lack of blog posts, I had my disputation last Saturday. Everything went well and I had a great time, so once the university paperwork is done, I get my PhD in education. My dissertation (in Finnish) deals with young people’s digital gaming – should you be interested, you can check out the summary here. And because it’s nice to occasionally share something outside the realm of minis, here I am posing, white tie and all, with one of my big brothers, my mother, and Emmi.

The happy family!

Back to the miniatures: with the windmill finished, I am now at 2/100 in my goal to finish 100 miniatures/scenery pieces during 2020. Might need to pick up the pace a bit.

h1

From the painting desk #66 – Gun battery

August 4, 2019

A little over a year back I got in on the Slug Industries Spanish fort Kickstarter and I’m happy to report that I’ve finally finished one of the pieces from it – a separate gun battery. I think the gun battery is a very iconic part of Caribbean pirate imagery, guarding those ports and looking menacing.

The paint job was a mixture of stippling, washing and drybrushing, and I probably should have kept notes as the fort itself will inevitably look different. I wanted a fairly light look, leaning more to brown and yellow than dark grey, and I’m quite happy with it.

You obviously can’t have a gun battery without guns, so I painted three cannon from Thomarillion to go with it. These were a right bastard to paint, mainly because I didn’t spray prime them, leading to those super annoying tiny tiny spots of bright unpainted metal hiding in nooks and crannies that you only spot when you think the mini is finished. As they are quite ornate pieces, I decided to paint them as bronze cannon and I think the effect is nice, I’m really happy with the tone!

Having started painting cannon, I came across a piece that I built during the very early days of my pirate project, four years back. As some faithful readers might remember, this is of course the Cagafuego which finally got painted. A massive, old WHFB Empire cannon on a scratch-built naval carriage, the Cagafuego makes for a nice centrepiece to the gun battery when heavier firepower (or plain old intimidation) is needed.

I was in a bit of a rush and photography is a little off as a result. I set up both a vanilla version with the regular cannon and a pirate-crewed Cagafuego version for some atmospheric shots.

Click for a larger version

Click for a larger version

Click for a larger version

Click for a larger version

Click for a larger version

Click for a larger version

Finishing this piece was a nice thing in many ways: there’s always a sense of accomplishment when you get a big item out of your painting queue, it was surprisingly quickly done (I spent one evening on it), it looks pretty Azazely awesome on the table and if I ever want to run a game, it’s a very playable piece for a scenario. Job well done, me!

h1

From the painting desk #65 – The Kraken Arms

July 22, 2019

Every pirate town needs a tavern, obviously. While I originally bought a Warbases modular building for this very purpose, it was when I came across a Citadel Lake-town house from the dreadful Hobbit films that I knew I’d found my tavern.

It’s a lovely piece of plastic kit that can be assembled in a couple of different configurations. I put it together to minimize the fantasy/medieval/Tudor aspects to keep it in line with the rest of my pirate buildings. In addition to the building itself, there are four pieces of jetty, a larger jetty platform for the building to sit on and an outhouse. There’s also a small rowboat that I haven’t painted yet.

My paintjob for both the jetty pieces and the building followed my usual formula, with a heavy reliance on washes and drybrushing. I went with a muted blue for the tavern itself with green for the door and window frames and some yellow curtains to add a splash of colour. I made the outhouse a very worn green. As you might notice, I couldn’t be bothered to shoot the tavern from every angle, but rather just rotated the building to show its different sides. Click on any photo for a larger view.

A shot of the full kit, showing the modularity

The kit is full of nice detail like this

An aerial view of the tavern

Wouldn’t swim nearby

Brighten up your tavern with some fresh mustard yellow curtains!

There was one part of the painting process that I had been dreading for a while: freehanding the tavern sign. While I’m happy with my painting skills when it comes to miniatures, I consider myself to be somewhat rubbish when it comes to freehanding anything more complicated than very simple glyphs or the like. Still, I wanted a tavern sign matching the tavern’s name – dubbed The Kraken Arms by this point – so it was time to grit my teeth and freehand an octopus. Quite surprisingly, it turned out pretty nice! In fact, nice enough for me to duplicate it on the other side of the sign as well. The sides are not identical, but very much passable. Did you know, by the way, that octopi do not in fact have tentacles, but arms? See, punny and scientifically correct.

Behold the mighty Kraken with its fairly cute little button eyes

Obviously you can’t have a tavern without people to run it. I had plenty of  potential customers in the form of grog-thirsty pirates, but an innkeeper was needed. I had luckily picked up a suitable mini (along with his wife) from Black Cat Bases some time back, so it was time to get them painted. I had a suitable Front Rank miniature lined up as well, so I decided to finish him too. I also asked Emmi to pick a mini for me to paint and she happened to pick out one from Black Tree Design’s Pirates of Treasure Island line that was very well suited to the surroundings so I’ll show him in this post while I’m at it.

Click for a larger version

Click for a larger version

This lot was really fun to paint! I’m a big fan of Black Cat Bases’ large, cartoonish style as well as Front Rank’s clean and simple elegance. The Black Tree Design pirate – the first from their Kickstarter that I’ve painted – took paint very nicely too. I love models like this with a limited number of elements, common in historical miniatures I think. A lot of fantasy stuff tends to be drowned in hundreds of buckles, straps, pouches, bags, daggers, more buckles and the like, and they get pushed back in the painting queue. Considering my backlog and slow painting speed, that is a long, long queue.

The innkeeper, wife and old pirate are obvious, but what do you think about the tubby man with the pewter tankard? Wealthy patron or greedy landlord?

I had a good time painting this lot, so I’m happy to enter them into Azazel’s Jewel of July community challenge! I need to do this kind of thematic thing more often, I think.

h1

Terrain upgrade

February 27, 2019

Like many other hobbyists (I assume), I have terrain pieces amassed through the years. After showing some old green hills in my previous post, I figured there might still be some use left in them. While I claimed they were from the 1990s, thinking back I’m fairly sure they’re mid-2000s as I remember us making them in my current apartment, so 10+ years old at least.

Click for a larger version

Now, when these were built, we prized durability a lot. The hills were carved from blue foam and then covered with a pva/sand mix. A phrase from an old White Dwarf sums it up: “In the morning you’ll need dynamite to shift it.” Of course the sand we used was a very cheap one, so it’s coarse as anything (and I’ve still got about 5-6 kg of it down in the basement). This in turn led to the hills (and the gaming boards built in the same manner) being terribly miniature-unfriendly. Basically, if you knocked a metal mini over, it was almost certain to chip. Good times!

Click for a larger version

I was already contemplating throwing the hills away, but as they already existed, I started thinking that they could be revived and actually put back to use. Out came the craft store acrylics, the static grass and the tufts, as well as some coffee stirrers, tea leaves and some sunken resin barrels and what do you know, they actually turned out pretty nice! The static grass helps with the aforementioned chipping issue too.

Click for a larger version

Click for a larger version

They can be used either as table edge pieces or put together to make a larger island. Painting them as islands obviously limits them to more nautical games, but I’m fairly certain I’ll have some of those with my lovely new ocean mat.

Click for a larger version

Here’s what they look like with scenery items and miniatures placed on the pieces.

Click for a larger version

Click for a larger version

I think it looks mighty nice! Finally, a before and after shot:

Click for a larger version

Sorry for the slightly overexposed quality of the photos, the pieces are so large that I had to rely on daylight rather than my usual lighting – and to be honest, I couldn’t be bothered to tweak camera settings.


h1

Custom mat from Deep-Cut Studio – a review

February 16, 2019

It just so happened, that I wanted a gaming mat for sea battles – possibly unsurprising considering my pirate infatuation. Turns out such a mat isn’t all that easy to find! You’d assume it to be a common gaming mat staple: a lovely, greenish-turquoise Caribbean seascape is pretty iconic and it’s not like pirate gaming isn’t popular. However, this assumption would be wrong. While there are seascapes available, many of them are very much a dark blue. This is nice in itself and probably fits most naval games wonderfully, but it’s not ideal for evoking a sunny Caribbean/West Indies feel. Furthermore, I wanted the mat to be mousepad material as it’s easy to store, lays flat and has a nice feel to it.

After doing plenty of googling and window shopping, I ended up looking at Deep-Cut Studios’ custom mat printing service, Print-O-Mat. I was overjoyed, now all I needed was a suitable image, and surely one would be easily available. How wrong I was. As is apparent in hindsight, you need a very big image for a quality print, and I was going for a 3x3ft map – roughly 90x90cm to fit my small table. While there are beautiful stock photos of Caribbean waters, you need a very high resolution for a high quality mat. After spending hours searching through various photo archives both free and commercial, I settled on something especially designed for the purpose: a printable battle mat image from Tiny Worlds. A bargain at $4.50, it suited my needs wonderfully. While it was also very blue, purchasing it as a file meant that I could simply use Photoshop to tweak it to my needs. I edited the colour balance to make the mat more green to evoke the correct genre feel.

Original on the left, colour-tweaked on the right

Pleased with the result, I headed to Deep-Cut Studios’ site and used their simple interface for creating the mat. The final price for a 90x90cm mat was around 40€ with a flat postage rate of 15€. Deep-Cut is situated in Lithuania, so no customs charges for a Euro customer. I was quite happy with the price altogether! The mat was very speedily delivered in a work week, and boy, was I impressed with the end result.

As you can hopefully see in the photos, the mat is crisp and vibrant. While colours are a tad darker than the original image, it’s still a faithful rendition and looks pretty much just like I imagined, and it should be noted that the lighting conditions and camera settings distort the colour in the photos! I threw down some super old hills that were originally made for WHFB way back in the 90s (I think) as well as some of my badlands/scifi cork outcrops that make for surprisingly nice rocky shoals. I love how it looks.

Click for a larger version

Click for a larger version

Click for a larger version

Click for a larger version

Overall verdict: I’m super happy with my custom mat. Great quality and quick delivery at a very reasonable price point. While a part of the credit obviously goes to Tiny Worlds for the original image, I’m really, really happy with Deep-Cut’s service and will likely use them again.

h1

Rubble City go go

February 1, 2019

Painted stuff! Not miniatures as such, but very useful nevertheless. Inspired by both Azazel’s monthly challenge and my lack of time to focus on miniatures, I figured it would be fun to add some generic scenery pieces to my table. All of these are from Fenris Games, one of my favourite companies for miniature terrain, and part of Fenris’ Rubble City range. For a change I figured I’d photograph the pieces on the gaming table!

Click for a larger version

I actually painted these fieldstone walls last year after buying them at Salute, but as I gave them a bit of touch-up, I thought to include them here as well. There’s nothing super special about them, but that’s pretty much what I like – they’re nice, clean and generic enough to go with pretty much anything.

Click for a larger version

There’s a similar charm to these rubble walls and corners that I got as part of Fenris’ Rubble City Kickstarter. Like the fieldstone walls, these are super clean sculpts and very crisp casts so a veritable joy to paint.

Paint jobs were simple, but I’m happy with the end results. I painted all the pieces using mainly craft store acrylics. I started with a dark brown base coat, stippled on browns and grays, followed with progressively lighter gray drybrushes. I then slapped on some Agrax Earthshade and finished everything with Athonian Camoshade (think Agrax Earthshade but green) at the base of each piece and painted splashes of the wash here and there. I think the stone looks quite naturalistic, which is what I was going for!

These are really useful gaming pieces, so I figure’d I’d show you a couple of shots with figures. The walls and ruins fit wonderfully into my Caribbean setting, but would definitely not look out of place on any fantasy or even modern table.

Click for a larger version

Click for a larger version

Click for a larger version

Click for a larger version