Posts Tagged ‘Aliens board game’

h1

All together now

May 14, 2012

Time to get back on the posting horse again, after my trip to Malaysia. I’ve been a bit busy lately, so really needed to stop for a moment and put a post together in order to keep this blog from going dormant.

I was recently asked to do a group shot of the terrain pieces I’ve finished for the Aliens board game, so I quickly rounded up the nine finished pieces and added some Colonial Marines and Aliens for style and scale. Below you can see the set piece of a valiant CM last stand.

Click for a larger version

Personally I think the miniatures and terrain pieces go together very nicely. What’s most important to me is that they capture that Aliens feel. Then again, I might just be blind to my own work, what do you think?

Also, I have to mention that I just got a new job as a project expert, working on a project focusing on preventing video gaming and gambling addiction in adolescents. So happy about this, as I actually get to combine my degree (MA in Education) with my interests and get paid to do it!

h1

Bursting with joy – Aliens game board update #5

April 21, 2012

Work continues on my Aliens game board pieces. This post showcases one of the larger pieces on the board, a large vent with a hapless colonist who has been used for Xenomorph breeding. He still grasps a pistol, but his arm has been secured into the wall to prevent him from ending his miseries prematurely.

Click for a larger version

Click for a larger version

The item is another case of trash bashing. It consists of a deodorant spray bottle cap, some bug screen, a gadget piece from an old Ral Partha Shadowrun mini, a few decorative beads, electrical conduit tubing and a hefty amound of silicone paste. I gave it my normal paintjob for this project. The metal parts were drybrushed first with Vallejo Oily Steel and then Vallejo Natural Steel. The Alien goo was given a drybrush first with Citadel Codex Grey and then Citadel Fortress Grey. It was then washed over with Citadel Badab Black and given a gloss varnish. The OSL from the red warning lights was simply drybrushed on with Citadel Blood Red. It gave me quite a headache, as I had to repaint it from the start once – you know, the “I’ll just add a little..ARGH! Well, I’ll fix it up with some more…ARGHHH! Just a little more then..ARRRGHG it looks horrible!” syndrome.

The colonist is a chopped up pre-painted plastic mini from the Horrorclix Aliens set. Too large to use with most 28mm miniatures, I’ve been trying to find a use for him as I have several. Here I chopped off his feet, crudely repositioned his arms (the paste handily covers the rough cuts on the shoulders), drilled a hole in his chest and then added some detailing with Procreate putty. The model has a suitably horrified expression as the original model is fittingly enough about the get attacked by a Xenomorph. I gave him Bishop-style blue-grey coveralls as they immediately remind me of Aliens. I think he turned out pretty nice, I guess all that zombie painting has helped with the dead look.

I’m very happy with how the piece turned out. The different parts fit together to form a nice whole. In my opinion, it’s the nicest yet on the board! I really liked constructing this, as it was kind of like a mini diorama. I might add an Alien egg on a separate terrain piece in front of the colonist to complement this one. Comments welcome, as always.

I’m leaving for Malaysia for two weeks tomorrow for some kung fu training, so the blog will be quiet for a while. Fear not, I’ll get back to updating once I’m back here in sweet Finland.

h1

More hive accessories – Aliens game board update #4

March 20, 2012

Work on the board is progressing steadily. Since the last post I’ve managed to complete five more obstacle pieces for the board. Shown below are four normal, one square filling obstacles.

Click for a larger version

The first one is a collection of beads and hardware store goods. The second one is a hollow wall anchor (as shown in the previous post). The third one is a container from Ainsty. It has been heavily alienized with conduit tubing and insulation paste. The fourth one is a small container from Ainsty. It has been left clean, as some parts of the reactor room will be relatively free of infestation.

The fifth piece I’ve completed is a large obstacle covering four squares.

Click for a larger version

I have no idea what it is. It’s built out of a toilet bowl cleaner bottle cap, two wooden IKEA furniture pegs and two small beads. It looks scifi-ish enough I think. I was even adventurous enough to try some OSL when painting it. I tried to convey the look of emergency/alarm lights, and I think it came out ok.

Comments, criticism, new ideas? Hit me!

h1

Accessorizing the hive – Aliens game board update #3

March 4, 2012

This is an update on my Aliens game board project. I’m at a point where I’ve glued most of the magnet pieces to the game board. I’d show you pictures, but it’s not much to look at currently, just black squares on a foam board. I’m going to focus on something much more interesting, in other words the various obstacles dotting the board. These are based on magnets, and should be pretty interchangeable throughout the board. I had three guidelines for these:

  1. Quick and easy. On a quick count, I need to make 23 of these. Since I want to eventually finish the board, I don’t want to spend an hour on each, but rather be able to churn them out at a steady rate, while still having them look nice enough.
  2. Cheap. See above. While it would be lovely to have 23 exquisite resin terrain pieces, I’m trying to keep my costs down.
  3. Large enough to block LoS. In the board game, all obstacles block line of sight. Me being something of a pedant at times, I didn’t want obstacles so small that I couldn’t see them blocking line of sight.

These guidelines were easy enough to follow. So far I’ve constructed three pieces, and I’m happy with all of them.

Click for a larger version

The first one is composed of a hollow wall anchor, available from hardware stores for a few euros per a bag of four or five. I removed the screw in the middle for an instant scifi-industrial looking structure. Next I added on some electrical wire and conduit tubing, applied a liberal amount of insulation paste and left it to dry. I then sprayed everything black and gave the Alien goo two drybrush layers of grey (GW Codex Grey and Fortress Grey) followed by a black wash (GW Badab Black). The visible part of the wall anchor was given a drybrushing first with VMC Oily Steel and then VMC Natural Steel. I finally gave the Alien parts a layer of gloss varnish for a wet look and to create more contrast between the alien and the man-made. The final step was to add a few drops of Scotch universal glue gel. As it began to dry, I stretched it around with a toothpick to create strands of that sticky resin the Xenomorphs tend to leave around, the messy critters they are.

Click for a larger version

The second one basically consists of a resin container from Ainsty. I simply glued it on a piece of magnetic sheet, which I’d covered with plastic bug screen to match the game board. Some insulation paste was added to Xenomorph it up a bit. Again I sprayed everything black, and then drybrushed the container with a suitable colour (GW Shadow Grey), and painted the Alien stuff as above, with the same gloss varnish treatment. While this piece is generally more expensive than the previous one, I happened to have the Ainsty bits around already, so I didn’t have to buy new stuff specifically for this.

Click for a larger version

The third terrain piece is a very simple, cheap scratchbuild. Like all of my hive accessories, there’s a square piece of magnetic sheet. On that I glued a 30mm stainless steel washer. On top of the washer I glued a plastic base from a Mantic miniature, and covered that with a small square of bug screen. I then glued four beads in the corners to look like rivets. Once more out came the black spray, followed by painting the steel like above. There was one problem, however: guideline #3, the line of sight one. Nice enough as it was, there was no way that flat ventilation thing would block line of sight. However, as I’m a clever little monkey, I’d taken this into account! I glued some white craft wool to the grid to represent steam billowing up (sadly not too visible in the photo), and gave it a spray of matt varnish to keep it in shape. Quick, easy, cheap as chips and guaranteed to block your LoS.

Here’s a final shot comparing them with a Woodbine miniature. I think they look fine. Opinions?

Click for a larger version


h1

From the painting desk #14 – Colonial Marines

February 28, 2012

I just completed these five models. They were specifically painted for my Aliens board game project. What these five models reminded me of is that I [expletive] hate batch painting. It’s dull, it’s dreary and it takes most fun out of the area of the hobby that I enjoy most – painting. After much eye-rolling, cursing and exasperated sighs, they’re finally finished – luckily they turned out alright. All miniatures except Frost (holding a pistol), who is a conversion of an em4 plastic trooper, are Woodbine Colonial  Marines. They were nice enough to paint, and I pretty much just followed my regular recipe for painting CMs. I’m quite happy with how some things turned out, such as Vasquez’s darker skin colour. Some of the teeth sculpted on the models make them look a bit squirrel-ish, but who’s counting.

Painted Colonial Marines

Click for a larger version

With all the minis I need for the project now finished, I can move on with the game board as well!

h1

Hive pageant – Aliens game board update #2

February 13, 2012

After my last post I’ve received very good comments regarding the hive walls. I agree that the first test piece was lacking that biomechanic look so iconic to the Alien franchise, so I went to work on different prototypes. I bought some electrical wire (as it’s very cheap and holds its shape) and using blue foam offcuts and Tetra paste I knocked together three prototypes for hive wall styles. I’ve shown them painted, with everyone’s favourite smartgunner Drake for comparison. What do you think? They’re still lacking all sorts of lumps, holes, glue-goo, gloss varnish, ribbing and things like that, but these should give a rough idea. None of them are quite right, but I have a feeling I’m getting there. They are a bit sparse, for one, so I really need to add a lot more stuff in.

First test – While I like the spinelike ribbing on the vertical struts, I quickly noticed that the background desperately needs texture. It’s also a bit too spider web looking.

Click for a larger version

Second test – In this one I like the organic look of the tubes. It’s much too sparse, though. The addition of a simple texture to the wall makes a huge difference.

Click for a larger version

Third test – In my opinion this is the most Gigeresque of the test pieces. I like the ribbed texture on the wall. A lot of the wire was left exposed to create a smooth look. I used some heavy drybrushing to emulate Giger’s airbrushed style.

Click for a larger version

In my own opinion there are good elements in all of them that could/should be combined. I hope you’ll agree that these are much closer to H.R. Giger’s aesthetic than my previous outing. There are two styles of hive wall that I’ve spotted in the films. One is a very random, swirly, gooey one, whereas the other one is very much straight-off Giger with less “bio” and more “mechanical”.

Here are some shots from Aliens to illustrate the look I’m trying to achieve. There’s obviously a lot of randomness, as well as plenty of organic looking strands of Xenomorph resin. Of course I’ll need to leave some original walls showing through as well to create a contrast between the man-made and the alien.

Click for a larger version

Click for a larger version

Click for a larger version

Now’s the time for comments. As you can see, I’m teetering between different options so input is very valuable at this time. Don’t be afraid to be critical, either!

h1

Dry heat – Aliens game board update #1

February 10, 2012

The Aliens board game game board (tee-hee) project I announced a while back is going strong. In this post I’ll take a look at what’s happening with it.

The board

In the previous post I wondered about a suitable flooring texture – brass and resin alternatives were too costly. I considered textured styrene sheets, but couldn’t find a suitable texture. In the end I settled for a cheap and easily handled material: plastic bug screen. It provided me with a nice mesh texture, and perhaps most importantly it was dirt cheap. I bought a large offcut sheet for 5€, and it’s over twice the size I needed.

Yesterday I cut a suitable shape from the sheet and glued it over the board with watered-down PVA. I left the staircase portion unglued. After the glue had dried, I carefully removed the rectangle with a craft knife. The bug screen has the added bonus of showing through the markings I made on the board earlier.

Click for a larger version

Today the mailman brought me the magnetic sheets that will be used to attach the terrain pieces to the board, so today will probably see some test fitting – not to mention testing whether the magnets have a strong enough hold. If they don’t, it’s back to the proverbial drawing board.

Accessories

The game board is clogged with various obstacles, and I’ve slowly gone to work on them as well. Shown below are some of the things I intend to use.

Various scifi bits and bobs from Ainsty. I bought these earlier to use in my Triton-4 Aliens/Predator/Colonial Marines campaign – which might or might not return. They’ll serve their purpose wonderfully here as well.

Click for a larger version

Scratch-built junk. Every miniature gamer hoards up things they might need one day. Lo and behold, this is “one day”! Out will come the random bits bought from hardware stores, beads, offcut pieces of sprue and miniatures and things like that. This project is a fine way to use them, since a lot will be covered more or less with Xenomorph gunk (more on that below). There is one innovation I’m actually proud of, and that’s using my Mantic bases. I’ve assembled quite a few from ghoul and zombie sets, and until now I’ve had no use for them. Now I’ve combined them with some of the extra bug screen I have, and they make wonderful exhaust vent -type thingies. A slight problem is that in the board game all obstacles block line of sight. In Aliens, however, there is steam billowing all around the reactor room (“Yeah, but it’s a dry heat!”), so I’m thinking of using craft wool to simulate steam issuing from the vents.

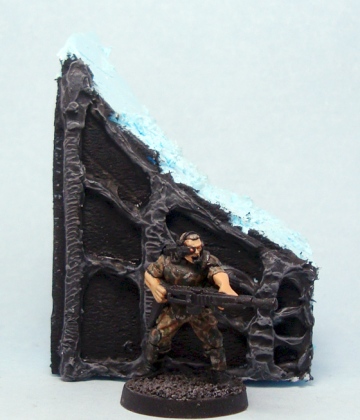
Alien gunk. This gave (and might still be giving) me a hard time. While I love the biomechanical Xenomorph look, it’s a bastard to recreate in larger quantities. Ready-made resin sets exist, but that would rapidly escalate the costs of this project – something I definitely don’t want. My current choice is to go with Tetra paste, which is a somewhat elastic paste for sealing windows, bathroom tiles and the like. This doesn’t produce a neat, organic surface, but rather a creepy, gooey one. It can be crudely shaped and takes paint well. Below is a quick mock-up using a blue foam offcut and some paste. On the right you can see the same piece with a quick, patchy paintjob (black with grey drybrushing, ink wash, I’ll later add some strands of glue for that sticky look) and a Marine to give you an idea of how it looks. Definitely let me know what you think. In my opinion it looks nice enough, even if it is a slight departure from the source material.

Click for a larger version

Miniatures

Unsurprisingly I have a whole lot of Colonial Marines. All I needed to do was pick out a suitable selection to match the characters in the film. I took some liberties to save me some time. What I needed was Apone (flamethrower), Crowe (pistol), Dietrich (flamethrower), Drake (smartgun), Frost (pistol), Hicks (shotgun), Hudson (pistol), Vasquez (smartgun) and Wierzbowski (flamethrower). Surprisingly I had less than half of suitable minis for these fellows painted. Like the Marines in the film, the lack of pulse rifles proved troublesome.

Here are the painted ones. Apone and Drake are from em4, while Crowe and Hudson are from Copplestone Castings.

L to R: Apone, Crowe, Hudson, Drake. Click for a larger version

And the unpainted ones. Apart from Frost they’re all Woodbine designs models. Frost is an as-of-yet unfinished conversion of an em4 plastic trooper.

L to R: Dietrich, Frost, Hicks, Vasquez, Wierzbowski. Click for a larger version

That’s the project so far. Comments and critique, send them my way!

h1

This time it’s war – in 3D

January 13, 2012

With my Blood Bowl team pretty much done (pictures coming up soonish), and armed with experience gained from building my BB pitch, I’ve decided to start a new project. I went through my boxes of old stuff some time ago, and dug out the old Leading Edge Aliens board game that I bought for a pittance years and years ago. I’ve played this game so many times in my teens, due to its solo play option.  I remember sitting in my room at the age of 14 or 15, and just playing the game over and over and over again.

Aliens board game

Click for a larger version

It wasn’t too difficult to form the following chain of thought: “Hmm, I really want to play this game again” to “I have loads of Colonial Marine and Alien miniatures” to “I wonder if the playing board accommodates 28mm miniatures – no” to…oh, you know how it goes. So now I’m looking to build a 3D gaming board to recreate the main – and in my opinion best – scenario from the game. It’s of course the reactor room one, where most of the CM squad is ripped apart. It’s a pretty difficult and brutal mission, but perfectly captures the feeling of the movie. Don’t believe me? Try the Flash version and come back!

With this in mind I picked up a sheet of blue foam and the Aliens game board and did some calculations. The original board is 14 by 25 squares. When I translated the squares to 30mm ones and left some extra room at the sides, it amounted to a 42,3 cm by 75,3 cm board. Perfectly reasonable size, only a bit larger than my Blood Bowl pitch. Storage is always an issue for me when it comes to wargaming scenery. Or rather, it has started to become an issue due to not being an issue before.

The Blood Bowl pitch project certainly taught me something, and that was to be careful with measurements and cutting. As a result, the Aliens board is much more symmetrical and the square grid much more even. I used the same push-pins and string -technique to build the grid, and used a felt-tip marker to mark the corners of the squares. Much more fun an easy than with the pitch.

After doing the grid, I marked down or the obstacles on the board so I know what to build and where, and that’s where I’m now. I’m thinking of attaching the various bits and pieces of the game board – at least the larger ones – with magnets, so they can be removed for easier storage.

Click for a larger version

(No, it’s not that irregular – the camera angle’s doing some nasty tricks there!)

What’s next? I’m thinking of buying a suitable plastic or metal mesh to use as flooring. While there are some nice stuff in resin and etched brass out there, I’m trying to optimise the cost/looks ratio. For the obstacles it’s going to be lots of scratch building, green stuff and some resin accessories I have stashed away. That’s one great thing about starting projects, especially thematically similar ones: you can use leftovers or stuff bought for something else easily. And of course I have all the Marines and Aliens I need already.

Ideas, comments, insight and encouragement warmly welcomed.