Archive for the ‘Tutorials’ Category

h1

Bottled up

May 30, 2019

For a growing time I’ve been frustrated with Citadel’s paints – or paint pots, to be exact. While the paints are in general very nice, year after year Games Workshop seems to go for worse and worse lid designs. The result? Paints that I’ve used only a couple of times have dried into a sludge because the pot failed to close properly due to paint getting between the lid and the pot and drying there. After whining and moaning I decided to do something about it, went on eBay and got a bunch of cheap dropper bottles. I then simply followed this tutorial:

A couple of episodes of iZOMBIE and some elbow grease later, I have this:

Citadel paint in dropper bottles

Click for a larger version

As you can see, I didn’t have to work with all that many paints. There are a few reasons for this, the first one being that because of rubbish lid design, I have refrained from buying the newer Citadel pots. Also, because of said rubbish lid design, some of the ones I have bought have already gone in the trash. I also decided to keep Citadel’s washes (which are runny enough not to dry in the lid) in their original pots as I find them easier to use that way.

Suitably for this post you can see a bunch of older paint pots in the background, with a far, far superior lid design. I mean, I’ve literally had some of these pots since I started with miniatures back in 1996 or so, and they’re still usable. Now back in the day we…

How the new bottles hold up in regular use remains to be seen, but I’m very hopeful!

h1

There Will Be Blood – a gore painting tutorial

August 7, 2012

A lot of miniature painters like to paint blood on their minis. I think most of us have at some point painted that splash of red on a sword blade or something similar – I know I did that with probably the third or something mini I painted back in the roaring 90s. Nowadays I don’t have too many blades to paint, but tend to dabble in zombies, Xenomorphs and all sorts of critters that leave splashes of blood around. Gore is definitely called for. In this tutorial I will show a few quick and simple techniques for painting gore – wounds, blood spatters and the like.

Lately TCR or Tamiya Clear Red has been all the rage in the world of gore painting, and rightfully so. It produces a very nice, realistic effect when used correctly and looks great when properly done. Just google “tamiya clear red blood tutorial” and you’ll see what I mean. Unfortunately the TCR method doesn’t really fit my style of painting, as it results in a very glossy, sticky look whereas I tend to make my miniatures as matte as possible, using gloss for choice bits such as visors or scopes. This is what I do when I need to paint some gore:

Step one – Red base

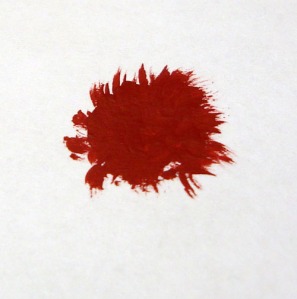
Take some dark red paint. My choice was Citadel’s Mechrite red, which according to Citadel’s paint conversion chart (pdf link) is currently Mephiston red.

Apply said red paint around wherever you wish to have gore. Remember, sometimes less is more! Painting half of the model red isn’t always the best possible solution.

Click for a larger version

Step two – Brown ink

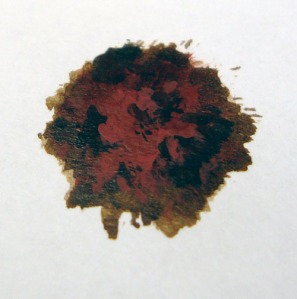
Paint some brown ink (I used Citadel’s old Brown ink, but any thickish dark brown will do) over the red. Don’t obscure the red completely. It’s more effective if you let the brown pool up in some places for a thicker, coagulated look. Depending on how dirty you want your blood to look, you can stay within the red or slightly overlap its edges.

Click for a larger version

Step three – Black ink

Dab some black ink (I used Citadel’s old Black ink) around. Blood tends to be quite dark, especially when it dries and coagulates. For a zombie, more black may be appropriate. At this stage you may already call your gore finished.

Click for a larger version

Step four – Red highlight (optional)

At this stage you can add some highlights with the original base color. Especially suitable for wound edges and the like.

Click for a larger version

Step five – White (optional)

Gruesome wounds? Add some bone fragments for that little bit of extra. You can give them a light brown inking, depending on how much you want them to stand out.

Click for a larger version

Aaaand that’s it. To finish the tutorial off, below are some of my examples. If you end up using this, do send me some pictures!

Click for a larger version

Click for a larger version

Click for a larger version

h1

Very tough hombres – a Colonial Marine painting tutorial

May 24, 2010

After posting about the Colonial Marine that I painted, I got a few requests for a tutorial on how I painted him. Since I was looking for one when I started, and ended up doing a bit of research on the subject, I figured I’d make a tutorial myself. Probably spurred on by the release of the new edition of Space Hulk, there’s a surprisingly large number of people gaming the Aliens universe, so I hope this is of use to someone. And even to those not painting Colonial Marines, this tutorial details a simple way of painting a fairly generic scifi trooper. Since I’m not a pro painter by a long shot, this tutorial should be fairly easy to follow. There’s no wet-blending, NMM or fancy stuff like that.

Throughout this tutorial you can click on photos to enlarge them in a new tab. As you’ll probably notice, the colours vary from photo to photo a bit. This is due to the fact that I shot the photos whenever I did some painting, meaning some were taken in bright daylight while others were taken in the middle of the night, not to mention using wrong camera settings etc. Photoshopping them all consistent would’ve been a huge chore, so I chose to live with them. I hope you can too.

Step one – Miniature

You can’t have a tutorial without a miniature to paint. As I posted earlier, I’ve picked Mark Copplestone’s scifi troopers (available from em4, Copplestone Castings and Mirliton) as my Colonial Marines. This particular miniature is a a trooper from em4.

The unpainted trooper

Step two – Research

The second thing I did was look for reference material. It’s a surprisingly simple step that is often neglected. Simply by browsing pictures of what you’re about to recreate helps you immensely. With Google’s image search, this couldn’t really be any simpler. I simply typed in “colonial marine” followed by “armor/weapons/bdu/etc”. If you’re really lazy, you can just click here. The internet is full of people collecting movie props and replicas, which helps miniature painters to no end.

These are some of the (shamelessly plundered – will take down on request) pictures I went with:

Colonial Marine BDU

Armour from Screamin’ Eagle studios (http://tinyurl.com/screagle), click for a larger version

Step three – Basecoat

Em4’s miniatures come ready with a grey basecoat. While this is usually really helpful, I’m completely rubbish at painting over anything other than a black basecoat. This was quickly remedied with a touch of black paint.

Black basecoat added

Step four – BDU base colour

Next I painted the BDU (Battle Dress Uniform) with VGC (Vallejo Game Color) Khaki. Nothing special here, being neat helps.

BDU painted VGC Khaki

Step five – Armour base colour

I then painted the trooper’s armour, armour straps and the pouches on his belt with VGC Cayman Green. As you may have noticed, what I’d interpreted as being the collar of the model’s BDU turned out to be a part of the armour. Probably. Don’t you just hate things like this?

Armour painted VGC Cayman Green

Step six – Skin and hair base colours

Next came the skin, using Citadel’s old Bronzed Flesh. This is an old paint that I have, and I believe it might’ve been licensed from Coat d’Arms. The hair was painted with VGC Khaki.

Skin and hair painted with Citadel Bronzed Flesh and VGC Khaki

At this point our trooper is starting to look something like an actual, painted miniature, albeit a cheap, prepainted plastic one. Now we start the fun(-ish) stuff, or in other words:

Step seven – BDU camo first colour

Painting camo tends to put people off for some reason. I don’t really understand why! It’s time-consuming of course, but it’s also really simple. I started with Citadel Graveyard Earth, and simply painted small irregular patterns/blotches on the BDU. I left fairly much empty space between the patterns, since I’d still need to squeeze in a second colour.

First BDU camo patterns with Citadel Graveyard Earth

Step eight – BDU camo second colour

In this step I simply repeated the procedure of the previous step, using VGC Cayman Green. I tried to be as neat as possible, and not have the two camo colours overlap. And just like that, we have camouflage! As you might notice, for this picture I remembered to flick on my camera’s correct settings.

Second BDU camo patterns with VGC Cayman Green

Step nine – Brown ink

To darken the armour a bit and to better bring out the folds in the BDU, I next gave the armour a thin coat of Citadel Brown ink and painted some of it in the cloth folds as well. The armor will  usually look a bit messy. Don’t worry. It’s just a phase it’s going through.

Citadel brown ink on armour and BDU folds

Step ten – Armour camo first colour

Checking the reference photos above shows that there’s camo on the armour as well. The patterns are a bit larger, so I took this into account. I used the same Citadel Graveyard earth paint as on the BDU. Note that I didn’t paint any camo on the armour straps.

First armour camo patterns with Citadel Graveyard Earth

Step eleven – Armour camo second colour

Next I finished off the armour camo by adding a second colour. The paint I used is an old Coat D’Arms one, and I have absolutely no idea of its name. It’s a darkish green, feel free to improvise to your own taste.

Second armour camo patterns with dark green

Step twelve – Armour weathering

A Colonial Marine’s armour is bound to get scuffed up a bit as he goes about the galaxy gunning down things, so my last step in painting armour was adding a little damage. I used Miniature Paints Chainmail, don’t know if you can find it anywhere. Any darker silvery metallic will do, though. I painted damage along the edges of armour as well as random scratches. Again the reference pictures are a great help.

Armour weathering with Miniature Paints Chainmail

Step thirteen – Skin shading

Since the skin was still flat at this point, my next step was to apply some Citadel Flesh Wash to the recesses, like between fingers, eyesockets etc.

Skin shaded with Citadel Flesh Wash

Step fourteen – Skin and hair highlighting

I finished off the skin with a highlight of Citadel Bronzed Flesh mixed with VGC Bone White, and the hair with a mix of VGC Khaki and VGC Off White. I like my highlights very subdued, and am not really a fan of the style of highlighting to pure white.

Skin and hair highlighted with lighter versions of base colours

Step fifteen – Highlighting the equipment

I have to make a confession here. I hate highlighting black, and am sick and tired of it, especially after these guys. Because of that, I really took an easy way out here, and simply highlighted every black item (weapon, headset, boots, gun holster, binoculars) on the Marine with Citadel Codex Grey and smoothed it down a bit with  Citadel Black Ink. It’s quick and easy and delivers a good enough result. The same mentality went into highlighting the green ammo pouches. I mixed a lighter highlight colour from VGC Cayman Green and VGC Off White, and highlighted the edges. I didn’t want the equipment to be focal points in the mini, so I didn’t spend much time and effort on them.

Black equipment highlighted with Citadel Codex Grey and dulled down with Citadel Black Ink, green equipment with lighter shade of base colour

Step sixteen – Finishing touches

Nearly there! I painted the eyes, based the model (sand, Citadel Fortress Grey, Citadel Black Ink, drybrush with Fortress Grey) and gave it a coat of gloss varnish followed by a coat of matt varnish to take away the shine.

The finished model

And there you go! A happy little Colonial Marine ready to die gruesomely in the hands of your extra terrestrial of choice. I’d love to get feedback on this post. Of course, if you use this tutorial, I definitely want to see the results!

That’s it. Game over, man, game over.

h1

Dead Simple – A quick zombie painting tutorial

May 3, 2009

The coolest thing about zombies for the wargamer? There are lots, so they look lovely on the table.

The worst thing about zombies for the wargamer? There are lots, which equates to a lot of work.

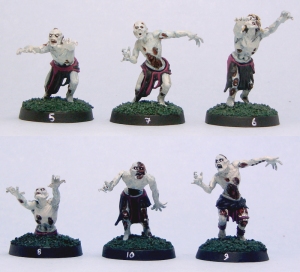
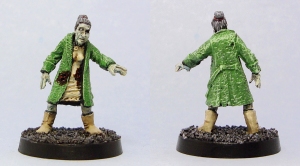
This tutorial will provide a quick and easy way to paint zombies to a good gaming standard. It leaves the painter room to embellish, too, while being easy enough for even a budding painter to produce fine results. So there’s a bit of something there for everyone. This style of painting is especially useful for some of the cheaper and rougher zombie miniatures on the market, but with a bit more attention works just as well for the classier ones too.

The principle? Zombies – whether you’re painting modern or fantasy models – are just regular people, with the notable exception of being dead. Hence, their clothing and equipment will paint up just like it would on any other model. Where the whole zombie-thing kicks in, is the whole ”dead” part.

For this tutorial I picked one of the Mega Miniatures zombies, a true flower child who has found himself a juicy leg and is now literally one of the Grateful Dead.

Unpainted model

Unpainted model

Step 1: Pick up your favourite zombie model. Or, if you’re just starting on your zombies using a tutorial, one that you don’t really like that much.  Clean the model as usual, and prime it black. We are looking for a finished zombie that’s dark and menacing, and a bit dirty. A black basecoat will help you with that.

Step 1: Basecoat the model black

Step 1: Basecoat the model black

Step 2: Paint the zombie’s clothing and equipment just like you would on any other model. Don’t touch the skin yet. I like to experiment on zombies’ clothing and other details, using different techniques. If something looks awful, you can just slap some blood on it. The mini will be lost amidst your horde, anyway.

Step 2: Paint clothing etc.

Step 2: Paint clothing etc.

Step 3: Paint the skin with the palest skin tone you have. You can go as far as ivory (a yellowish, natural white). Don’t worry about the paint not covering the black basecoat all that well, and don’t paint too thick layers on. In fact, the black basecoat shining through will add to the skin’s blotchy, dead appearance. Doing this also saves you time, which is lovely when you have dozens of zombies lined up for painting.

Step 3: Paint the skin.

Step 3: Paint the skin

Step 4: Give the zombie’s skin a light blue wash, using either a very thinned down blue paint or ink wash (I use GW’s old blue glaze). Don’t overdo it, you want a zombie instead of a blue-skinned alien. You can also experiment with different shades of blue and green for different end results. Make sure the wash ends up all over the skin, especially on places you want to accentuate, such as the eyesockets.

Step 4: Give the skin a light blue wash

Step 4: Give the skin a light blue wash

Step 5: Use a very thinned down black ink (again, I use GW’s) to accentuate some shadows (as in step 4, the eyesockets are important, as are cheekbones) even further and generally ”dirty up” the zombie. The deeper shadows give the zombie a more menacing, gaunt and even deader look. If you want to use the black ink to add some splotches of dirt to the zombie’s clothing, now’s a great time.

Step 5: Use black wash to accentuate shadows

Step 5: Use black wash to accentuate shadows

Step 6: The blood. Yes, there’s always blood. I like my zombies bloody and gruesome, death by undead should never be too pretty. Take some brownish red paint (GW’s Mechrite red for me), and add loving splashes of it on the model. Use your imagination! How did he die? Throat torn out? Paint a lot of blood on the throat and down the front of his shirt. Has he eaten someone? Some blood around the mouth and chin. The zombie carries a weapon, did he defend himself before he died? And so on, you get the point. Again, don’t overdo it. You don’t want to end up with a walking clot of blood. Actually, if you do then feel free to overdo.

Step 6: Add blood

Step 6: Add blood

Step 7: Simple red paint won’t do. It just looks fake and too clean, doesn’t it? Paint liberally over it with dark brown ink (GW, surprisingly). Let the ink overlap the paint’s borders for a more natural and dirty look. You’re gunning for the gross-factor here. Messy, dirty, icky. Let your imagination run free. A lot of blood seeping into the zombie’s clothing? Paint a lot of brown ink on it for a darker overall effect.

Step 7: Paint over the blood with brown ink

Step 7: Paint over the blood with brown ink

Step 8: Dot in some black ink to represent coagulated and dried blood. By now your zombie should look fairly awful, in a good way. I also added some black ink to the eye sockets at this point, since that will make the eyes stand out more.

Step 8: Dot in some black ink

Step 8: Dot in some black ink

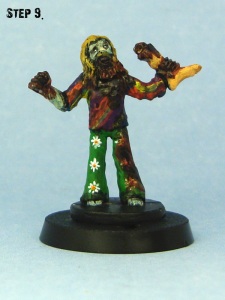
Step 9: Paint the eyes. I simply use a drop of very light grey, white’s fine too. Don’t bother with pupils, the full-grey eyes will look creepier and more dead. You can also pick out other detail, such as teeth. For once, don’t stress too much if the eyes end up a bit lopsided. They’re zombies, they don’t mind.

Step 9: Paint the eyes

Step 9: Paint the eyes

Step 10: Base the model to your liking, and you’re done!

Step 10: Base the model

Step 10: Base the model

And next? Just repeat this procedure a hundred times or so, and you’ll have a miniature zombocalypse on your hands. Oh, and if someone actually tries this tutorial out, I’d love to see the results!