Posts Tagged ‘em4’

h1

Genbu by Zenit Miniatures – a review

April 18, 2014

I usually spend money on miniatures somewhat sparingly. Or rather, I do consider price quite a lot when making my purchases, although I end up spending lots of money nevertheless. Usually this means I steer away from keywords such as “limited edition” or “boutique” or “for collectors” when it comes to miniatures. Despite this, every now and then I run into something exceptionally interesting that makes me break this rule, and I end up doing a review like the one that follows after this unnecessarily long intro.

As regular readers know, I’m working on a project inspired by the movie Pacific Rim, and thus I’m on the lookout for interesting monsters and giant robots. I visited Salute 2014 a week ago, and I ran into a miniature I’d seen on a news site before and noticed, but which had slipped my mind – Genbu by Zenit Miniatures.

Click for a larger version

Click for a larger version

Genbu is a giant, bipedal turtle monster with a snake for a tail, and a part of Zenit Miniatures’ Kensei line. If the concept sounds strange, it has its roots in Chinese (and later Japanese) mythology, and you can read more about it here. Genbu also links directly into the kaiju genre, as it’s undoubtedly the inspiration behind Gamera.

The model comes in seven parts: main torso, shell, tail and four limbs. Normally I would classify this as a nightmare, as I loathe putting metal miniatures together after too many cases of ill-fitting and poorly cast parts requiring literally hours of filing, sanding, cutting, pinning and filling to fit. Zenit Miniatures’ offering was a positive surprise in this respect: the parts fit together well right out of the box. There are joins that need filling, but the model doesn’t appear to require pinning – although you may want to do that with the tail due to the small surface for attaching it. The shell especially snaps into place in a very, very satisfying manner. The one glaring exception to this is the left leg, which I simply couldn’t get to fit well, and will require filling of the joint.

Both the torso and the inside of the shell are hollow, in a smart move to reduce the amount of metal needed. Genbu stands at 45-46mm from soles to top of head, so the model is impressively sized and will work as a giant monster in smaller scales or an ogre sized one in 28mm. There’s a separate square plastic base included, but I mounted mine on a standard 40mm round base.

Sculpting on Genbu is excellent. The sculptor has managed to make a wonderfully characterful giant turtle monster with a gnarled, well textured skin. My only complaint is that the model was originally supposed to be a giant Kappa (see here for original concept art, notice the distinct lack of tail) and as such the Genbu model still has a patch of hair-like texture on top of its head, which doesn’t quite fit in. Even though it can be painted to match the skin, the texture is obviously different. Casting quality is very good, with crisp detail and very little flash. There are some noticeable mould lines but they were quick and easy to clean.

Praise upon praise then, any downsides? Yes. There’s one obvious one that I mentioned right at the start. I bought Genbu at £18.60, and on the Zenit Miniatures site it retails at €19.95. Nice as the model is, that is a hefty price compared to many competitors on the market and will sadly put potential customers off buying it. The model comes with nice packaging – a padded cardboard box with a full colour sleeve around it. I can’t help seeing this as somewhat too much. I don’t know the actual packaging costs, but this grates on me a from an ecological viewpoint as well. I’ve added a photo below showing the actual space the model takes up vs. the size of the box. Then again, the lovely packaging did catch my eye, but it’s a very rare case that I actually by something from a brick and mortar store. If I was mail ordering Genbu, the shipping would add an extra €5 to the price, bringing it to €24.99 and probably keeping me from buying it. Then again, I know a lot of people are used to spending lots more on a single mini than I am, so your mileage may vary!

Click for a larger version

A smaller box maybe?

As usual, I added a size comparison picture. I also added a 28mm miniature, as Genbu is intended to be a large creature in that scale.

L to R: Pacific Rim Heroclix Knifehead, em4, Genbu, Reaper CAV Weasel

L to R: Pacific Rim Heroclix Knifehead, em4, Genbu, Reaper CAV Weasel

Overall verdict: Genbu is pricey, but you do get a very nice model for your money. Good, clean sculpting and very nice casting with (mostly) well fitting parts mean that you won’t pull your hair out putting the model together. If you’re on the lookout for a great giant turtle monster to spice up your games, whether they’re giant monster ones or something else, you could do far worse. Also, if you leave out the tail, this is the nicest Gamera in miniature form you’ll probably find.

You can get Genbu direct from Zenit Miniatures.

h1

From the painting desk #21 – More Utopia

April 14, 2013

Wow, this is actually my 250th post. While the blog hasn’t been updated as frequently as before, I ensure you it’s still going strong. As the blog now has a quarter of a thousand posts, I figured I’d give you a look at what’s up.

As you can’t have failed to notice, I’ve been running a near future military scifi campaign for a while now. With seven games played (AAR #7 coming soon!) this is the longest campaign I’ve run in good long while, and both I and the players have really enjoyed it. You can find the associated posts by checking out everything tagged Utopia. The campaign has not only allowed me to use a lot of my miniatures, but also has really inspired me to paint minis and build terrain a lot. Deadlines help too!

Click for a larger version

Click for a larger version

Anyway, it’s on with the minis in chronological order. First up is a hunting beast for my Predators. The miniature is actually a hellhound by Heresy with the choice of a skeletal head. I really liked the idea of Predators using dog-like hunting creatures as shown in the Predators film. This one’s by no means a full match, but I think it looks fearsome and alien enough. Like practically all of the Heresy multipart minis, I had plenty of work getting the hound to a paintable state. There were some heavy mould lines and the fit of the parts really wasn’t stellar. After I’d all but finished painting it, I found out to my delight that I’d missed a glaring mould line on the hound’s side. As I didn’t want to ruin the paintjob, I painted some scarring over it, which I think turned out nice.

Click for a larger version

Click for a larger version

Next up is a conversion. While originally painted for Utopia, this fellow hasn’t appeared on the field so far. It’s actually the late-ish Pvt. Jane, who was captured fighting the Terminators. As you can see, he has been subjected to horrible experimentation and has been made into a cyborg. The model is a warbot from Pig Iron Productions with a head from Puppetswar and a minigun from Maxmini. I think the parts work nicely together and combine well to make a really intimidating figure. The paintjob is super simple, with basically just washes and drybrushing on the bulk. I paid more attention to the face, and I think it turned out looking pretty good. That resin head is pretty awesome, and I basically made this conversion just so I could justify buying the head…

L to R: Trill, Cohl, Abdul, Dastevan. Click for a larger version

L to R: Trill, Cohl, Abdul, Dastevan. Click for a larger version

Up next is a bunch of Utopia troopers – Trill, Cohl, Abdul and Dastevan. Nothing too special here, they were all given my typical trooper treatment. Trill is a Hasslefree mini, Cohl is a SWAT sniper from Foundry and Abdul and Dastevan are both from em4. I think Cohl is a good example of how a paint job can really change the way a model looks.

Click for a larger version

Click for a larger version

Topping off the post is General Hyun – set to appear in the upcoming Utopia AAR #7. Hyun is a Copplestone Castings miniature and I’m really really happy with him. Somehow those greys just turned out lovely and the uniform looks very crisp. I rarely get the feeling that I really nailed a mini, but with this one I’m patting my own back. Please refrain from posting ego-crushing comments!

h1

From the painting desk #17 – More Colonial Marine specialists

August 30, 2012

It’s a busy time here, with plenty of work. I’ve got a few new projects in the pipeline, and surprisingly this doesn’t even mean I’ve dropped my old ones. The Colonial Marines are still rolling out and they’re slowly moving towards a more generic futuristic army. My latest addition to the force consists of three models from three different manufacturers.

A while back, Paul a.k.a Sho3box commented on how he felt that the Colonial Marines deserved better leadership than that of the inept Lt. Gorman in Aliens.

Click for a larger version

Enter this officer from Copplestone Castings. With his simple stance and his hands behind his back, he really looks like he means business. I’m guessing actual combat drops instead of simulated.

Next up is a CM operating a sentry gun. The model is from Woodbine, and I really like the pose, with the trooper sitting on his knees and casually holding his rifle. I painted the laptop’s screen to suggest that it’s being used to control the sentry gun. I like the way his paintjob turned out, and I’m especially happy with the five o’clock shadow I painted on his face. The sentry gun is from the same set, and it’s a very nice piece of hardware as well. It will join my four em4 sentry guns to help my marines dish out loads of automatic, motion tracking death. The laptop’s screen didn’t photograph too well, due to the gloss varnish on the screen.

Click for a larger version

Click for a larger version

Speaking of em4, they produce the third model of this trio. I decided that attaching some form of special forces to the Colonial Marine strength would be fun, so I’m currently painting up these troopers in berets. I settled for a black beret with a silver/steel badge, and in my opinion it looks suitably special force-y. What do you think?

Click for a larger version

A fun batch to paint, all were minis that painted up nicely. I ran into a terrible hitch during spray varnishing, as for some reason – humid weather I guess – my Army Painter matt varnish left the models with a horrible, gritty texture and turned all the blacks grey. After some brooding I went back and did a lot of fixing on the minis. The next run with the same can of spray went without a problem, so despite the setback the minis are finally finished.

As always, comments and critique welcome!

h1

From the painting desk #16 – Marine specialists

June 3, 2012

My Colonial Marine force is steadily progressing from being a small group of models to be used in Space Hulk towards being an actual fighting force of troopers, maybe eventually used in one game or another. My fairly relaxed approach to this project has enabled me to use all sorts of minis as USCM, and this post details another such case. This time it’s three different specialists. They’re all straying from the Aliens movie – you don’t see these guys in the film.

First up is a sniper. The model is a Games Workshop Imperial Guard trooper from the Schaeffer’s Last Chancers set. I’ve cut down the barrel way back when I bought them to make it look less like a lasgun. Looking back, I don’t really regret it.

Click for a larger version

The second model is a support weapon gunner from Defiance Games. Part of their multi-part UAMC marines, I painted this one up to see how they look like when painted as Colonial Marines. Can’t say I’m disappointed, so the DG marines will definitely be joining my force.

Click for a larger version

The third one is a conversion. Not a very complex one though! He was originally an em4 trooper carrying a laser. In my opinion lasers and CMs simply don’t go together, so I chopped down the barrel and added a massive flamer nozzle from GW’s plastic Catachan set. To further enhance the flamer look, I added a small canister from the same plastic flamer to the side of the backpack. I like how it turned out, as it does look like a pretty bad ass heavy flamer.

Click for a larger version

Finally, here’s a group shot of all three. I think they work nicely together despite different manufacturers. As I’ve said, uniform basing and …uniform goes a long way.

Click for a larger version

h1

All together now

May 14, 2012

Time to get back on the posting horse again, after my trip to Malaysia. I’ve been a bit busy lately, so really needed to stop for a moment and put a post together in order to keep this blog from going dormant.

I was recently asked to do a group shot of the terrain pieces I’ve finished for the Aliens board game, so I quickly rounded up the nine finished pieces and added some Colonial Marines and Aliens for style and scale. Below you can see the set piece of a valiant CM last stand.

Click for a larger version

Personally I think the miniatures and terrain pieces go together very nicely. What’s most important to me is that they capture that Aliens feel. Then again, I might just be blind to my own work, what do you think?

Also, I have to mention that I just got a new job as a project expert, working on a project focusing on preventing video gaming and gambling addiction in adolescents. So happy about this, as I actually get to combine my degree (MA in Education) with my interests and get paid to do it!

h1

Sizing up

March 2, 2012

To my regular readers, apologies in advance. The post mentions a fair few points that I’ve made earlier, so there’ll probably be a feeling of repetition here.

Miniature size/scale is one of those things that tends to come up whenever different ranges are discussed. Some people will stalwartly refuse to combine different ranges in their games, if they’re not stylistically compatible. I used to be one of these people. However, as years have gone by I’ve started to alter my stance. See, the Colonial Marine review I did left me with a slew of miniatures from various manufacturers, in different sizes and styles. As I tend to favour a “waste not, want not” approach when it comes to miniatures (and stuff in general), I figured that the differences weren’t such a problem.

I think that one of the main reasons for the aversion to mixing sizes and styles comes from the way we view miniatures. Most comparisons are done at eye level, setting the miniatures next to each other and noting all the differences. However, when gaming we view the minis from what – half a metre, metre (that’s two to three feet for all you silly ancient measurement system types) up? In most games they aren’t next to each other either, and our eye will probably focus on the uniting factors, such as paint schemes and basing, instead of the differences.

Allow me to demonstrate. In the pictures below there’s a variety of scifi miniatures from six different manufacturers painted with a similar colour scheme. There are major differences in size and proportions, and viewed next to one another, the ranges certainly don’t look too compatible in terms of size and style, although the paint scheme and basing does help.

L to R: Woodbine, Denizen, Copplestone, 1st Corps, Hasslefree, em4, em4 plastic. Click for a larger version

Let’s have a look at the picture below. For some obscure reason my Marines have wandered onto a Blood Bowl pitch, where they are about to take on the Drakwald Ravens who are incidentally another group of miniatures of various styles and manufacturers. The photo is taken from a gamer’s eye view, e.g. me sitting down and viewing the game board from a usual gaming height. See my point? The same size and style differences are still present, but in my humble opinion they are far less prominent, even to the point of being negligible. The eye is drawn to the different bases (green vs. grey) and colour schemes (the Marines’ green and camo vs. the Ravens’ black and purple). What we have here is not a motley collection of miniatures of various sizes and styles, but rather two coherent factions.

Click for a larger version

Your mileage may vary, of course, but I believe that sticking too adamantly to a single manufacturer’s ranges will sometimes unnecessarily limit your options. Naturally if you’re painting miniatures only for display, it’s another story. If not, do something wild (well, ‘geek-wild’) and try mixing two or more ranges if you haven’t already.

Crazy, I know!

h1

From the painting desk #14 – Colonial Marines

February 28, 2012

I just completed these five models. They were specifically painted for my Aliens board game project. What these five models reminded me of is that I [expletive] hate batch painting. It’s dull, it’s dreary and it takes most fun out of the area of the hobby that I enjoy most – painting. After much eye-rolling, cursing and exasperated sighs, they’re finally finished – luckily they turned out alright. All miniatures except Frost (holding a pistol), who is a conversion of an em4 plastic trooper, are Woodbine Colonial  Marines. They were nice enough to paint, and I pretty much just followed my regular recipe for painting CMs. I’m quite happy with how some things turned out, such as Vasquez’s darker skin colour. Some of the teeth sculpted on the models make them look a bit squirrel-ish, but who’s counting.

Painted Colonial Marines

Click for a larger version

With all the minis I need for the project now finished, I can move on with the game board as well!

h1

Hive pageant – Aliens game board update #2

February 13, 2012

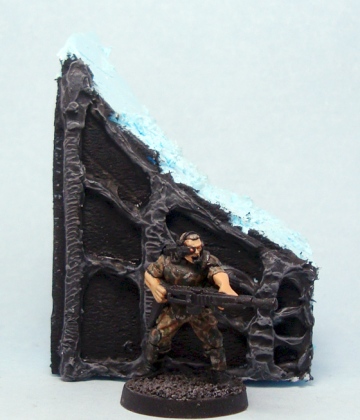
After my last post I’ve received very good comments regarding the hive walls. I agree that the first test piece was lacking that biomechanic look so iconic to the Alien franchise, so I went to work on different prototypes. I bought some electrical wire (as it’s very cheap and holds its shape) and using blue foam offcuts and Tetra paste I knocked together three prototypes for hive wall styles. I’ve shown them painted, with everyone’s favourite smartgunner Drake for comparison. What do you think? They’re still lacking all sorts of lumps, holes, glue-goo, gloss varnish, ribbing and things like that, but these should give a rough idea. None of them are quite right, but I have a feeling I’m getting there. They are a bit sparse, for one, so I really need to add a lot more stuff in.

First test – While I like the spinelike ribbing on the vertical struts, I quickly noticed that the background desperately needs texture. It’s also a bit too spider web looking.

Click for a larger version

Second test – In this one I like the organic look of the tubes. It’s much too sparse, though. The addition of a simple texture to the wall makes a huge difference.

Click for a larger version

Third test – In my opinion this is the most Gigeresque of the test pieces. I like the ribbed texture on the wall. A lot of the wire was left exposed to create a smooth look. I used some heavy drybrushing to emulate Giger’s airbrushed style.

Click for a larger version

In my own opinion there are good elements in all of them that could/should be combined. I hope you’ll agree that these are much closer to H.R. Giger’s aesthetic than my previous outing. There are two styles of hive wall that I’ve spotted in the films. One is a very random, swirly, gooey one, whereas the other one is very much straight-off Giger with less “bio” and more “mechanical”.

Here are some shots from Aliens to illustrate the look I’m trying to achieve. There’s obviously a lot of randomness, as well as plenty of organic looking strands of Xenomorph resin. Of course I’ll need to leave some original walls showing through as well to create a contrast between the man-made and the alien.

Click for a larger version

Click for a larger version

Click for a larger version

Now’s the time for comments. As you can see, I’m teetering between different options so input is very valuable at this time. Don’t be afraid to be critical, either!

h1

Dry heat – Aliens game board update #1

February 10, 2012

The Aliens board game game board (tee-hee) project I announced a while back is going strong. In this post I’ll take a look at what’s happening with it.

The board

In the previous post I wondered about a suitable flooring texture – brass and resin alternatives were too costly. I considered textured styrene sheets, but couldn’t find a suitable texture. In the end I settled for a cheap and easily handled material: plastic bug screen. It provided me with a nice mesh texture, and perhaps most importantly it was dirt cheap. I bought a large offcut sheet for 5€, and it’s over twice the size I needed.

Yesterday I cut a suitable shape from the sheet and glued it over the board with watered-down PVA. I left the staircase portion unglued. After the glue had dried, I carefully removed the rectangle with a craft knife. The bug screen has the added bonus of showing through the markings I made on the board earlier.

Click for a larger version

Today the mailman brought me the magnetic sheets that will be used to attach the terrain pieces to the board, so today will probably see some test fitting – not to mention testing whether the magnets have a strong enough hold. If they don’t, it’s back to the proverbial drawing board.

Accessories

The game board is clogged with various obstacles, and I’ve slowly gone to work on them as well. Shown below are some of the things I intend to use.

Various scifi bits and bobs from Ainsty. I bought these earlier to use in my Triton-4 Aliens/Predator/Colonial Marines campaign – which might or might not return. They’ll serve their purpose wonderfully here as well.

Click for a larger version

Scratch-built junk. Every miniature gamer hoards up things they might need one day. Lo and behold, this is “one day”! Out will come the random bits bought from hardware stores, beads, offcut pieces of sprue and miniatures and things like that. This project is a fine way to use them, since a lot will be covered more or less with Xenomorph gunk (more on that below). There is one innovation I’m actually proud of, and that’s using my Mantic bases. I’ve assembled quite a few from ghoul and zombie sets, and until now I’ve had no use for them. Now I’ve combined them with some of the extra bug screen I have, and they make wonderful exhaust vent -type thingies. A slight problem is that in the board game all obstacles block line of sight. In Aliens, however, there is steam billowing all around the reactor room (“Yeah, but it’s a dry heat!”), so I’m thinking of using craft wool to simulate steam issuing from the vents.

Alien gunk. This gave (and might still be giving) me a hard time. While I love the biomechanical Xenomorph look, it’s a bastard to recreate in larger quantities. Ready-made resin sets exist, but that would rapidly escalate the costs of this project – something I definitely don’t want. My current choice is to go with Tetra paste, which is a somewhat elastic paste for sealing windows, bathroom tiles and the like. This doesn’t produce a neat, organic surface, but rather a creepy, gooey one. It can be crudely shaped and takes paint well. Below is a quick mock-up using a blue foam offcut and some paste. On the right you can see the same piece with a quick, patchy paintjob (black with grey drybrushing, ink wash, I’ll later add some strands of glue for that sticky look) and a Marine to give you an idea of how it looks. Definitely let me know what you think. In my opinion it looks nice enough, even if it is a slight departure from the source material.

Click for a larger version

Miniatures

Unsurprisingly I have a whole lot of Colonial Marines. All I needed to do was pick out a suitable selection to match the characters in the film. I took some liberties to save me some time. What I needed was Apone (flamethrower), Crowe (pistol), Dietrich (flamethrower), Drake (smartgun), Frost (pistol), Hicks (shotgun), Hudson (pistol), Vasquez (smartgun) and Wierzbowski (flamethrower). Surprisingly I had less than half of suitable minis for these fellows painted. Like the Marines in the film, the lack of pulse rifles proved troublesome.

Here are the painted ones. Apone and Drake are from em4, while Crowe and Hudson are from Copplestone Castings.

L to R: Apone, Crowe, Hudson, Drake. Click for a larger version

And the unpainted ones. Apart from Frost they’re all Woodbine designs models. Frost is an as-of-yet unfinished conversion of an em4 plastic trooper.

L to R: Dietrich, Frost, Hicks, Vasquez, Wierzbowski. Click for a larger version

That’s the project so far. Comments and critique, send them my way!

h1

Campaign building blocks

July 14, 2011

For any miniature game, you generally need the following: miniatures, terrain and rules. In this post I’ll do a bit of an inventory of what of each of those three elements I have available for Triton-4.

Miniatures

It should come as no surprise that as far as miniatures are concerned, I’m pretty well covered. As a result of both my own collecting and my Aliens, Predator and Colonial Marine miniature reviews I’m nicely stocked. I also have a few other nasties in store, which I’ll save until later. Just in case my players happen to read this.

I just received the scientists and utility crew that I ordered from Victory Force Miniatures. Joining them is be the not-Bishop from Woodbine Designs. I’ve also been thinking of ordering more inspectors from Heresy. Inspector Knuckles is already doing his rounds as a combat synthetic, and I think that with matching paint jobs the more peaceful-looking others would make for nice additions to the crew. I will need the civilian types to add some variety to the games, as they can be for example objectives (“Find the missing synths”), targets for rescue or protection (“Escort the scientists to the crashed ship”) or simply random encounters (“A feverish colonist staggers out of the jungle”).

I’ve also been thinking of investing in an APC for the CMs, probably this from Old Crow.

Shown in the pictures below is the current cast for the campaign, starting with the Marines.

Click for a larger version

I think the photo very nicely demonstrates the benefits of a unified  colour scheme. The fifteen Marines above look like a unit. Look a little closer, and you’ll see there are big variations in body proportions, style and gear. The models in the picture above come from no less than seven different manufacturers (em4, Copplestone, Prince August, 1st Corps, Denizen, Hasslefree and GW), and yet the simple paint scheme and unified basing tie the models together nicely. There are a lot more CMs waiting to be painted, but these guys and gals are a good start.

28 mm Predators

Click for a larger version

Here are my Predators, sans the wonderful Hürn from Heresy, who sits almost finished on my painting desk. Being bigger than the others, he’ll make for a nice pack leader.

Horrorclix Aliens

Click for a larger version

And here are as many Xenomorphs that I could cram into one picture. They’re missing their mommy, since the queen was far too big to fit in and is not yet finished.

Terrain

I’ve been working more than usual on my terrain. I currently have 16 CDs covered with jungle terrain. When I placed the first bunch on the table, I noticed that they looked a bit too sparse. This is due to the fact that I wanted to be able to position models on the pieces, as well as simply skimping on my terrain building materials. The newer ones that I’ve built are much more dense, and will be scattered around to create the illusion of a thicker jungle. I’m also intending to build small vignettes of some jungle pieces. Maybe a few skinned corpses? Chestburst animals? A cluster of eggs?

I’ve also been wanting to use a large outdoor fountain element ever since I bought it (see this post from a year back). Thus far it has seen no action whatsoever, but will surely be utilised here.

I also received a bunch of scenic elements from Ainsty – crates, barrels and the like – which I’m using to make something to represent a military camp. I’ve also just ordered some barbed wire pieces from Products for Wargamers, more supplies from Old Crow and sandbag walls from Fantascene.  The should make a nice, Vietnam war -style jungle camp. For the time being I will settle on a temporary looking camp, and as the campaign progresses, I’ll maybe add something to it, such as landing pads etc.

Here is most of my current terrain setup on my gaming boards in a few different configurations.

Click for a larger version

Here’s the table in its entirety. I placed a Marine communications setup in the middle as well as some CMs to show the size of the table.

Click for a larger version

Here’s a close-up of the comm setup. The dish is from a plastic toy, the pole a piece of an old GW building and the pegs around it from an IKEA bookshelf. The beacon in the middle is from Ainsty, and the barricade from a plastic army men set. The plants are aquarium plants. I’ve used different flocks to differentiate the camp terrain from the jungle. However, I’m also trying to convey the feeling that the jungle quickly creeps in around whatever the humans build.

Click for a larger version

Here’s the monstrous fountain element. It’s so big that I’ll probably need to add a third table (I have four sheets) to accommodate it. See the lone Marine for scale. I think I’ll have entire scenarios centered on this piece of terrain, since its build is very good for that. Just imagine the Marines defending the mouth of that gully, and you’ll see what I’m getting at. Or just take at this little diorama from way back when I bought it.

Rules

This section is the easiest and most complete. Flying Lead from Ganesha Games suits my needs nicely. It’s a fast-flowing system, which leaves plenty of room for narration and improvisation while also presenting players with tactical dilemmas and the like. As GG’s games use similar mechanics, I should be able to easily port extra rules from Fear and Faith, GG’s horror game.

We had our first playtest last week, and really enjoyed it. The system worked fine for what we’re going after, so I’m really pleased. We also worked that playtest already into the campaign – naturally it was the final bootcamp simulation before the actual mission.

So there, my plans so far for the campaign. Now I turn to you, dear readers. Tens of heads are usually better than one, so feel free to provide me with ideas, tips and even requests. Are there minis you think I could use? Got an idea for a terrain piece or vignette? Send them in, I’ll be eternally grateful and hopefully use them.

I’ve also been thinking of making a small tutorial on how I made the jungle pieces. Is there a call for an article like that?