Posts Tagged ‘Mega Miniatures’

h1

From the painting desk #8

December 31, 2010

This post will have the massive honour of being my last post this year. I’ve been painting a bit lately, and it’s time to show what I’ve been up to.

First up is a zombie from Mega Miniatures. Nothing fancy. The model had been on my desk for ages, so I spent an hour or so to get him off the desk and into the cabinet. A very simple paintjob, and I love going to town with the blood spray effect, which I think makes the sledgehammer even more brutal.

Click for a larger version

The next one is a zombie punk rocker from Recreational Conflict (go here for my review). I put some more work into her, and I think it shows. The presence of The Disciple inspired me to use some of my understandably less used paints, and I think they really made the punk rock look work.

Click for a larger version

There’s a bit of a Warmachine fever sweeping our gaming group, and yes, it appears I’m getting into a new game system. What can you do, the models are just too lovely. I picked Khador as my faction of choice, as I really love their visual style. I’d also previously bought some Khador widowmakers to use as engineers/champions in my WHFB Empire army. They went into their originally intended service instead, and here’s the first of them painted. I think he came out pretty nice. I have to mention though, that bleedin’ steampunk basically means straps, straps, buckles, piping and straps. All of which are a pain to paint. Can’t have everything, I guess.

Click for a larger version

With these I’d like to wish you all a happy new year! Keep painting, gaming, blogging and spending indecent amounts of money on miniatures and assorted largely useless paraphernalia. I know I will.


h1

My zombie horde

March 1, 2010

For a zombie blogger and miniatures collector, I have surprisingly few painted zombies, only around 50 or so. Since I was asked to show more of my painted stuff, I figured I’d put up my horde along with some closeups of my favourites.

Here’s my “horde” in full. 50+ models don’t look like much, do they? At the moment they’re a mix of  GW plastic zombies, GW plastic Catachans, Mega Miniatures, Recreational Conflict, Ral Partha and Copplestone Castings. Additionally there’s one model each from Heroquest, GW Imperial Guard, Warzone, HorrorClix, and HeroClix.

Click for a very large version

I already showed some of my favourites in the post on GW plastic conversions, but there are others as well. Here’s a selection:

The Zombie Patient is a repaint of a HorrorClix model. It’s quite an improvement, don’t you think? Sorry for the horrible quality on the comparison original, I had to snatch it from an older pic and resize it. The promotion picture for the model was far better looking than what I received. Also note the change in lighting. White daylight bulb on the left.

Click for a larger version

Zombie Kids are always fun and creepy. The following three are all from Mega Miniatures. The freehand on all models rather shows that I’m not really that focused on neat painting on zombies, they’re very much test pieces to try stuff on. These ended up looking nice enough for the tabletop, though.

Click for a larger version

The Chewed Up Shambler from Recreational Conflict is a nice model. I usually give my zombies fast, rough paintjobs and it shows. Here, however, I wanted to try and paint a zombie to the standard that I use on other models, and I’m very happy with the result. If I only had the time and patience to do this on all zombies!

Click for a larger version

The Classic is an old Grenadier mini – still available through Mirliton – from the 80s, making it probably as old young as I am. I started my gaming with Dungeons & Dragons (or actually Miekka ja Magia, the first Finnish RPG, which was basically a simplified D&D) with my big brothers, and this also introduced me to miniatures. This Frankensteiny zombie dates back to those days, and it was a moment of great nostalgy for me to paint him. The model show its age, but is still one of my favourites.

Click for a larger version

The Neo-Nazi is a conversion based on a HeroClix thug, with a GW zombie hand and head, and the other arm cut off. Simple, characterful and effective in my opinion.

Click for a larger version

The Rambo is a GW Catachan jungle fighter. The left leg has been cut up and repositioned and the head glued on in a zombie-ish angle. The hanging left arm adds to the effect. The right wrist that he’s missing was used in the soldier zombie conversion shown in the previous post. This model is a nice example of how simple it’s to make zombies out of other models, especially if they’re plastic. With very little work you could transform a full box of plastic troopers into zombies with limb repositioning.

Click for a larger version

The Officer is a metal GW Imperial Guard model from the Last Chancers box set. The left hand was holding a massive weapon, so I cut the wrist off and replaced it with a plastic one from the Catachan set. The model ended up looking like it’s reaching for someone, and the bandages and torn clothing only enhance the zombie appearance. The Officer is another example of a zombie that I spent a bit more time painting as I liked the model too much to just give him a basic zombie slap-on.

Click for a larger version

The Jogger and The Beach Bum are my own sculpts, so I naturally gave them more attention than my usual zombie fare. While the sculpts aren’t that great, I think they look very nice painted and certainly don’t look out of place in my horde. The feeling of painting metal that you’ve sculpted yourself, man that was cool.

Click for a larger version

Click for a larger version

I’ve got plenty more to paint, and I’m slowly starting to attack my backlog. Anyway, here’s what I have managed to do so far. I’d be happy to hear your comments, as usual.

h1

Dead Simple – A quick zombie painting tutorial

May 3, 2009

The coolest thing about zombies for the wargamer? There are lots, so they look lovely on the table.

The worst thing about zombies for the wargamer? There are lots, which equates to a lot of work.

This tutorial will provide a quick and easy way to paint zombies to a good gaming standard. It leaves the painter room to embellish, too, while being easy enough for even a budding painter to produce fine results. So there’s a bit of something there for everyone. This style of painting is especially useful for some of the cheaper and rougher zombie miniatures on the market, but with a bit more attention works just as well for the classier ones too.

The principle? Zombies – whether you’re painting modern or fantasy models – are just regular people, with the notable exception of being dead. Hence, their clothing and equipment will paint up just like it would on any other model. Where the whole zombie-thing kicks in, is the whole ”dead” part.

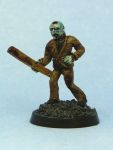
For this tutorial I picked one of the Mega Miniatures zombies, a true flower child who has found himself a juicy leg and is now literally one of the Grateful Dead.

Unpainted model

Unpainted model

Step 1: Pick up your favourite zombie model. Or, if you’re just starting on your zombies using a tutorial, one that you don’t really like that much.  Clean the model as usual, and prime it black. We are looking for a finished zombie that’s dark and menacing, and a bit dirty. A black basecoat will help you with that.

Step 1: Basecoat the model black

Step 1: Basecoat the model black

Step 2: Paint the zombie’s clothing and equipment just like you would on any other model. Don’t touch the skin yet. I like to experiment on zombies’ clothing and other details, using different techniques. If something looks awful, you can just slap some blood on it. The mini will be lost amidst your horde, anyway.

Step 2: Paint clothing etc.

Step 2: Paint clothing etc.

Step 3: Paint the skin with the palest skin tone you have. You can go as far as ivory (a yellowish, natural white). Don’t worry about the paint not covering the black basecoat all that well, and don’t paint too thick layers on. In fact, the black basecoat shining through will add to the skin’s blotchy, dead appearance. Doing this also saves you time, which is lovely when you have dozens of zombies lined up for painting.

Step 3: Paint the skin.

Step 3: Paint the skin

Step 4: Give the zombie’s skin a light blue wash, using either a very thinned down blue paint or ink wash (I use GW’s old blue glaze). Don’t overdo it, you want a zombie instead of a blue-skinned alien. You can also experiment with different shades of blue and green for different end results. Make sure the wash ends up all over the skin, especially on places you want to accentuate, such as the eyesockets.

Step 4: Give the skin a light blue wash

Step 4: Give the skin a light blue wash

Step 5: Use a very thinned down black ink (again, I use GW’s) to accentuate some shadows (as in step 4, the eyesockets are important, as are cheekbones) even further and generally ”dirty up” the zombie. The deeper shadows give the zombie a more menacing, gaunt and even deader look. If you want to use the black ink to add some splotches of dirt to the zombie’s clothing, now’s a great time.

Step 5: Use black wash to accentuate shadows

Step 5: Use black wash to accentuate shadows

Step 6: The blood. Yes, there’s always blood. I like my zombies bloody and gruesome, death by undead should never be too pretty. Take some brownish red paint (GW’s Mechrite red for me), and add loving splashes of it on the model. Use your imagination! How did he die? Throat torn out? Paint a lot of blood on the throat and down the front of his shirt. Has he eaten someone? Some blood around the mouth and chin. The zombie carries a weapon, did he defend himself before he died? And so on, you get the point. Again, don’t overdo it. You don’t want to end up with a walking clot of blood. Actually, if you do then feel free to overdo.

Step 6: Add blood

Step 6: Add blood

Step 7: Simple red paint won’t do. It just looks fake and too clean, doesn’t it? Paint liberally over it with dark brown ink (GW, surprisingly). Let the ink overlap the paint’s borders for a more natural and dirty look. You’re gunning for the gross-factor here. Messy, dirty, icky. Let your imagination run free. A lot of blood seeping into the zombie’s clothing? Paint a lot of brown ink on it for a darker overall effect.

Step 7: Paint over the blood with brown ink

Step 7: Paint over the blood with brown ink

Step 8: Dot in some black ink to represent coagulated and dried blood. By now your zombie should look fairly awful, in a good way. I also added some black ink to the eye sockets at this point, since that will make the eyes stand out more.

Step 8: Dot in some black ink

Step 8: Dot in some black ink

Step 9: Paint the eyes. I simply use a drop of very light grey, white’s fine too. Don’t bother with pupils, the full-grey eyes will look creepier and more dead. You can also pick out other detail, such as teeth. For once, don’t stress too much if the eyes end up a bit lopsided. They’re zombies, they don’t mind.

Step 9: Paint the eyes

Step 9: Paint the eyes

Step 10: Base the model to your liking, and you’re done!

Step 10: Base the model

Step 10: Base the model

And next? Just repeat this procedure a hundred times or so, and you’ll have a miniature zombocalypse on your hands. Oh, and if someone actually tries this tutorial out, I’d love to see the results!

h1

From the painting desk #1

April 28, 2009

Lately I’ve been painting zombies by Mega Miniatures. The Screaming Alpha has posted an excellent review of these, which I completely agree with, so instead of typing all that again I advise you to pop over to TSA and read the review. And while you’re there, subscribe to the feed, it’s an excellent blog!

The Mega Miniatures zombies are a joy to paint. While they aren’t the most detailed or crisp of sculpts, they can be brought to life (awful pun, sorry) by relatively simple painting. In fact, the upcoming zombie tutorial got started while I worked on these fellows. I hope the few pictures below serve to illustrate on one hand the roughish sculpting but on the other hand the way the characterful models start to look a lot lovelier with a suitable paint job. Click on the images for larger pics.

And a final shot with all of my so far painted MM zombies, including a few lovely zombie kids and the delightful zombie hooker. Don’t let her nom on your junk.


h1

The road to a good tutorial

April 26, 2009

For the past few weeks I’ve toyed with the idea of writing a small tutorial on how to paint zombie miniatures. Eventually I up and wrote the thing, and with my new camera arriving last Friday, the tutorial is well on its way. I actually went through the tutorial and took photos of the process, and realized that in order to take a series of miniature photographs you need a fixed camera + lights setup. At least if you want  the photos to be similar in hue, exposure and color balance. I do, don’t know about you people.

The tutorial itself is a simple 10 step guide from this:

step01

to this:

step9

…with the tenth step being “base to your own liking.” The tutorial is fairly quick. As mentioned before, I’m a conscientious painter and as such my painting tends to take a lot of time. With this technique I’m painting a couple of solid zombies in one evening, from basecoat to varnish. For me this – painting a model in an hour or less – is like speedracing and as such prompted me to write it up. I hope to get the tutorial with full photos up next week, once I have the whole photo setup ready.