Without further ado, six days into the new year and I’ve finished my first painted things. Granted, they’re simple ones but you have to start somewhere!
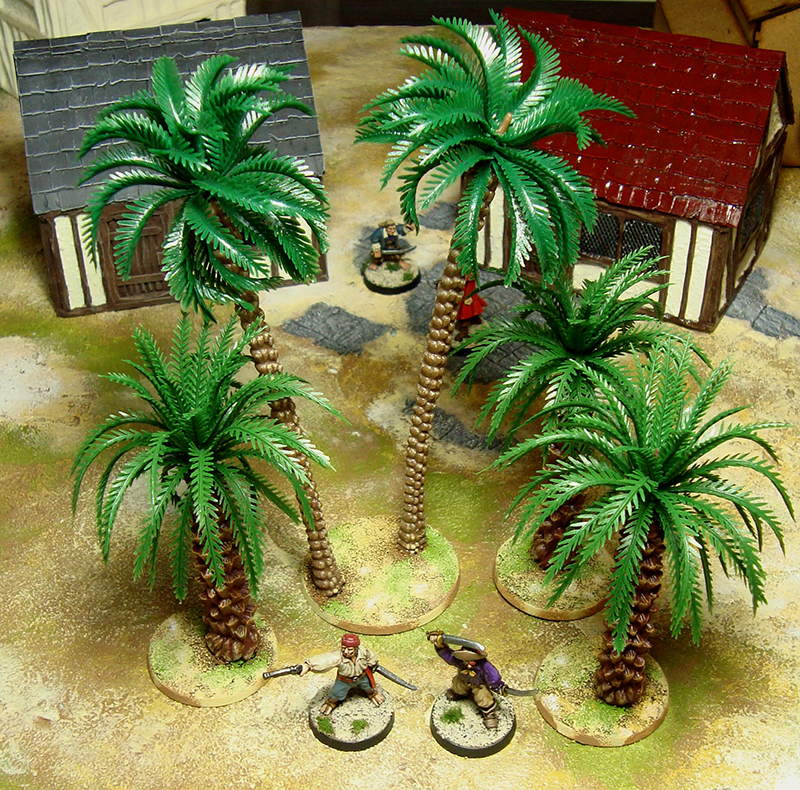
Palm trees
I bought two varieties of plastic palm tree from vendor “everestmodel” on eBay. They were cheap and definitely look nice enough. I based them on 40 and 50 mm bases, gave the trunks a few drybrush layers and painted the bases to match my pirate board. While they were very quick jobs, I’m really happy with them and they are very effective in creating that Caribbean pirate vibe. Sorry for the harsh lighting in the photos – because of the height of the taller variety, it wasn’t easy squeezing them into frame. I’m still pondering if I should give the leaves some paint as well, but at the moment they look nice enough. That one brown peg at the top of the tallest tree needs to be tidied up, though! As you can see from the photo, they really are quite tall and the thicker palm trees really have some heft to them.
Click for a larger version
Market stall and goods
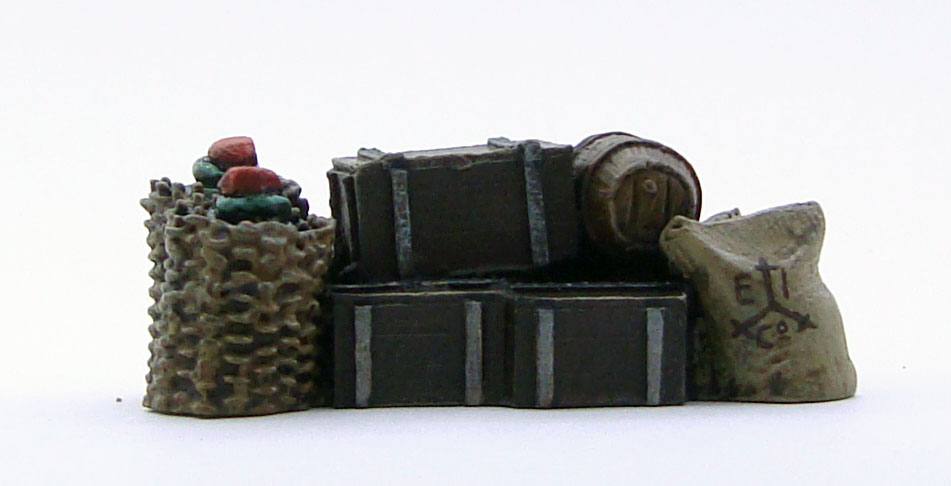
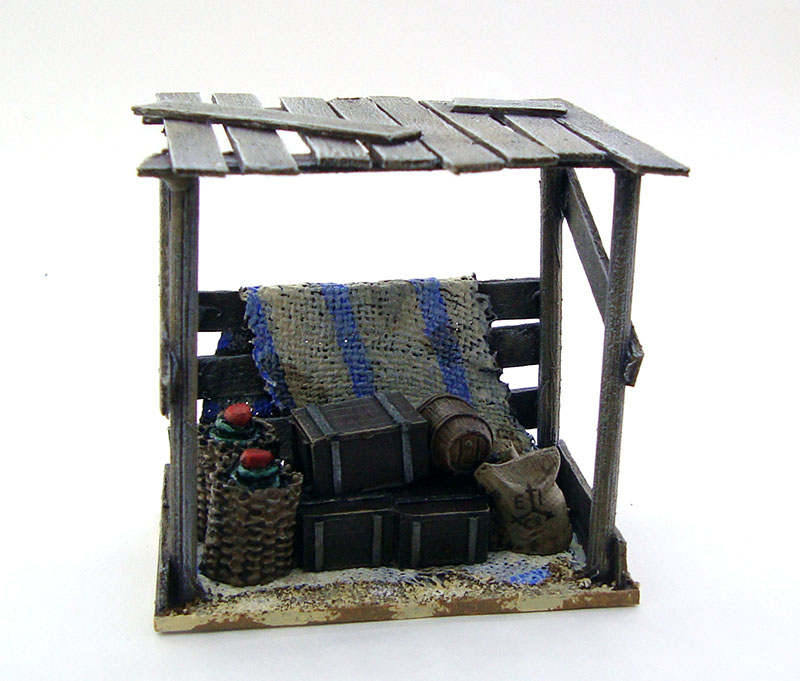
This is one of the two market stalls that I scratchbuilt earlier, painted using really cheap euro store acrylics. I applied a dark brown undercoat, then used a dabbing sponge to apply a patchy coat of lighter brown. After that it was three layers of drybrushed highlights in grey and white, and I think I managed to pull off the sun- and salt-bleached look quite well! The market goods are from Ainsty Castings, and I painted in an East India Company logo on the bags to suggest they might not be the most honestly acquired goods (and also because I’d just watched Pirates of the Caribbean 2 and the EIC was fresh in my mind). The cloth worked quite nicely too, so all in all I’m very happy with this piece. I didn’t attach the goods to the stall as this allows me to use them elsewhere if needed. Funnily enough I didn’t do any measuring when building the piece, and the trade goods fit the stall only by happy accident. I’m not complaining.
Click for a larger version
Click for a larger version
Click for a larger version
With these done and some other pieces half finished but well on their way, 2016 is looking very good for my pirate town so far. Comments welcome as always!
It’s December 11th and Christmas is less than two weeks away. I assume that in many homes two things are happening:
A miniature hobbyist is wishing for a present related their hobby, knowing that they’ll almost certainly not get one.
A miniature hobbyist’s significant other, parent or sibling is desperately wanting to give said hobbyist a hobby related present, but doesn’t have a clue where to start.
So I figured I’d write up a little something to help potential gift givers, so all you hobbyists can just nonchalantly leave this blog post visible. Of course, this isn’t in any way a hint to anyone I know…
Do note, that this isn’t too serious a post. You don’t need to get anything for Christmas. But hey, for those interested here goes.
First of all, if you don’t know what the whole miniature hobby is about, buying presents related to it can be a chore. It’s obviously a dear activity to someone close to you, so you want to get it right. Then again, if you’re not familiar with the various aspects of the hobby, the amount of stuff on offer can be overwhelming. Here are some general guidelines:
Miniatures
I think this is the most risky choice. Most miniature enthusiasts, especially if they’ve been doing their thing for years, have more than enough miniatures filling their cupboards, closets, garages and so on. Adding random miniatures to the “lead pile” (as it’s affectionately known as) might actually cause extra stress. If they’re playing fantasy and scifi games, getting them a few Napoleonic soldiers may give them Present Face:
Even if you do know what they’re gaming, there’s still the question of factions. If they’re collecting the Dark Brethren of the Axe then the Shadowy Brethren of the Sword miniatures you bought them…oh well. If they collect historicals, it’s worse, believe me.
One way to get around this is to just buy something that you like and ask them to paint it. There are plenty of hobbyists who buy miniatures simply because they look nice. Enter “wargaming miniatures” or “roleplaying miniatures” into Google and off you go!
There are also a lot of miniatures out there that draw inspiration from books, films and so on, so if you know their favourites, go for it. It’s easy too, just type “[favourite fiction] miniatures” into Google and go crazy. You’ll likely end up with forum discussions in the search results, so just check the first few links to see what people have thought to be best fits. If you’re in luck, there are official, licensed miniatures available.
While miniatures are indeed a risky choice, they do send a loving message: you not only approve of the lead pile, but are willing to contribute to it. This really isn’t something to underestimate.
Terrain
Much easier than miniatures, and hobbyists always need more so this is a safe choice. Just check the general style and size of whatever they’re currently working on, and buy something that more or less fits. You’re even safer with generic things like walls, rivers, rocky outcrops, ruins and the like. Size/scale is the most important thing, but even that’s not a huge issue with rivers and such.
Tools and supplies
Another very safe choice, and easily acquired. Hobbyists need a lot of things, and hoard a lot that they obviously might need in the next ten years or so. Paints, brushes, fake grass and the like are nearly always welcome. These keep for years, so even if there’s not an acute need, they’re still useful. There are also plenty of tools that get worn with use, so drills and craft knife blades and the like are quite handy as well. You can also just buy something like sculpting clay or putty such as Fimo, ProCreate or Kneadatite, wooden craft sticks or the like from the local craft or hardware store, as the recipient will surely find a use for them eventually.
Books
Another fairly safe choice, and one that overlaps with non-hobby gifts as well. Art books and films’ “making of” books especially are often very useful for hobbyists as visual guides. If there’s a favourite subject that you know of, you can just pop over to a book store either physically or online, and look for “The art of [movie title]” or something similar. You’ll find things like this or this, for example. Historical books are also often useful, and as there’s a huge variety, there’s probably plenty that haven’t been read yet by the recipient. Just make sure to check the bookcase first! If you’re looking online, Osprey Publishing has a huge selection.
Vouchers
The safest and the most boring choice. Stores often offer different gift cards, and hobby stores are no exception. If you want to play it safe but get something hobby related, this is the way to go. As many miniature stores are mainly online affairs, this is especially useful for last minute gifts.
Now, these suggestions might seem like strict instructions, buth they’re not. Gifts should be a thing expressing love and appreciation for the other person, not just a way to get stuff we want for free – something especially important to remember around Christmas time. While wargamers and miniature hobbyists love stuff, from my own experience I can tell that we love our hobby and our craft even more. Showing respect and genuine interest in the things we build and paint and even offering help every now and then is often more important than any physical thing you can get. It’s often said that with presents it’s the idea that counts, and while we hobbyists may be a nitpicky lot, it holds especially true in this case.
While my pirate ship isn’t finished yet, my pirates need a place to live in. That’s why I started building them a town. This has given me plenty of fun things to work on, and I figured I’d show you what I’ve been up to. Sadly I haven’t been documenting the process that much, so you’ll have to take my word for some of it.
The Board
I happened to have some square pieces of blue insulation pieces lying around, waiting for a good long while to get turned into terrain boards. A part of this whole project is to give me a reason to put to use a lot of the assorted junk that tends to pile up in a modeller’s home. Sometimes the material itself will drive you to design decisions.
I covered the rough edges of the board with masking tape to prevent chipping and tearing. Next I covered the board with acrylic sealant (caulking). While it smells god-awful when wet, it’s really cheap, sticks well, doesn’t shrink when drying, is easy to spread and texture and is semi-elastic, so the resulting surface is not as destructive to miniatures as a board covered in sand for example. The elasticity also keeps it from chipping. As an added bonus, it’s white and takes paint well. I love the stuff, even if it takes a good while to dry completely.
Before painting on all of the sealant, I noticed that I had some Fimo – an oven baked modelling clay – tucked away in my supply stash. I decided to make the board a little more interesting by adding a half buried town square. I used a rolling pin to make thin discs of the Fimo and sculpted in a cobblestone pattern. The technique was already familiar as I’d used it before on some monster bases. Once I’d baked the Fimo, I cut it into smaller pieces and glued it to the board with PVA.
After spreading the sealant on the board and making sure to cover parts of the cobblestone, I added texture using a shower sponge, and got to painting. In hindsight, I should’ve waited longer for the sealant to dry, as it resulted in some stickiness which is disappearing now, several days after painting. For painting I used cheap craft store acrylics and various sized stippling sponges. I wanted a generic Hollywood pirate island, so I went for a wind-blown, sandy look with patches of green. In my mind the town is a former bustling British market town somewhere in the Caribbean, that has fallen to ruin and been overrun with pirates. I’m really happy with the end result!
Early stages of painting
The finished product
The Fountain
Every town needs a fountain. While there are plenty of commercial ones available, I was impatient and wanted to see if I could build one out of rubbish. So, out of plasticard, bathroom mosaic tiles, the end of a poster cardboard tube, a cut up cap of a Vallejo paint bottle and a resin barrel by Ainsty came this:
Click for a larger version
While definitely not as fancy as some of the stuff on offer in various stores, I think once painted it will look the part and cost me next to nothing.
Market stalls
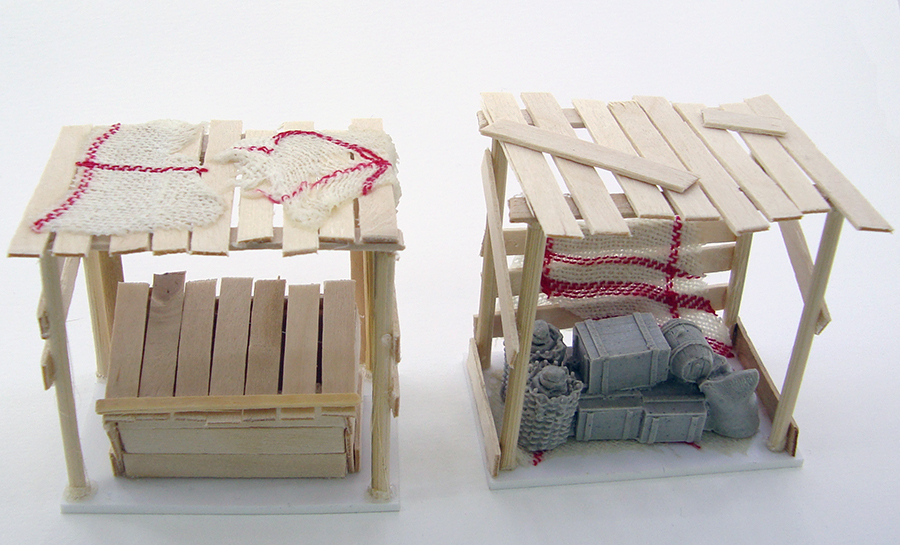
I figured market stalls would fit a ramshackle pirate town quite well, and going over some photos, I figured they’d be fairly easy to make. Sure enough, after some work with barbecue skewers, plasticard, matchsticks and coffee stirrers I had these two:
Click for a larger version
I added some tarp as added detailing. It’s pieces of a worn dishcloth soaked in a mix of water and PVA. It sticks wonderfully and is rock solid when dry. I added some Ainsty supplies to demonstrate the final look of one of the stalls, while the other one will likely get some fruits and vegetables. Happy with these too, and after the painstaking neatness that went into the ship, intentionally building something to look shabby was really fun!
So here are the beginnings of my so far unnamed pirate town. I already have some buildings too, but I’m saving those for a later post. Comments welcome as always!
The ship is finally being painted! Or rather, I’ve been painting it on and off for months, but to be honest it’s boring as anything – much more dull than putting it together. Nevertheless, I’m grinding my way through it and figured you’d like to see some WIP shots as some of you have been following through the whole progress. Plenty of work is still needed, but I’ve noticed that making these posts tend to remind me that the thing is progressing and boost my motivation! I’m at the crucial stage where projects are either finished or left to gather dust momentum, and I’m definitely going with the former.
So, here’s the ship. As you can see, I went for a wood/black/red colour theme with some gold and brass detailing. Note that only the outside of the ship has been washed and drybrushed, the decking is still heavily WIP, missing all detail work, so it will look a whole lot better eventually. The ship is also still missing its figurehead as well as the stern lanterns, which I haven’t painted yet. There’s still loads to do, but it’s progressing.
Click for a larger version
Click for a larger version
Click for a larger version
Click for a larger version
I wanted a colour scheme that was menacing enough to be used as a pirate ship but also neat and clean enough for the ship to be used as a more reputable vessel if needed. The ship has a fair amount of decoration and detailing. I went with gold for these, as I love how they give the ship a bit of extra flamboyance. Most credit goes to my lovely girlfriend who painted the extra fiddly stuff by the aft windows.
I’m somewhat sorry for the poor quality photos, but hey, that’s WIP for you! C&C welcome as always.
I’ve been working hard on the ship in the past few weeks, and it’s almost ready to paint. Here are the latest updates. I sadly forgot to take a lot of photos, but this should give you a fair idea.
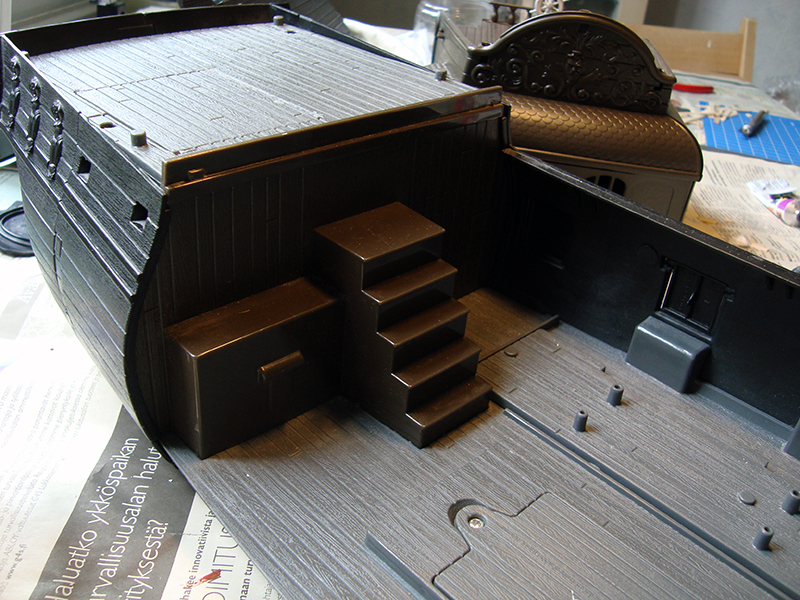
I got to work on the ship’s hold. The key elements were stairs and something that I think was meant to represent a chest.
Click for a larger version
There was also a large, barred gate leading to another part of the hold. I decided to remove the door, leaving a very large doorway. The hole in the background is one of the ship’s toy functionalities, as there’s a matching piece that blows out when a button is pressed – a mechanism I left intact.
Click for a larger version
I went to work on the stairs and what I’ll now call the chest. I wanted the stairs to be usable in games, so I used plasticard and build a platform halfway down the stairs to allow me to place minis. The chest was given a very rough treatment, as my plans only involved covering it with planks.
Click for a larger version
Sadly, there are WIP pictures missing here, and I’ll just skip ahead to where the stairs and the chest are finished. You can see I also chopped down the pegs that were originally holding the ship’s toy cannon. As you can see I added some details to the stairs to make them look a bit nicer. I also added planking around the battery case for the same reason. As you can see, the whole thing has already been sprayed a glorious brown.
Click for a larger version
I gave the doorway a frame, but left it otherwise untouched. I figured the size makes it look like the ship is capable of taking in loads of cargo.
Click for a larger version
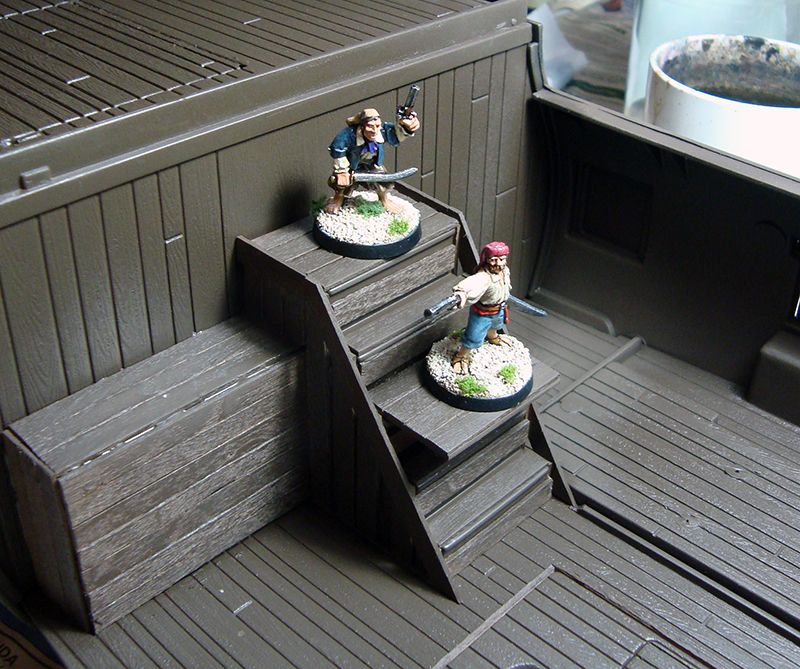
As you can see, the stairs can nicely accommodate a few pirates.
Click for a larger version
Apologies for the unusually poor quality of the photos, they’ve been hit with a fair amount of blur and excess lighting. The uneven, bleached look in some of the brown areas isn’t only due to lighting, however. I spray painted part of the ship during really humid weather, i.e. Finnish summer, so I got some of the lovely frosting that tends to happen. Luckily the brown paint it there primarily to serve as a basecoat, so no real harm done.
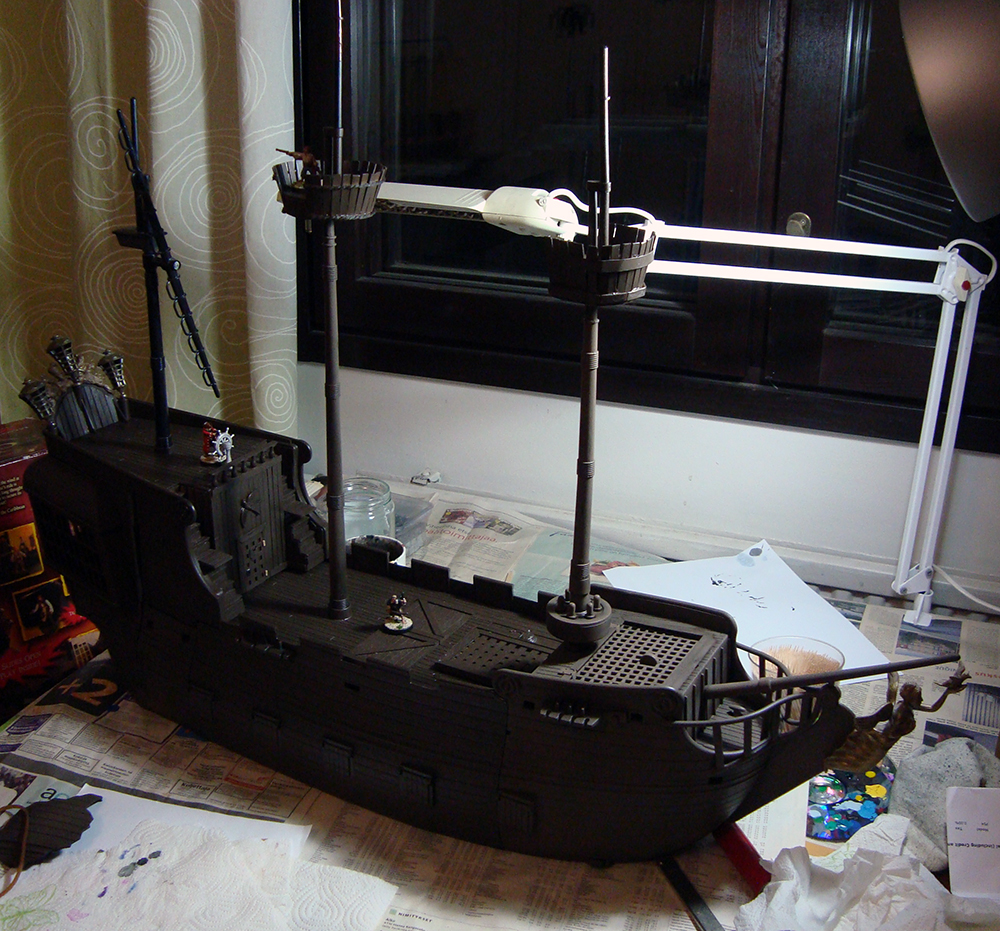
Here’s a final photo of the ship in its present state.
Click for a larger version
As crazy as it sounds, all I need to do is rough up the mizzenmast, add some planking to the forecastle and basecoat both, and I’m actually ready to start painting this thing. For the paint job I’m thinking of something similar to the one on this model of Bartholomew Roberts’ Royal Fortune, so burnt umber with a dash of red. Of course I want to throw in something a bit more extravagant, so you can be sure you’ll be seeing a lot of gilding as well. Getting there!
In my previous post I lamented too small cannon, so I wanted something bigger. Remembering I had just the thing in my bits box, I got to work. Said “thing” is a WHFB cannon from the 6th edition boxed set, now 15 years old. It’s not in the best shape, having had bits glued, removed, re-glued and so on, as well as fairly haphazard filing and smoothing of mould lines and such.
Courtesy of me 15 years ago
The cannon itself is a big, ornamental beast as fits the gothic fantasy look of WHFB. This led me to thinking that obviously such an ornamental piece on a pirate ship must be looted from the Spanish. Seriously, is there another explanation? I think not. This also gave me the chance of using one of my favourite words ever, as I named it…
Cagafuego!
Impressive name, isn’t it? Of course, it has a historical background, as it was the nickname of a Spanish ship captured by Sir Francis Drake. As Wikipedia will tell you:
Nuestra Señora de la Concepción (Spanish: “Our Lady of the (Immaculate) Conception”) was a 120-ton Spanish galleon that sailed the Peru – Panama trading route during the 16th century. This ship has earned a place in maritime history not only by virtue of being Sir Francis Drake’s most famous prize, but also because of her colourful nickname, Cagafuego (“fireshitter”).
Seriously, is there a better name for a massive Spanish cannon than “Fireshitter”? I think not. It appeals both to my love of history and 10 year old’s sense of humour.
Cagafuego is a huge piece, and I’m thinking that its role on the ship is that it’s a piece mainly for intimidation. Due to the build of the ship and for practical reasons, it’s only going to carry some seven cannon altogether – much fewer than a ship of this size historically would have. Of these seven, six will be normal sized and Cagafuego much larger, so I’m thinking that it’s always a bit of a spectacle when it’s utilised. You know:
– Captain, they’re not striking their colours.
– Very well then. ROLL OUT CAGAFUEGO!
The only problem was that I didn’t have a carriage for the gun as the original mount was a field one, not suitable for ships. Having grown more accustomed to working with plasticard and coffee stirrers, I figured I’d try my hand at building the carriage from scratch, resulting in this:
Click for a larger version
Click for a larger version
It turned out alright, I think! Sure, anyone into things like history and realism will probably find plenty of things wrong with it, and there are some irregularities here and there, but to my fantasy pirate eye it looks as it should. The core structure is plasticard with an old Warmaster base underneath. The wooden bits are coffee stirrers, the wheels are cut from 10mm diameter dowel rod and the axles are decorative studs meant for clothing. The smaller iron rings are plastic pieces from the original cannon set and the bigger ones are from WHFB orc weapons. As with a lot of my woodwork, this one also relies a lot on the “it’ll look nicer once painted” factor, but I have high hopes!
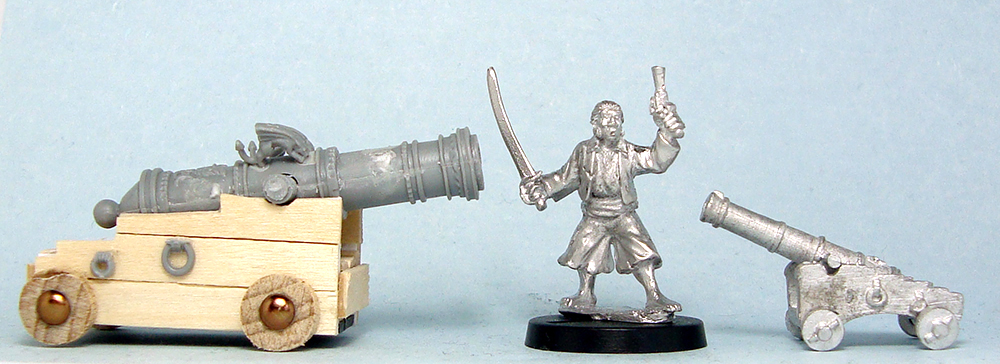
To cap off the post, here’s a comparison shot of Cagafuego and my existing Ainsty cannon as well as a Foundry pirate. Neat, right?
Eventually, any project will suffer minor setbacks. I received my order of 6 cannon from Ainsty. Lovely, crisp castings, great detail…and far too small for my heroic-scaled ship. See here:
Click for a larger version
While it’s quite realistic in size, that’s very much the problem. I’m not at all faulting Ainsty, as the problem stems more from my massive ship – even with the base the cannon barely reaches over the side at the gunport. I’m going to need bigger guns, so I put in an order with Thomarillion for some more beefier guns:
Now, what to do with the six guns I already own? They will probably find employment in small coastal settlements, guard towers and such. I’m also thinking I might use some of them as very large swivel guns like shown below, what do you think? I feel it might work with a bit of converting.
Click for a larger version
That’s all for now! I’ll put up a post once the Thomarillion cannon arrive. Should someone arrive here looking for measurements for the Ainsty cannon, they’re
Length of cannon 30mm
Length of cannon + carriage 34-35mm
Height 15mm (highest point with level barrel)
Width of carriage + wheels 21mm
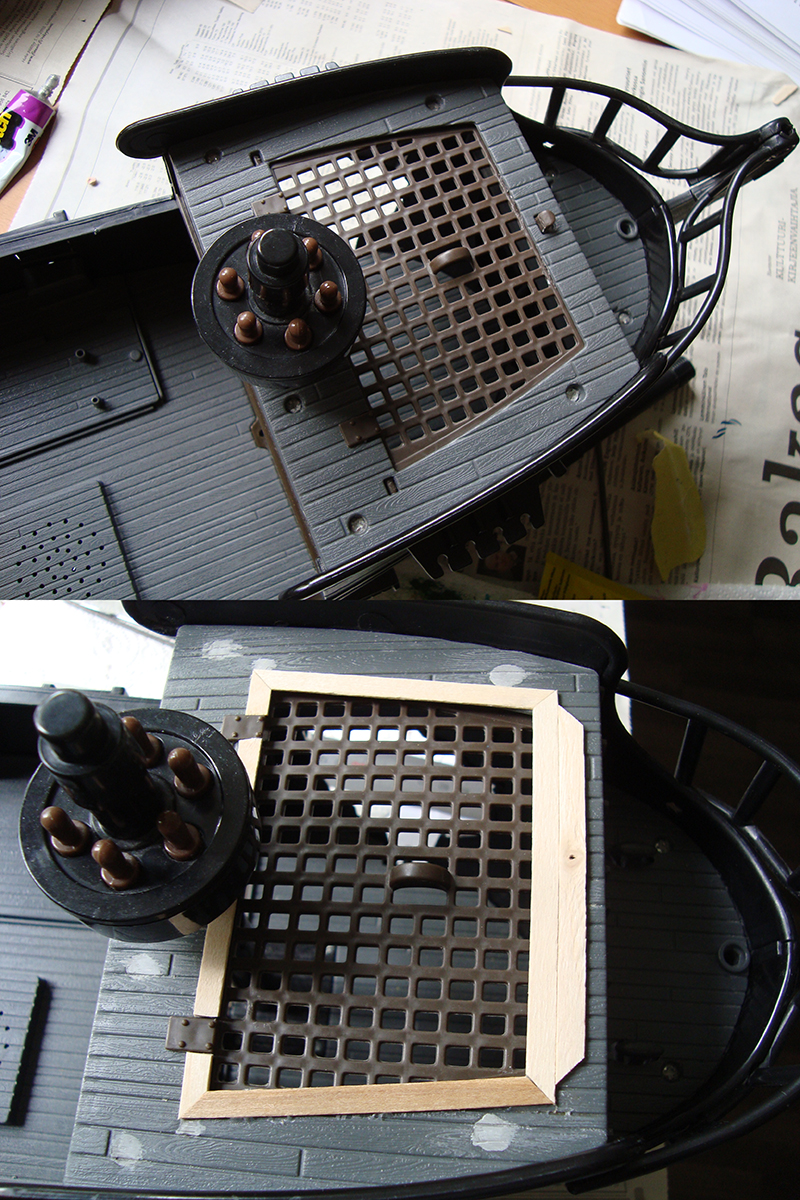
The ship project is my first time working with coffee stirrers. It’s immensely fun and satisfying work, as the perfectionist in my rejoices every time I manage to make a nice, fitting angle. On that note I present to you my latest work on my ship’s foredeck.
Click for a larger version
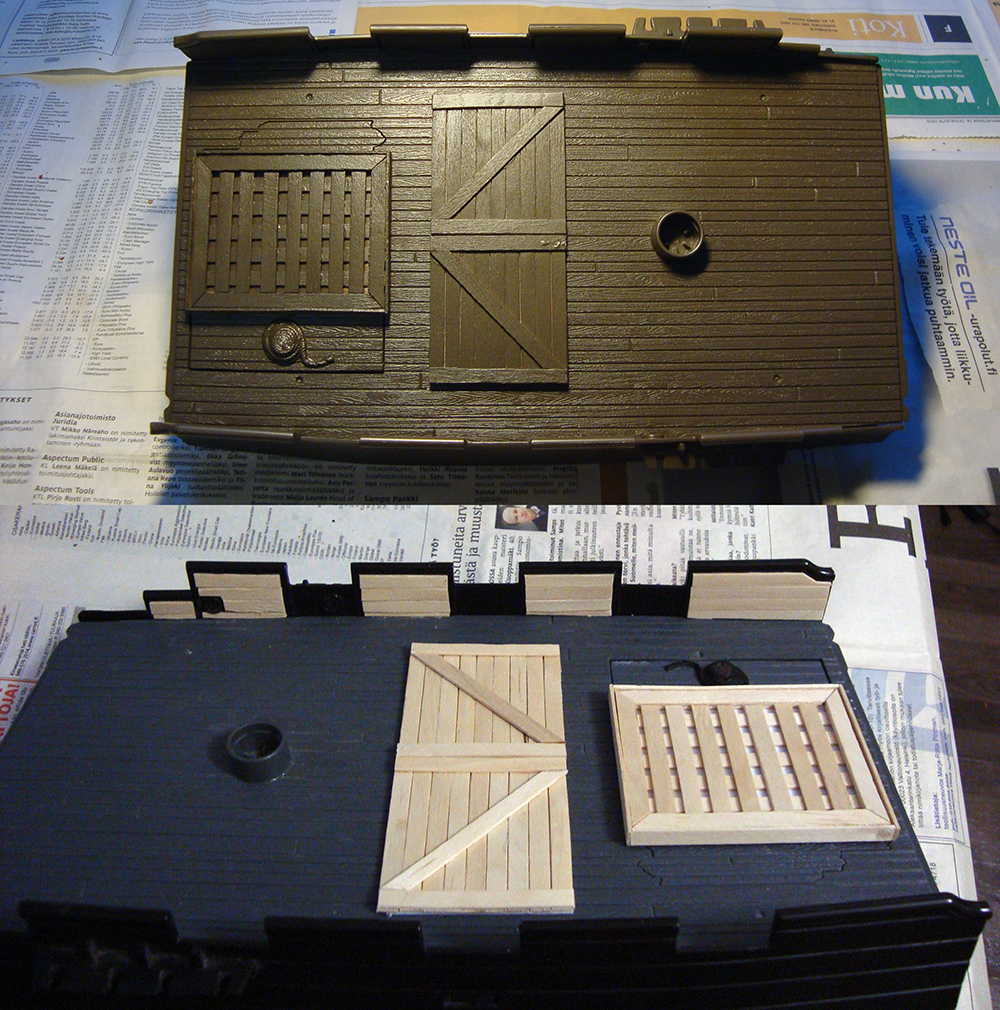
The foredeck isn’t a very large part. The deck planking had plenty of holes for screws in it, so I filled those with ProCreate putty. While they don’t look very nice, once painted they blend in quite well. The lattice hatch was designed to open and drop action figures down into the hold. As obviously I didn’t want that to happen to my miniatures, I glued it shut. While the hatch itself looked fairly nice, it looked weird situated sort of under the deck planking. I added a rim around it, and I think this improved its look a lot. It was the most difficult cutting work so far, so you can imagine how happy I was when everything finally fit into place. I added a decorative piece (the foremost plank) to cover up the cut off peg that originally locked the hatch in place. I liked the look of the hatch hinges, so I left them in place. The belaying pins at the base of the mast can be pressed for awesome sound effects, so they’ll definitely be left in place. With this part done, the foredeck only needs a little more planking work and two more screw holes filled (oh my, that sounded somewhat inappropriate). After that it’s a bit more work on the hold and that’s it. I’m actually finishing this thing!
In what has to be one of the most boring updates ever on this blog, I report that the main deck of my pirate ship has now been painted a flat brown. That’s it.
Click for a larger version
…ok, as an afterthought I added a before shot, showing the paneling I added to the rail. It still doesn’t make this post super interesting, but it’s something! The main thing I want to report is that the project is still going strong. I’m starting to surprise myself.