
Pirate haven
December 6, 2015While my pirate ship isn’t finished yet, my pirates need a place to live in. That’s why I started building them a town. This has given me plenty of fun things to work on, and I figured I’d show you what I’ve been up to. Sadly I haven’t been documenting the process that much, so you’ll have to take my word for some of it.
The Board
I happened to have some square pieces of blue insulation pieces lying around, waiting for a good long while to get turned into terrain boards. A part of this whole project is to give me a reason to put to use a lot of the assorted junk that tends to pile up in a modeller’s home. Sometimes the material itself will drive you to design decisions.
I covered the rough edges of the board with masking tape to prevent chipping and tearing. Next I covered the board with acrylic sealant (caulking). While it smells god-awful when wet, it’s really cheap, sticks well, doesn’t shrink when drying, is easy to spread and texture and is semi-elastic, so the resulting surface is not as destructive to miniatures as a board covered in sand for example. The elasticity also keeps it from chipping. As an added bonus, it’s white and takes paint well. I love the stuff, even if it takes a good while to dry completely.
Before painting on all of the sealant, I noticed that I had some Fimo – an oven baked modelling clay – tucked away in my supply stash. I decided to make the board a little more interesting by adding a half buried town square. I used a rolling pin to make thin discs of the Fimo and sculpted in a cobblestone pattern. The technique was already familiar as I’d used it before on some monster bases. Once I’d baked the Fimo, I cut it into smaller pieces and glued it to the board with PVA.
After spreading the sealant on the board and making sure to cover parts of the cobblestone, I added texture using a shower sponge, and got to painting. In hindsight, I should’ve waited longer for the sealant to dry, as it resulted in some stickiness which is disappearing now, several days after painting. For painting I used cheap craft store acrylics and various sized stippling sponges. I wanted a generic Hollywood pirate island, so I went for a wind-blown, sandy look with patches of green. In my mind the town is a former bustling British market town somewhere in the Caribbean, that has fallen to ruin and been overrun with pirates. I’m really happy with the end result!

Early stages of painting

The finished product
The Fountain
Every town needs a fountain. While there are plenty of commercial ones available, I was impatient and wanted to see if I could build one out of rubbish. So, out of plasticard, bathroom mosaic tiles, the end of a poster cardboard tube, a cut up cap of a Vallejo paint bottle and a resin barrel by Ainsty came this:

Click for a larger version
While definitely not as fancy as some of the stuff on offer in various stores, I think once painted it will look the part and cost me next to nothing.
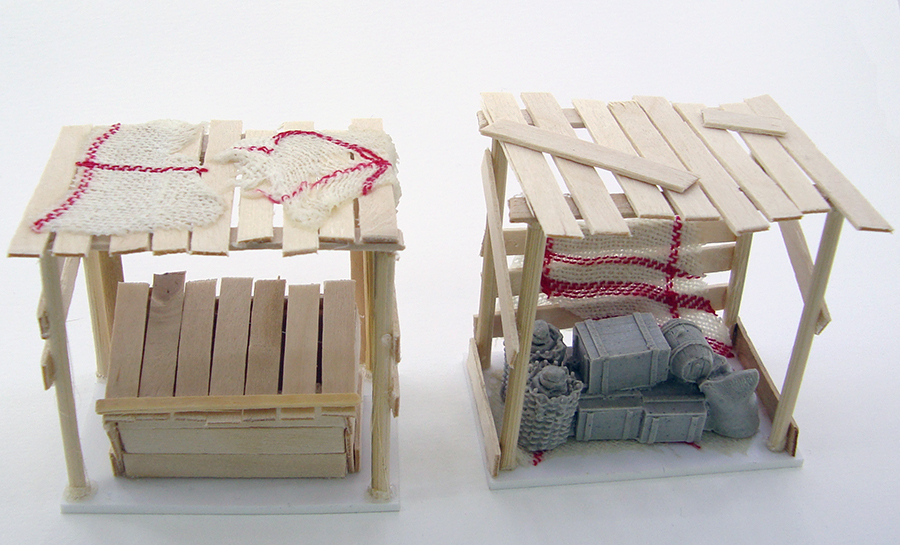
Market stalls
I figured market stalls would fit a ramshackle pirate town quite well, and going over some photos, I figured they’d be fairly easy to make. Sure enough, after some work with barbecue skewers, plasticard, matchsticks and coffee stirrers I had these two:
Click for a larger version
I added some tarp as added detailing. It’s pieces of a worn dishcloth soaked in a mix of water and PVA. It sticks wonderfully and is rock solid when dry. I added some Ainsty supplies to demonstrate the final look of one of the stalls, while the other one will likely get some fruits and vegetables. Happy with these too, and after the painstaking neatness that went into the ship, intentionally building something to look shabby was really fun!
So here are the beginnings of my so far unnamed pirate town. I already have some buildings too, but I’m saving those for a later post. Comments welcome as always!

That is seriously nice dude! Great job so far.
LikeLiked by 1 person
Thanks Bob! Now to get them painted…
LikeLike
I am looking foward to see the finished fountain. Looks already good and shows that you can indeed make anything you want from scratch.
LikeLiked by 1 person
Thanks! I’ve certainly grown more self-confident over the years. At first scratchbuilding feels like a monumental task, but when you get down to it, it’s actually really fun stuff.
LikeLike
looking good, quick question: Have you planned out the look of the town or is it developing more naturally?
LikeLike
I’m taking a fairly loos approach, maily just adding things as I see fit and trying to keep the budget down. I’m using several styles of buildings too, so I can cram all of Hollywood’s pirate clichés in!
LikeLike
[…] no doubt noticed, this year has been pirates, pirates, pirates. Building a ship, building a town, building a terrain board and occasionally even painting a pirate. Most of the things I’ve done this year have related […]
LikeLike
[…] is one of the two market stalls that I scratchbuilt earlier, painted using really cheap euro store acrylics. I applied a dark brown undercoat, then used a […]
LikeLike
[…] finally got to work on the fountain originally shown in this post and also finished the second one of the two market stalls. They’ve been sitting […]
LikeLike
[…] back when I showcased my pirate terrain board? Little did I know back then, that it would cause me a bit of a […]
LikeLike